Author Topic: Threading by hand  (Read 33315 times)

Offline wongster

  • Full Member
  • ***
  • Posts: 242
  • Country: sg
Re: Threading by hand
« Reply #25 on: June 19, 2010, 12:48:14 PM »
Ah... I got what you meant now.  Strange that it was cutting at every pass of the same depth and suddenly the cut deepened.  Maybe it was cutting less than the amount I dialed and the accumulated amount kicked in all at the offending pass.

Any idea how I should drill the hole to hold the die without a rotary table?  Or I should get one for this and future projects? The Sherline's rotary table cost quite a bit and there is still the decision whether to go with the CNC ready or manual version.

Regards,
Wong

Offline andyf

  • In Memoriam
  • Hero Member
  • *****
  • Posts: 1795
  • Country: gb
    • The Warco WM180 Lathe - Modifications
Re: Threading by hand
« Reply #26 on: June 19, 2010, 12:59:34 PM »
Hi Wong,
It looks OK so far :thumbup:
I found the hardest bit was to position the holes for the setscrews which hold the die in place. They have to be the right distance from the bottom of the counterbore; too close is better than too far away, because in the latter case the die isn't properly supported from behind and can tilt slightly as it is forced on to the work. If doing it again, I think I would drill the holes first, then bore out the counterbore to the right depth while making trial fits with the die.

Another problem I had, being merely an amateur tinkerer with no rotary table, was that though the three screwholes were at 45o to each other on the outer surface (and for me, marking out for that was easier said than done) they certainly didn't come out that way on the inside. I ended up enlarging the holes so I could get a silver steel (drill rod) punch through to mark for three new holes at the correct angular spacing on the opposite side of the inner surface of the bore, then following up with a drill to drill from the inside. That rescued the job, once the unwanted holes had been plugged.

By the way, it looks from your pics as though the body of the holder is long enough to bore out for a different size of die at the other end. My dies are all either 13/16" or 25mm, so I made my dieholder double-ended.

Andy
Sale, Cheshire
I've cut the end off it twice, but it's still too short

Offline wongster

  • Full Member
  • ***
  • Posts: 242
  • Country: sg
Re: Threading by hand
« Reply #27 on: June 19, 2010, 01:14:40 PM »
By the way, it looks from your pics as though the body of the holder is long enough to bore out for a different size of die at the other end. My dies are all either 13/16" or 25mm, so I made my dieholder double-ended.

Andy

Hi Andy,

Thanks for your input.  I always wanted a rotary table though I've nothing in mind what to do with it till now.  ::)

About making a double-sided die holder.  How are you holding the die holder?  I intend to drill and tap for 3/8-24 so that the adaptor for my jacob drill can be used (one end of the adaptor MT #0 for the tailstock and the other end 3/8-24).

Regards,
Wong

Offline No1_sonuk

  • Full Member
  • ***
  • Posts: 242
Re: Threading by hand
« Reply #28 on: June 19, 2010, 07:28:32 PM »
The double-ended ones (and single-ended for that matter) usually run on a smaller shaft that goes through the centre.  To use it, you hold or turn it by hand, while turning the workpiece, and the shaft in the tail stock keeps it straight.

Offline wongster

  • Full Member
  • ***
  • Posts: 242
  • Country: sg
Re: Threading by hand
« Reply #29 on: June 19, 2010, 09:03:32 PM »
Hi No1_sonuk,

Do you have a pic or 2? Can't really visualise this.  I'll also search the forum for double ended ones to see how others had done.

Regards,
Wong

Offline andyf

  • In Memoriam
  • Hero Member
  • *****
  • Posts: 1795
  • Country: gb
    • The Warco WM180 Lathe - Modifications
Re: Threading by hand
« Reply #30 on: June 19, 2010, 09:05:35 PM »
Hi Wong,

I made a dieholder with an 18mm through hole, and an 18mm diameter mandrel with a 2MT taper on the end to fit in my tailstock. The dieholder is free to slide along the mandrel as the thread is formed on the workpiece.

The dieholder has a tommy bar screwed into it from the side, but unlike No1_sonuk, I turn the workpiece rather than the dieholder. The tommy bar is just long enough to drop down between the bedways of my lathe and prevent the dieholder from turning as I rotate the lathe spindle and workpiece using the spindle handcrank shown half-way down this page: http://andysmachines.weebly.com/miscellaneous.html

I decided that it would be easier to turn the handcrank in free space than to contrive some way of locking the spindle and turning the dieholder in an area which is confined by the chuck to the left, the tailstock to the right and the lathe bed underneath. The carriage needs to be up against the headstock so the tommy bar doesn't hit it as threading proceeds and pulls the dieholder slowly leftwards along the mandrel. 

Andy
Sale, Cheshire
I've cut the end off it twice, but it's still too short

Offline Dean W

  • Hero Member
  • *****
  • Posts: 571
  • My kingdom for a lathe!
    • Projects web pages
Re: Threading by hand
« Reply #31 on: June 19, 2010, 09:16:16 PM »
Wong, the problem you had with the tool suddenly cutting too much sounds like you had a chip welding problem.  When
this happens, a small chip gets stuck to the tip of your tool, and the tool doesn't want to cut.  After you get into the cut
a little more, the chip comes off and suddenly starts cutting what you had dialed on all at once.

For getting the holes in the right place on your die stock, you can use simple chuck indexing.  The jaws of your three jaw
chuck are spaced just right.  Check out the pics.


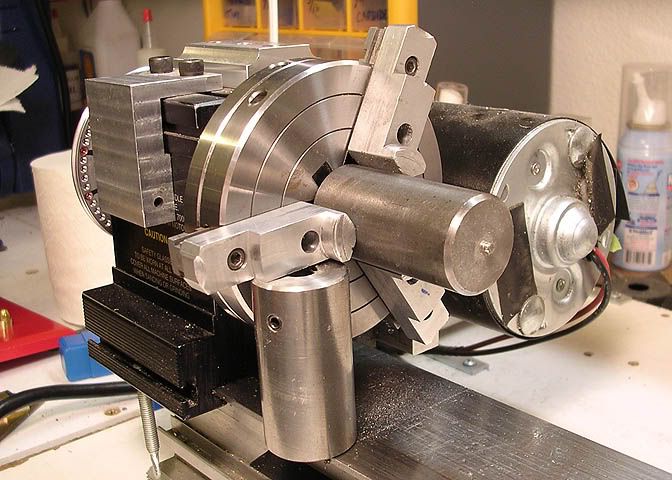
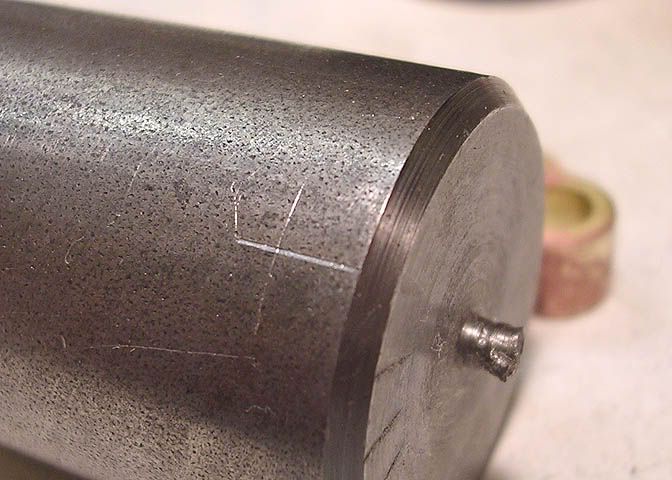
Find or cut a piece of stock that lets one of the chuck jaws rest on it while the piece of metal rests on the lathe bed.


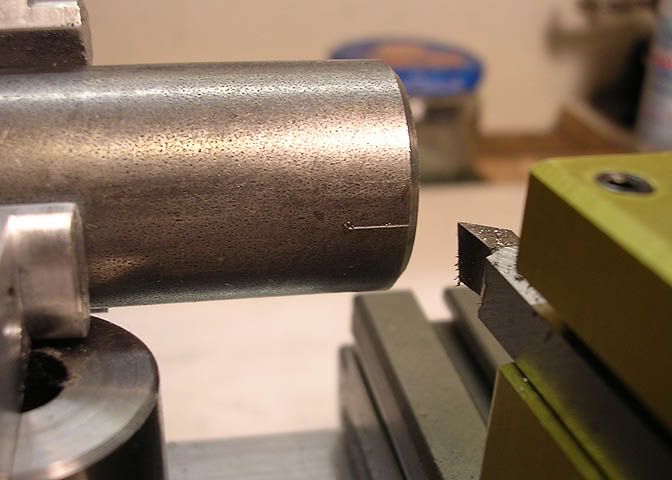
Then use the cutting tool in the tool post to engrave a small line.  Just crank the cross slide in until the tool bit touches
your die stock and use the carriage to run it in and make the line.


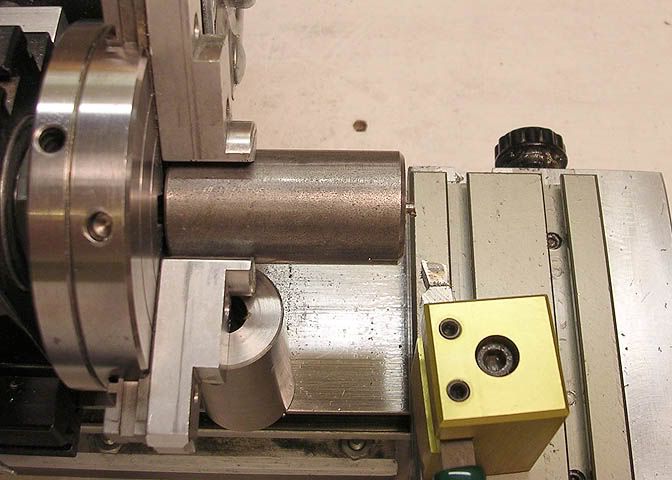
Here's another view. 
After you make one line, remove the piece of metal from under the first chuck jaw, rotate the chuck a bit, and do the
same for the next two lines, until you have three lines total.  Now you have three perfectly spaced lines.


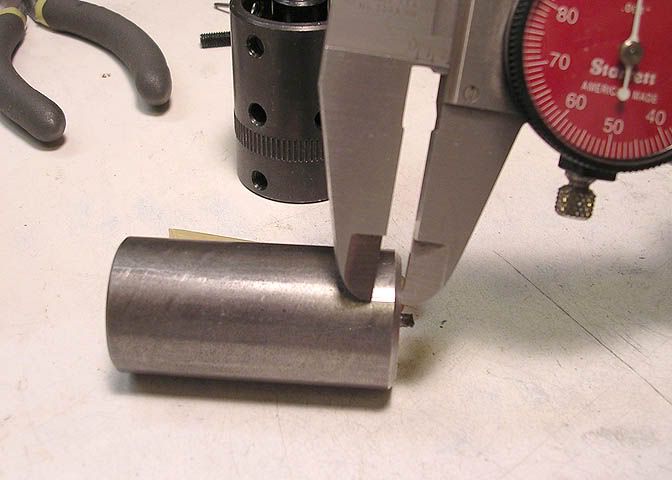
To finish the line, use a divider or your dial caliper, set it to where you want the hole distance from the end of the
die stock, and make a scratch over each of the three marks.


You'll have cross marks like this, and you can use a punch to mark for drilling.  Set up your drilling operation carefully
and you'll have the holes done in a minute, and you can tap them.


The die stock I have for my Taig lathe has the setup that sonuk mentioned.


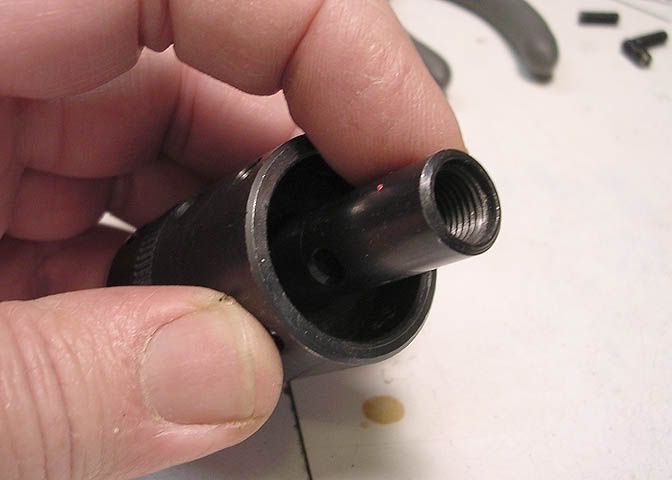
A pin goes through the center and turns freely.  The pin can be held in a drill chuck.
I think you would do best not to try to tap a hole in the die stock for the pin.  You have a good chance of getting
it slightly off, and you'll have the same problem you started with in getting a good straight thread using a die.  If
you let the die stock float on the pin it will be in line with whatever you are using to hold it, like a drill chuck.

Good luck!

Dean
Dean W.

Shop Projects:
http://www.deansphotographica.com/machining/projects/projects.html

Praise the Lord and pass the Carbide!

Offline wongster

  • Full Member
  • ***
  • Posts: 242
  • Country: sg
Re: Threading by hand
« Reply #32 on: June 19, 2010, 09:18:31 PM »
Hello Andy,

Can I trouble you to take a pic of your holder when you have some bit of extra time?

I like your DTI holder but the dovetail is so small for me to mill it out.  I'll figure that out later after I completed the torch and the dieholder.

Regards,
Wong

Offline wongster

  • Full Member
  • ***
  • Posts: 242
  • Country: sg
Re: Threading by hand
« Reply #33 on: June 19, 2010, 09:30:43 PM »
Hi Dean,

This is a clever way of indexing without a rotary table!  The die I have has a slit for a long pointed bolt and 2 dimples at 45 degree.  I'll get the first hole right and hopefully don't need the other 2 dimples to hold the die in place while turning the holder.

The pin through the die holder has to be slip fitted? I'm still experimenting how to cut accurately enough to slip fit, press fit etc.  But this seems a easier option.

Thanks for your help with the pics!

Regards,
Wong

Offline Dean W

  • Hero Member
  • *****
  • Posts: 571
  • My kingdom for a lathe!
    • Projects web pages
Re: Threading by hand
« Reply #34 on: June 19, 2010, 09:41:50 PM »
Yes, the hole is a close running fit on the pin.  Do you have any reamers?  If you have one in a size the same as a piece of stock
sized material you're set.  Say a 9mm piece of round stock, and drill and ream the die holder for 9mm.  If the piece of round stock
is a little tight, you can make it a nice running fit with a bit of emery or wet 'n dry paper.  Spin the piece in the lathe and sand it
lightly until you get a nice fit.  If you do that, make sure to clean the lathe well to get rid of any abrasives.

Dean
Dean W.

Shop Projects:
http://www.deansphotographica.com/machining/projects/projects.html

Praise the Lord and pass the Carbide!

Offline wongster

  • Full Member
  • ***
  • Posts: 242
  • Country: sg
Re: Threading by hand
« Reply #35 on: June 19, 2010, 10:01:14 PM »
Only acquired a 1/4" hand reamer.  Limited reamers around the area I searched.  I'll give that a shot.  Like to sand on the lathe as the finishing is really nice  :)

Offline DMIOM

  • Hero Member
  • *****
  • Posts: 676
  • Country: gb
  • Isle of Man
Re: Threading by hand
« Reply #36 on: June 20, 2010, 04:06:36 AM »
....The die I have has a slit for a long pointed bolt and 2 dimples at 45 degree.  I'll get the first hole right and hopefully don't need the other 2 dimples to hold the die in place while turning the holder. ......

Hi Wong,

you really should try to accomodate all three setscrews when you're actually using the dieholder.

The two dimpled ones are the main securing mechanism, but the central one which bears on the slit has a different function - the conical point acts as a wedge and gives a measure of control of the size being cut by the die.

If you screw in as hard as you can on that central setscrew, it opens out the split in the die, so the circumference is greater, and the finished thread can be a little oversize; relax the wedging pressure in the split then when the other two main securing setscrews are tightened, the split is closed and the resultant thread is slightly undersize.  Also, because its in the split, the central setscrew does give some rotational anchor, but doesn't have great holding power axially.

The normal method is to apply as much pressure as you need to the central setscrew, and then tighten the other two to (a) hold the die in the holder, and (b) push in against the wedge effect of the first screw that has pre-set the amount of open split.

Dave

Offline wongster

  • Full Member
  • ***
  • Posts: 242
  • Country: sg
Re: Threading by hand
« Reply #37 on: June 20, 2010, 05:07:20 AM »
Roger that, Dave.  Thanks for the tip.  I thought about it.  Since I'm using 4-jaw chuck, I can easier mark out the dimple holes position using Dean's method (90 degree to each other).  Once the 2 points are center punched, I can use a divider to measure the distance and halves it.  This will give the point for the center screw.  To avoid error, I just need to drill a slightly bigger hole for the center screw.

To make it more accurate, I can use the divider to mark an arc from each known point and drop a perpendicular line to the base line.  I remember doing that doing my secondary school days.  Hope my memory didn't fail me...

Offline andyf

  • In Memoriam
  • Hero Member
  • *****
  • Posts: 1795
  • Country: gb
    • The Warco WM180 Lathe - Modifications
Re: Threading by hand
« Reply #38 on: June 20, 2010, 07:39:16 AM »
Hi Wong,

Pics below. This was a scrapbox project, and the three different outside diameters on the holder reflect the outline of the lump of steel I found. The piece I used for the mandrel was a bit short, and the stub screwed into the end was added so it would self-eject from the tailstock. The finish on the parallel part would have been a lot better if I had left enough metal for a finishing cut when turning it down to fit the bore in the holder :doh: 

The six M4 screws were made from silver steel, then hardened and tempered. Four have rounded ends and two are pointed to go in the splits in the dies. It would have been fiddly to hold stock screws to modify their ends, and I reckoned that the pointed ones would need hardening so they weren’t damaged when they pushed into the split. It was easier to make the screws and part them off one by one on the end of a silver steel rod.

The tommy bar screws into the side of the holder and is locked in place by a nut with a washer beneath, concave on one side to suit the curved surface.


As to the DTI holder, I used a tiny dovetail cutter on my mill, but it would be easy enough to file the dovetails to a good enough fit. They don’t have to resist any substantial forces from the DTI finger.

Andy


Sale, Cheshire
I've cut the end off it twice, but it's still too short

Offline wongster

  • Full Member
  • ***
  • Posts: 242
  • Country: sg
Re: Threading by hand
« Reply #39 on: June 20, 2010, 08:31:50 AM »
Hi Andy,

Thanks for the pics.

I assume the tommy bar can swing freely and not hit the bed.  So the holder would just "hang" on the mandel so that you can advance the die by just pushing it forward?  I may still be able to do this with the piece still in the chuck.

Appreciate your taking the time to take the pics.

Regards,
Wong

Offline andyf

  • In Memoriam
  • Hero Member
  • *****
  • Posts: 1795
  • Country: gb
    • The Warco WM180 Lathe - Modifications
Re: Threading by hand
« Reply #40 on: June 20, 2010, 09:44:27 AM »
Hi Wong,

The tommy bar hangs down below the top of the bed, so it will only move a few degrees either way before being stopped by either the front or the rear bedway. That's the whole idea - the tommy bar keeps the dieholder stationary while the spindle handcrank is used to turn the workpiece and cut the thread. One of these days I will fit a boss to the tommy bar so that it fills up the space between the bedways and doesn't knock from side to side so much as I crank forward and back (see below), but the parts of the bedway it bumps up against are not critical. 

The dieholder has to be pushed on to the work during the first one or two turns to get the thread started, but after that the die pulls itself to the left as it cuts the thread.

By the way, as with tapping by hand, take one turn forward, then half a turn back, another turn forward and so on. This helps to form a clean thread by clearing the chips from the die (or the tap) as the work proceeds. A little lubrication can help, too. Specialist cutting fluids are on the market for tap and die work, but for steel I find that any lubricant works well enough for me. Sometimes I find myself tapping a hole by hand on the kitchen table, and use cooking oil because it's nearby. WD40 and paraffin (kerosene) are good on aluminium alloys. I don't use any lube when threading cast iron or brass. Others may have better ideas about lubrication.

Andy 
Sale, Cheshire
I've cut the end off it twice, but it's still too short

Offline wongster

  • Full Member
  • ***
  • Posts: 242
  • Country: sg
Re: Threading by hand
« Reply #41 on: June 20, 2010, 10:01:38 AM »
That's a good idea! I'll only need to turn the spindle without having to stop the holder from moving.

Thanks for your help Andy.

Regards,
Wong

Offline No1_sonuk

  • Full Member
  • ***
  • Posts: 242
Re: Threading by hand
« Reply #42 on: June 20, 2010, 01:30:04 PM »
I made a hand crank for my lathe, but found it didn't hold all that well when threading hard materials with taps and dies.

What I do now is to hold the chuck with my left hand, and turn the holder with my right.  Then move the chuck back to bring the die holder handle round, then hold the chuck while turning the holder, and so on.
I find that gives better control, and means getting a decent arc.
Another thing, Wong, it looks like you don't have a slot between the ways on your lathe.  So you can't use it to hold the handle.

All this assumes threading with no power, of course.
When I use taps and dies, the only time I use power is at very low speed in reverse to "unscrew" the tool off the material when I'm done.

Offline wongster

  • Full Member
  • ***
  • Posts: 242
  • Country: sg
Re: Threading by hand
« Reply #43 on: June 22, 2010, 05:39:49 AM »
Sonuk,
When I turned the holder more than the chuck, the chuck was stuck to the spindle that I had a hard time getting it off.

I just returned to office after running out to the hardware store. Both a set of taps & die made in India. Most important for me at this stage is to have a set of die with the same OD. Best of all, it's smaller which mean lesser material to remove... Lazy me...  :)

Ok, back to work now.


Offline wongster

  • Full Member
  • ***
  • Posts: 242
  • Country: sg
Re: Threading by hand
« Reply #44 on: June 22, 2010, 09:41:43 AM »
Ok.  Managed to part off the 40mm aluminum.  This is my 1st real parting off of a large diameter.  I'll complete this die holder for the bigger die to get an overall feel.  At least a completed project despite the look...

To make thing simple so that i can go back to make the brass torches, I'll just drill and tap 3/8"-24 at the back of the holder and use the adaptor (one end MT #0 and 3/8"-24 on the other) to mount it on the tailstock.  Too bad my Knurling tool can only handle up to 1" in diameter.  I'll drill a few holes for tommy bar instead.

Regards,
Wong.

Offline No1_sonuk

  • Full Member
  • ***
  • Posts: 242
Re: Threading by hand
« Reply #45 on: June 22, 2010, 01:47:39 PM »
Sonuk,
When I turned the holder more than the chuck, the chuck was stuck to the spindle that I had a hard time getting it off.
Ah. I didn't think of that.
The chuck on my lathe is bolted on, not threaded, so I don't have that problem.  :thumbup:

Offline Dean W

  • Hero Member
  • *****
  • Posts: 571
  • My kingdom for a lathe!
    • Projects web pages
Re: Threading by hand
« Reply #46 on: June 23, 2010, 01:16:49 AM »
Wong, if you drill and tap it there is some chance it won't be straight when you mount it on the threaded Morse taper arbor.

Dean

Dean W.

Shop Projects:
http://www.deansphotographica.com/machining/projects/projects.html

Praise the Lord and pass the Carbide!

Offline wongster

  • Full Member
  • ***
  • Posts: 242
  • Country: sg
Re: Threading by hand
« Reply #47 on: June 23, 2010, 02:02:04 AM »
Hi Dean,
Would it be straighter if I drill and initiate the tap on the lathe?

Wong

Offline wongster

  • Full Member
  • ***
  • Posts: 242
  • Country: sg
Re: Threading by hand
« Reply #48 on: June 24, 2010, 12:33:36 PM »
Hi all,

Had a little time earlier this evening to spend some time in the shop to complete the Die Holder.  The back was drilled and tapped for 3/8"-24 for the MT0 adaptor.  I took the easier way out for this die as its OD is different from the set I bought.  I may go with the floating die holder next, but that will be after I finished at least 2 brass torches.

A couple of pics attached.

Thanks for all the help I get.  Appreciate them.

Regards,
Wong

Offline andyf

  • In Memoriam
  • Hero Member
  • *****
  • Posts: 1795
  • Country: gb
    • The Warco WM180 Lathe - Modifications
Re: Threading by hand
« Reply #49 on: June 24, 2010, 01:00:16 PM »
Nice job, Wong - I'm sure you will find it very useful.

In the background of your the photo, is that a chip shield made from locally sourced materials - a bamboo curtain, no less?

Andy
Sale, Cheshire
I've cut the end off it twice, but it's still too short