Author Topic: Solenoid engine Build  (Read 64461 times)

Offline CallMeAl

  • Jr. Member
  • **
  • Posts: 95
  • I came, I saw, I wondered how to do it!
Solenoid engine Build
« on: November 21, 2010, 11:04:26 PM »
I have been intrigued by the solenoid engines I have seen on this forum and on Youtube.  When I acquired a rather large hydraulic valve solenoid off a surplus valve at work I thought it might be the seed I needed to start building such an engine.


I also had an old cast iron barbell weight to use for a flywheel.


The scale of these two items is going to make for a fairly good sized engine.  When I consider how fast these engines get going, I thought it would be interesting to make it a fly ball governed hit & miss style engine.  So I started by building the governor first.  This will control a switch to interrupt the electrical current as needed to throttle the engine.

Someone posted this drawing - forget who - I liked the design because it screws into the end of the crankshaft, at least that's how I'm going to use it. 


Here is my stab at building it, it seems to work on the drill anyway!


Here is a test run:


One part down, a lot to go.  I plan to cast the base.  It will be a horizontal engine - the design is still in progress.  Don't expect the speed of others builds one this forum, I'm in no hurry and I am still figuring out how to build it!
I skin cats my own way!

Offline crabsign69

  • Full Member
  • ***
  • Posts: 165
Re: Solenoid engine Build
« Reply #1 on: November 22, 2010, 01:12:55 PM »
ill be watch very close here . nice flyball too

Offline Powder Keg

  • Global Moderator
  • Hero Member
  • *****
  • Posts: 932
  • Country: us
  • Machinist Extraordinaire
Re: Solenoid engine Build
« Reply #2 on: November 22, 2010, 07:28:12 PM »
I've always been fascinated with those solenoid motors. I'll be watching this one close:o)
Wesley P
A Gismo ??? If it has a flywheel or spins and is made with small parts. I'll take one! If it makes noise, moves, or requires frequent oiling and dusting it's a better deal yet. It's especially right if its shiny and bright; but if it's dirty and dull it wont mater at all...

Offline andyf

  • In Memoriam
  • Hero Member
  • *****
  • Posts: 1795
  • Country: gb
    • The Warco WM180 Lathe - Modifications
Re: Solenoid engine Build
« Reply #3 on: November 22, 2010, 07:59:48 PM »
I have to confess that I've never come across a solenoid engine before.

 :scratch: How does it work? Contacts arranged so that the plunger of a solenoid moves to and fro, like the piston in a conventional steam or IC engine, with a con rod and crank to convert the linear motion to a rotary one? Does it have any advantage over a normal electric motor, or is it something to build just for the fun of it? Not that there's anything wrong with fun, of course  :)

Andy
Sale, Cheshire
I've cut the end off it twice, but it's still too short

Offline Stilldrillin

  • Global Moderator
  • Hero Member
  • *****
  • Posts: 4972
  • Country: gb
  • Staveley, Derbyshire. England.
Re: Solenoid engine Build
« Reply #4 on: November 23, 2010, 03:38:46 AM »
Hmmm...... Yes..... I'm confused too!  :scratch:

But, watching!  :thumbup:

Nice work on the governer.  :clap:

David D
David.

Still drilling holes... Sometimes, in the right place!

Still modifying bits of metal... Occasionally, making an improvement!

Offline madjackghengis

  • Hero Member
  • *****
  • Posts: 717
  • big engine
Re: Solenoid engine Build
« Reply #5 on: November 23, 2010, 08:28:41 AM »
That's quite a good looking governor arrangement you've got made, it looks very sturdy and workman like.  I'll have to file that one away for future use.  Looking forward to the build as well, I've got a handful of solenoids with nothing to do with them, so they would be useful for something after all.  That governor looks very fine indeed :bow: :jaw: mad jack

Offline CallMeAl

  • Jr. Member
  • **
  • Posts: 95
  • I came, I saw, I wondered how to do it!
Re: Solenoid engine Build
« Reply #6 on: November 26, 2010, 10:54:08 PM »
Thanks all for the comments on the governor.  Yes, I am just building to see if I can make it work and I wanted to make something different and because I have the stuff laying around to do it. :D

Here is a small version of a solenoid engine I found on the net. The one I am attempting to build will be about  4 times the size!


I bored out the end of the solenoid tube end to get the floating piston that was inside:


Temporally added a rod. I don't have to worry about sealing the cylinder and actually the slits in the piston are a good thing since I do not want any compression at all!


I cut some 2.5 inch x 1/2" discs for the crank counter weights, pasted a full size pattern on one, bolted the two together, and whittled away till I had this result:


Next is the pattern for the base casting.  Can't do to much more till I get that poured.  I also need to figure out the governor cut out switch and the timing actuator and switch.
I skin cats my own way!

Offline raynerd

  • Madmodder Committee
  • Hero Member
  • *****
  • Posts: 2893
  • Country: gb
    • Raynerds Projects - Raynerd.co.uk
Re: Solenoid engine Build
« Reply #7 on: November 27, 2010, 04:25:23 AM »
Nice work, like the governor video!

Offline madjackghengis

  • Hero Member
  • *****
  • Posts: 717
  • big engine
Re: Solenoid engine Build
« Reply #8 on: November 27, 2010, 09:22:51 AM »
Well Al, that picture is about what I had in my mind, and my immediate thought was finding sufficient solenoids to make up a V-8 or V-12, and have a nice "distributer" to apply power to all the solenoids in turn, just to hear it run.  I remember building a solenoid engine as a project out of an old boy's project book from the thirties, when I was a boy, it was a fascination for everyone who saw it.  I'm looking forward to seeing this one, with a governor. mad jack

Offline CallMeAl

  • Jr. Member
  • **
  • Posts: 95
  • I came, I saw, I wondered how to do it!
Re: Solenoid engine Build
« Reply #9 on: November 29, 2010, 12:24:52 AM »
Thanks craynerd for the comment.

Mad Jack: Wow a V-8, that would be sight to behold and I can't image what it would sound like, fairly quiet I would think except for the spark arcs snapping on the distributor!

I got a start on the engine base.  It still needs a lot of clean up a coating of paint.

It's not in the same league as Rob Wilson's beautiful patterns, but it should pour OK. I'm still learning how cast items and every pour is a new adventure!


I skin cats my own way!

Rob.Wilson

  • Guest
Re: Solenoid engine Build
« Reply #10 on: December 02, 2010, 04:35:00 PM »
Hi Al 


Sure going to look a fine engine , :clap: :clap: :clap: :clap: :clap: :clap: great to see more casting on the forum  :thumbup:

Every pore is still an adventure for me to ,,,,,  :headbang: :headbang: :headbang:


Rob

I faff about way way to much with my patterns  :doh:

Offline CallMeAl

  • Jr. Member
  • **
  • Posts: 95
  • I came, I saw, I wondered how to do it!
Re: Solenoid engine Build
« Reply #11 on: February 12, 2011, 10:13:37 PM »
Well I'm finally getting back to this project

I made a flange to put on the solenoid core tube:


Solder on the flange:


Ready to go:


Pattern painted and waxed ready for casting attempt:


I had to make a new flask since none of mine wood fit:


OK - time to melt some aluminum turn wood into metal tomorrow!
I skin cats my own way!

Offline Stilldrillin

  • Global Moderator
  • Hero Member
  • *****
  • Posts: 4972
  • Country: gb
  • Staveley, Derbyshire. England.
Re: Solenoid engine Build
« Reply #12 on: February 13, 2011, 04:28:12 AM »
Looking really good Al!  :clap: :clap:

Good luck for tomorrow.....  :thumbup:

David D
David.

Still drilling holes... Sometimes, in the right place!

Still modifying bits of metal... Occasionally, making an improvement!

Offline Mascobe

  • Newbie
  • *
  • Posts: 1
Re: Solenoid engine Build
« Reply #13 on: February 13, 2011, 12:52:19 PM »
Hey there, Just ran across this post and love to see that someone found my work and posted it here. Here is a link to the motor running:


More different designs are found on my YouTube Channel:

http://www.youtube.com/user/mascobe

Enjoy!

Mascobe

Thanks all for the comments on the governor.  Yes, I am just building to see if I can make it work and I wanted to make something different and because I have the stuff laying around to do it. :D

Here is a small version of a solenoid engine I found on the net. The one I am attempting to build will be about  4 times the size!


Offline CallMeAl

  • Jr. Member
  • **
  • Posts: 95
  • I came, I saw, I wondered how to do it!
Re: Solenoid engine Build
« Reply #14 on: February 13, 2011, 09:49:43 PM »
Hello Mascobe,

Thanks for posting the links to your videos and Youtube page.  I think I found the picture of your engine when some requested what a solenoid engine, after I started this, was by doing a image search in google.  You do wonderful work and I hope everyone will take look.

 Your work is much more ingenious and detailed than mine will be, but mine will be more massive - if it works!
I skin cats my own way!

Offline CallMeAl

  • Jr. Member
  • **
  • Posts: 95
  • I came, I saw, I wondered how to do it!
Re: Solenoid engine Build
« Reply #15 on: February 13, 2011, 09:53:47 PM »
Looking really good Al!  :clap: :clap:

Good luck for tomorrow.....  :thumbup:

David D

Thanks David - here comes the saga of the pour.  :palm:
I skin cats my own way!

Offline CallMeAl

  • Jr. Member
  • **
  • Posts: 95
  • I came, I saw, I wondered how to do it!
Re: Solenoid engine Build
« Reply #16 on: February 13, 2011, 10:47:42 PM »
Ok Scottie, prepare to ram!


I ran low on sand so I used what I had.  I have not poured anything this size and have never used any weight on top of the flask.  So with the reduced sand load and no weight holding the flask together - disaster!  The metal lifted to half up and started spilling out between the cope and drag!  I didn't take any photo's because I was scurrying around and shouting bad things! :bang:


To top it all off the sand had broken apart in the mould!   :palm: 

The results..


The next attempt, after re-mulling the sand with a little more water and clay, I clamped the flask together and stacked on some weight.  This had better work!


Oh, when I was pulling the pattern for the second pour, I dropped it!  :bang:  So it really better work!


Success!  Not too shabby looking after shake out, no clean up other than cutting the sprues off.


Comparing the two results.  More lessons were learned the hard way on this pour..


That's it though with my homemade green sand.  It works OK, but you have to be fiddling with it all the time to make it preform well.  Life being shorter that it was, I am too creaky, cranky, and lazy to deal with it.

I got online and ordered a pile of Petrobond.  Now I have to build a moulding bench..

The saga never ends.
I skin cats my own way!

Offline CallMeAl

  • Jr. Member
  • **
  • Posts: 95
  • I came, I saw, I wondered how to do it!
Re: Solenoid engine Build
« Reply #17 on: February 16, 2011, 10:40:17 PM »
I cleaned up the casting a little and fly cut the base:


My shop built fly cutter:


Here it is in action.  The base was remarkably flat so I only had to make three lite passes.  I'm not showing the full cut - boring!


All the parts made so far, much left to figure out since I'm making this up as I go along:


Thanks for viewing

 AL

 
I skin cats my own way!

Offline Stilldrillin

  • Global Moderator
  • Hero Member
  • *****
  • Posts: 4972
  • Country: gb
  • Staveley, Derbyshire. England.
Re: Solenoid engine Build
« Reply #18 on: February 17, 2011, 03:35:34 AM »
Well done Al!  :clap:

A lesson learned, first try. Then a gem produced from the "wreckage".......  :thumbup:

It's all looking good to me!

David D
David.

Still drilling holes... Sometimes, in the right place!

Still modifying bits of metal... Occasionally, making an improvement!

Rob.Wilson

  • Guest
Re: Solenoid engine Build
« Reply #19 on: February 17, 2011, 11:01:09 AM »
Hi Al  :clap:  :bow::clap:  :bow::clap: :bow: :clap:  :bow::clap:  :bow::clap: :bow: :clap:  :bow::clap:


I am  pleased to see the bed plate  casting came out  great in the end :headbang: ,it looks a good solid casting  :thumbup:, I no what was going through your head when the mould split  :doh: , i seam to learn more about casting when things go wrong  :lol: :lol:


Rob

Offline saw

  • Hero Member
  • *****
  • Posts: 1003
  • Country: se
  • lucky amateur
    • Svenssons AckordsWerkstad
Re: Solenoid engine Build
« Reply #20 on: February 17, 2011, 11:16:48 AM »
This is looking very intressting, keep on good work  :clap:
_________________________
Greetings / Benni
http://myprojecty.wordpress.com/category/steam-engine/

Offline cfellows

  • In Memoriam
  • Sr. Member
  • *****
  • Posts: 303
Re: Solenoid engine Build
« Reply #21 on: February 17, 2011, 11:55:59 PM »
Very nice looking build you got going there, Al.  I, too, have a keen interest in solenoid engines of the hit n miss variety.  One of the issues I've noticed with all solenoid hit n miss engines is that they don't make very many revolutions between "hits".  I think the secret to making a good running hit and miss solenoid engine is to drive the solenoid at maybe double or even 4 times it's rated amperage.  Since it is only operating maybe 20% of the time, it shouldn't overheat.  However, yours may run perfect right out of the box so would only try overdriving the solenoid if you're disatisfied with the way it runs.

Chuck

Offline CallMeAl

  • Jr. Member
  • **
  • Posts: 95
  • I came, I saw, I wondered how to do it!
Re: Solenoid engine Build
« Reply #22 on: February 19, 2011, 10:03:28 PM »
Stilldrillin:  Wreckage is correct.  Some times you just get lucky

Rob: You are correct, I learn something every time I pour and sometimes I relearn what I did wrong the last time!

Chuck: Yes I hope the heavy fly wheel I intend to use will let it coast awhile before it "hits" again.  This whole thing is just an experiment so I have no idea if it will work like I want it to or not.
I skin cats my own way!

Offline CallMeAl

  • Jr. Member
  • **
  • Posts: 95
  • I came, I saw, I wondered how to do it!
Re: Solenoid engine Build
« Reply #23 on: February 19, 2011, 10:44:49 PM »
Now that I have a bed casting - time to move on:

When I built the building my shop is in I never intended it to house a rather tall mill, so I put a simple shed type roof on it.  When I bought the mill and moved it in, it was a tight fit, in fact after I insulated the roof the motor was trapped. 


It didn't really bother me till I need to move the ram on the mill for this project.  So I had to take the time to build a tunnel to traverse the head out.


The reason was to get some head room for some operations and boring on the engine base.  I wanted it to hang off the edge of the table on an angle plate.


First drill and ream for the cylinder guide rods:


Drill and bore the cylinder mounting hole:


Fly cut for the solenoid tube mounting flange:


Drill and tap the tube mounting flange screws and cut the guide rails to length.  The guide rails are held in place the tube flange.


The solenoid coil sides on the tube and is held on by it's original nut.  I also drill some holes for the wiring connections which will have to be insulated.  I'm hoping to have no exposed wires:


The results so far:


Calipers for scale:


That's it for now - more fun to come..

Thanks fro viewing.

AL
I skin cats my own way!

Offline CallMeAl

  • Jr. Member
  • **
  • Posts: 95
  • I came, I saw, I wondered how to do it!
Re: Solenoid engine Build
« Reply #24 on: March 02, 2011, 12:06:12 AM »
Da_Kengineer_Meister:  Hey, I was up in your area last week - Kent, WA. for a business meeting.  Yes, I was worried about the bit wandering off.  I even bought a extra long centering bit, but it really flexed when I tried to start the second hole because if the angle.  I ended up using the next smaller bit I had than the hole size I needed and slowly let it rub in.  Worked out just fine.   
I skin cats my own way!

Offline CallMeAl

  • Jr. Member
  • **
  • Posts: 95
  • I came, I saw, I wondered how to do it!
Re: Solenoid engine Build
« Reply #25 on: March 02, 2011, 12:21:46 AM »
As mentioned above I was out of town last week and didn't get much done on the solenoid engine.  Started working on the cross head:

Squared up a block and drilled and reamed holes


Trimmed the piston rod for length and fitted to cross head and milled connecting rod clevis ears:


Cross head on engine. Slides very smoothly and keeps piston from rubbing the walls on the solenoid tube


I still need to radius the corners and make it look all fancy and such!

Moving along slowly.
I skin cats my own way!

Offline CallMeAl

  • Jr. Member
  • **
  • Posts: 95
  • I came, I saw, I wondered how to do it!
Re: Solenoid engine Build
« Reply #26 on: May 24, 2011, 10:09:10 PM »
Finally getting back to working on this project.  I have been busy with other stuff - Spring, ya know. Plowed out the cavity for the crank weights.


Leveled area for bearing caps.


Made bearing caps, line drilled and bored the bushings and reamed them in place.


Test fitted the fly wheel, as you can see, a barbell weight I found at he scrap yard and have been determined to use it some where!

I know:  :loco:


Pressed the crank together with a little Loctite - twice.  I'm not totally happy with the result, but I'm going to carry on so I can make some progress on this motor.


Test mounted the previously made ball governor just see how it looked.. The scale doesn't look quite right, but this is a learning/ experimental project so many lessons are being gained. It's somewhat intimidating the skill level on the members on this site and though I have learned much by looking over the shoulders of the master builders here, my techniques need much practice and improvement.  I need to improve on my measurement precision to approach the quality of projects presented here.  I have built 3 previous engines, each very different from the others, and learned something from each - this one is no exception!


This may be why I never build anything off of published plans, this way I can go my own way and fudge thing as I need too! ::)

Thanks for viewing.
I skin cats my own way!

Offline saw

  • Hero Member
  • *****
  • Posts: 1003
  • Country: se
  • lucky amateur
    • Svenssons AckordsWerkstad
Re: Solenoid engine Build
« Reply #27 on: May 25, 2011, 04:22:58 AM »
Very nice build.  :clap: :thumbup:
_________________________
Greetings / Benni
http://myprojecty.wordpress.com/category/steam-engine/

Offline Stilldrillin

  • Global Moderator
  • Hero Member
  • *****
  • Posts: 4972
  • Country: gb
  • Staveley, Derbyshire. England.
Re: Solenoid engine Build
« Reply #28 on: May 25, 2011, 10:10:40 AM »
That engine is developing so nicely......   :bugeye:

Love it! Well done/ doing, Al!  :clap: :thumbup:

David D
David.

Still drilling holes... Sometimes, in the right place!

Still modifying bits of metal... Occasionally, making an improvement!

Offline cfellows

  • In Memoriam
  • Sr. Member
  • *****
  • Posts: 303
Re: Solenoid engine Build
« Reply #29 on: May 25, 2011, 11:15:04 AM »
You've got some nice features on this engine, Al.  I like the crosshead arrangement, it's integrated into the frame very nicely.  Do you know what the voltage and amp rating of the solenoid are?

Chuck

Offline CallMeAl

  • Jr. Member
  • **
  • Posts: 95
  • I came, I saw, I wondered how to do it!
Re: Solenoid engine Build
« Reply #30 on: May 25, 2011, 10:17:00 PM »
Thanks for the comment Saw and David.

Chuck:  The solenoid is rated a 110V AC about 5A.  My intention is to be able to plug it to run it.  I know enough about electricity to be dangerous and have tried the coil with a 14.4V DC drill battery and it pulled the piston in with a lot of force.  I may see if it works on DC, but that may cause some heating issues in the coil and arcing in the switches.
I skin cats my own way!

Offline metalmad

  • Jr. Member
  • **
  • Posts: 62
Re: Solenoid engine Build
« Reply #31 on: May 26, 2011, 02:23:50 AM »
hay Mate
Ive never seen a solenoid motor before but yours is looking great
Pete :clap:
A little bit every day, sometimes the same little bit!

Offline cfellows

  • In Memoriam
  • Sr. Member
  • *****
  • Posts: 303
Re: Solenoid engine Build
« Reply #32 on: May 26, 2011, 07:00:24 PM »
Thanks for the comment Saw and David.

Chuck:  The solenoid is rated a 110V AC about 5A.  My intention is to be able to plug it to run it.  I know enough about electricity to be dangerous and have tried the coil with a 14.4V DC drill battery and it pulled the piston in with a lot of force.  I may see if it works on DC, but that may cause some heating issues in the coil and arcing in the switches.

Since you are running in hit n miss mode, you could run the solenoid at a lot higher voltage / amperage.  That would give you more of a power stroke giving you more RPM's between "hits".  You can limit arcing at the switch by installing a clamping diode if you are using DC.

Chuck

Offline CallMeAl

  • Jr. Member
  • **
  • Posts: 95
  • I came, I saw, I wondered how to do it!
Re: Solenoid engine Build
« Reply #33 on: May 29, 2011, 11:11:06 PM »
Pete: The rate I'm going on this you still might not ever see a solenoid motor!  Thanks for your comment.

Chuck:  I'm fairly sure this is going to be a 110V motor.  I have yet to figure out the "valving" but I have a idea of how I want to do it and I hope I can "tune" it in to make this thing actually work!  :zap:
I skin cats my own way!

Offline CallMeAl

  • Jr. Member
  • **
  • Posts: 95
  • I came, I saw, I wondered how to do it!
Re: Solenoid engine Build
« Reply #34 on: May 29, 2011, 11:53:29 PM »
Now that I have a crank and the cross head, I wanted to try a different way, at least to me, to make a connecting rod to hook the two together.  Started with a aluminum block and knocked the lead corners of with a ball mill and drilled a hole for the rod shaft.


Turned down a piece of 1/2" bar to 3/8" on the end with my shop built tangential lathe tool holder, this will be held in the base with a set screw and some Locktite when finished.


Tapered the rod, but left the end to cut for a the small end of the rod.


Here is a couple of shots of the tool holder and bit.  It doesn't do everything, but it cuts well, is easy to sharpen when you make the simple bit sharpening guide, and with the length of bit I have in it and how often I need to sharpen it the bit will out last me most likely!


I drilled the base end for bolts, cut the end off for a cap, reinstalled the cap piece, drilled and reamed for the pin, and finally turned a clearance shoulder on the sides.


Next was to drill the cross hole in the small end and flatten the sides.  Rod assembled.


Rod installed on the motor.  After a little tuning, it operated smoothly.


Now that the major mechanical components are in place, I will have to figure out the "valving" arrangement and actuation.

Thanks for viewing.


I skin cats my own way!

Rob.Wilson

  • Guest
Re: Solenoid engine Build
« Reply #35 on: May 30, 2011, 04:13:33 AM »
 :clap: :clap: :clap: :clap: :clap: Nice going Al  :dremel:

The engine is coming together great  :thumbup:


Rob

Offline CallMeAl

  • Jr. Member
  • **
  • Posts: 95
  • I came, I saw, I wondered how to do it!
Re: Solenoid engine Build
« Reply #36 on: June 01, 2011, 12:16:12 AM »
Thanks Rob.  I value a comment from from someone with our abilities.  :bow:
I skin cats my own way!

Offline CallMeAl

  • Jr. Member
  • **
  • Posts: 95
  • I came, I saw, I wondered how to do it!
Re: Solenoid engine Build
« Reply #37 on: July 12, 2011, 10:24:49 PM »
Time to put a bullet the head of this thread/project and put it out of it's misery.  Lot of things have happened since I posted last. Most of them discouraging.  Here are the finial steps of putting this experimental engine/motor and the frustrating end.

Making the eccentric:


Soldered together showing the offset:


Switch rod guide bracket and actuating cams:


Mounted on the frame:


Switch actuator rod and how it is actuated by the cams:


Switch bracket and it's mounting in the base.  The switch was out of an industrial limit switch and has a spring loaded plunger:


The overall arrangement of the switching setup:


Looks like it might work, but here is the result:


I have spent a lot of time trying to get this running, but no combination of eccentric and cam timing can make it continue to run.  I believe there is just too much friction on the crank bushings and connecting rod to allow the momentum of the fly wheel to continue the rotation.  Also. the impulse from the coil is not strong enough and it starts heating up more than I would like (I expected this might happen, but not as quickly as it does).

I have reached that point where I must give up on this configuration, redo the bearings, or convert the bones into a pneumatic engine, which what is most likely to happen.

Oh well, not everything turns out like you would hope of expect it might.  I learned something form this exercise that will be useful on the next project.  Time to put this one on the shelf for a while and comptenplate the adventure in self taught home shop machining!

 :D

I want to thank all that all that followed along on this episode and I certainly enjoyed your comments and encouragement.  :clap:

Sorry the end turned out kind of anticlimactic!

I skin cats my own way!

Offline John Hill

  • The Artful Bodger
  • Madmodder Committee
  • Hero Member
  • *****
  • Posts: 2016
  • Country: nz
Re: Solenoid engine Build
« Reply #38 on: July 12, 2011, 11:23:01 PM »
Dont give up on it yet!

I see you said the solenoid is 110Volts 5Amps.

I would be inclined to charge a big capacitor via a diode and current limiting resistor.  The capacitor will charge to much more than 110V and if you use a simple voltage doubling arrangement you will have several hundred volts available to be dumped into the solenoid in a very short, very high current, pulse. You could add capacitors for a longer pulse and hence more torque.  Those are my ideas anyway. :beer:
From the den of The Artful Bodger

Offline Mad_Grasshopper

  • Jr. Member
  • **
  • Posts: 7
  • Faceting Machine
Re: Solenoid engine Build
« Reply #39 on: July 13, 2011, 02:09:27 PM »
I don't understand the timing. :scratch: It appears to me to be flowing current twice per revolution when it should only activate once at a few degrees after TDC. -Unless there is something I don't see switching the current from push to pull? Has it been tried with only one of the collar-ramps engaging switch? Looks too cool to quit now!

Regards,
Jamie

Offline John Hill

  • The Artful Bodger
  • Madmodder Committee
  • Hero Member
  • *****
  • Posts: 2016
  • Country: nz
Re: Solenoid engine Build
« Reply #40 on: July 13, 2011, 03:46:25 PM »
OK, after laying awake trying to figure out why this does not run as nicely as it looks I might have figured something..

That solenoid is an AC device?  If so it is quite different in operating principle to a regular DC solenoid. 

The AC solenoid operates on the same principle as a split phase AC motor so you should probably ignore my earlier comment about giving it a vigorous DC kick.

However that still does not explain why it does not work. 
John
From the den of The Artful Bodger

Rob.Wilson

  • Guest
Re: Solenoid engine Build
« Reply #41 on: July 13, 2011, 05:13:41 PM »
Al ,,,,,,,,,, Still a great thread whatever the out come  :clap: :clap: :clap: :clap:   i am sure you will get that cat skinned  :med:


Rob  :thumbup:

Offline cfellows

  • In Memoriam
  • Sr. Member
  • *****
  • Posts: 303
Re: Solenoid engine Build
« Reply #42 on: July 13, 2011, 11:22:21 PM »
If that is a typical solenoid, the switch should close at or shortly after bottom dead center then open at or shortly before top dead center.  Does your switch open or close when the cams push against the button?

Chuck

Offline Stilldrillin

  • Global Moderator
  • Hero Member
  • *****
  • Posts: 4972
  • Country: gb
  • Staveley, Derbyshire. England.
Re: Solenoid engine Build
« Reply #43 on: July 14, 2011, 02:09:48 AM »
I don't understand the timing. :scratch: It appears to me to be flowing current twice per revolution when it should only activate once at a few degrees after TDC. -Unless there is something I don't see switching the current from push to pull? Has it been tried with only one of the collar-ramps engaging switch? Looks too cool to quit now!

Regards,
Jamie


Al. I'm with Jamie on this one......
At the final crank rotation....... The solenoid "squarks" at both ends of the stroke.......

Or, am I missing something.......  :scratch:

What a crackin' build.  :clap: :clap:    Please don't abandon at this point.......   :palm:

David D

David.

Still drilling holes... Sometimes, in the right place!

Still modifying bits of metal... Occasionally, making an improvement!

Offline tomrux

  • Jr. Member
  • **
  • Posts: 34
Re: Solenoid engine Build
« Reply #44 on: July 14, 2011, 04:39:30 AM »
I dont have a whole lot of experience building motors yet (planing on fixing that once i get a couple of other projects out of the way) but do have abit more than the usual electric/electronic  knowhow.

an ac solenoid will only work in one direction (usually pull) reversing a dc curentthrough it wont change that. try using a small spring for one direction (I would start with push)and electric excitation for the other(pull). the idea of using capacitors to more grunt is a good one but would need to be fairly big.

Tom

Offline SPiN Racing

  • Madmodder Committee
  • Hero Member
  • *****
  • Posts: 506
Re: Solenoid engine Build
« Reply #45 on: July 14, 2011, 10:12:51 AM »
Beautiful build, and exciting project!

I was a arcade manager in the late 80s, and early 90s when in college and a bit beyond, and ended up traveling all over ehe state of Florida repairing pinball machines for the arcade company I worked for.

I still have a handful of the Solenoids we used to use for pinball machines, and seeing this made me seriously consider putting one of these on the back burner.

I actuallymade a electromagnetic rail gun of sorts from coils back then.  Basically it was a board with 8 coils in a line, wired with optical switches, so that when the metal shaft broke the optical sensor the next coil in line was energized, and drew the rod into it. When the rod passed far enough into it, the coil turned off and inertia carried it through to break the beam on the next coil, energizing it.

In the end it would shoot the rod that was attached to the pinball flippers across the arcade with enough force to stick it into the cedar 1" paneling 30 feet away.


With regard to your engine, as others have mentioned it sounds as if its energizing whenever the piston is anything OTHER than TDC.

I would think you simply need to set up a relay that closes when the engine is at BDC, and then once it hits TDC, or a bit before, it Disengages the relay.. so the coil is no longer energized while its traveling to BDC.

Scott
SPiN Racing

Offline AdeV

  • Madmodder Committee
  • Hero Member
  • *****
  • Posts: 2434
  • Country: gb
Re: Solenoid engine Build
« Reply #46 on: July 14, 2011, 10:58:31 AM »
Firstly - congratulations on a beautifully built machine! You've got some excellent skills there, many of them I'd like to learn myself...

So, have some of these:  :bow: :bow: :bow: :beer:  :thumbup: :clap:

A thought as to why it's not running:

Your activation system is turning the solenoid on both as the piston is going down into the solenoid, and as it is pushed back out; ISTM that the solenoid is doing its best to stop the engine on the in stroke; and obviously can't push hard enough to overcome both that & the friction on the out stroke. Since your net energy input from the solenoid is, effectively, zero; what you're seeing is the energy imparted to the flywheel being lost to friction.

IMHO you need to alter your activation system so it doesn't "fire" on the side-shaft down-stroke (piston in-stroke). I can think of 2 ways to do this:

1) Profile a bar so that one side allows the switch to operate, the other side doesn't. at the end of each stroke, have a mechanism that causes the bar to turn by 90 degrees, anticlock at one end, clock at the other; so the bar presents a different profile each stroke (but the same profile each up stroke & the same profile each downstroke). If it's as difficult to machine as it is to describe, it's probably quite a tricky one.... OTOH, it gives you a way of hooking your governer up; if the engine is above the governer shut-off speed, the bar-twisting mechanism is moved out of reach; so the "non active" side of the bar is always presented to the engine; as it slows, the twister drops back into place, allowing the solenoid to "fire" again.


2) Arrange the switch shaft to travel at half the speed of the crank shaft, just like a real IC engine camshaft does. You'll still need to find some way of making it "fire" at different points on the up & down stroke (of the side shaft), though...
Cheers!
Ade.
--
Location: Wallasey, Merseyside. A long way from anywhere.
Occasionally: Zhengzhou, China. An even longer way from anywhere...

Offline DaveH

  • Hero Member
  • *****
  • Posts: 1413
  • Country: za
  • Kempton Park, South Africa
Re: Solenoid engine Build
« Reply #47 on: July 14, 2011, 12:59:06 PM »
Al,

what a great post. :clap:

Beautifully built engine .... incorporating great skill coupled with a lot of know how. :clap: :clap: :clap:

Thanks Al I really enjoyed it. :D

 :beer:
DaveH
(Ex Leicester, Thurmaston, Ashby De La Zouch.)

Offline CallMeAl

  • Jr. Member
  • **
  • Posts: 95
  • I came, I saw, I wondered how to do it!
Re: Solenoid engine Build
« Reply #48 on: July 15, 2011, 12:20:19 AM »
First of all, thanks everyone for your comments and words of encouragement.  Sorry for the slow reply, but I have distant family in town and an somewhat occupied for a few days.

I appreciate the suggestions and advice on how I might over come the problems with the design on the switching on this motor.

Some answers to questions:

cfellows: the cams close the switch. 

Jamie & David D: Yes, it fires at each end of the stroke for I am trying to an impulse at each end of the stroke (double acting).  I'll elaborate on my thinking in another post later in the next couple of days.  Unfortunately the cams currently are actuating the switch just prior to TDC and BDC so I was hoping the momentum of a heavy flywheel would carry the piston over center and the coil impulse would pull it back until the cam released the switch.  Hey, i said it was experimental! :loco:

 AbeV:  Interesting suggestions

John Hill: When I started this I stated I new enough about electricity to be dangerous  :zap: and I still stand by that statement. 

Rob & DaveH: Thanks for your nice comments.

Scott & Tom:  As I said, I will try to explain my thinking on the solenoid, piston, switch arrangement in a following post, thanks for your interest.

I'm going to play around more with the timing on this thing this weekend and try a couple of other things before I totally give up on this thing, but not too long for I have another project in mind and am itching to get on with it.

I skin cats my own way!

Offline John Hill

  • The Artful Bodger
  • Madmodder Committee
  • Hero Member
  • *****
  • Posts: 2016
  • Country: nz
Re: Solenoid engine Build
« Reply #49 on: July 15, 2011, 02:02:53 AM »
Al,  unfortunately I dont think you can get double action from an AC solenoid.

My suggestion is to adjust your timing so that the switch is closed for the entire 'in stroke',  that would be the most simple configuration and would be a good starting point.  IMHO of course.
From the den of The Artful Bodger

Offline foozer

  • Full Member
  • ***
  • Posts: 194
  • Camano Island WA
Re: Solenoid engine Build
« Reply #50 on: July 15, 2011, 02:19:14 AM »
Ages ago helped the boy build a gadget similar for his school science project. Do 'member timing was fun. Energized the coil and let it lock the piston in place. Used that to set rod length so crank was at the qtr over position (90 with BDC as 0) We set the switch to energize coil a tad after BDC  and release before crank reached the 90 degree point. Was a simple gizmo and IIRC it ran the best with just the tiniest bump of juice to the coil.

Robert

 
Ignorance is Bliss, thus I aim for Perfection

Offline cfellows

  • In Memoriam
  • Sr. Member
  • *****
  • Posts: 303
Re: Solenoid engine Build
« Reply #51 on: July 15, 2011, 11:03:45 AM »
Al, I think I see what you are trying to do.  I saw a similar magnetic engine in an old Popular Mechanics (or Popular Science) magazine.  It can be done if your piston (plunger) is exactly at the half way point through the coil when the crankshaft is at 90 degrees and 270 degrees.  In other words, at top dead center and bottom dead center,  the piston must be past the center of the coil by an equal amount.  The coil coil should be energized at both top dead center and bottom dead center, then turned off when the piston is close to the center of the coil in either direction.

I doubt this form of double acting piston really gains anything in speed or efficiency over a single acting piston which is energized for the full stroke with the piston travel reaching the center of the coil at or before top dead center.

Chuck

Offline Bernd

  • Madmodder Committee
  • Hero Member
  • *****
  • Posts: 3688
  • Country: us
  • 1915 C Cab
    • Kingstone Model Works
Re: Solenoid engine Build
« Reply #52 on: July 15, 2011, 01:31:46 PM »
My 2¢ Al, I think you'll need two selenoids to make it work. I'll try to get a C-of-C together and post it later.

Bernd
Route of the Black Diamonds

Offline foozer

  • Full Member
  • ***
  • Posts: 194
  • Camano Island WA
Re: Solenoid engine Build
« Reply #53 on: July 15, 2011, 02:50:30 PM »
One thing that I haven't seen in this build and have assumed you've tested it.

When you energize the coil does it center the piston in the bore or draw it to one end, shape seems to indicate that it pulls the piston all the way to the end of the stroke. If thats the case dont think a double action will fly. A pulse of juice at any point from BDC to TDC for a duration of just a few degrees should get it going
Ignorance is Bliss, thus I aim for Perfection

Offline CallMeAl

  • Jr. Member
  • **
  • Posts: 95
  • I came, I saw, I wondered how to do it!
Re: Solenoid engine Build
« Reply #54 on: July 17, 2011, 03:20:20 PM »
Well I finally got it to run! :ddb:

Today I did some more fiddling with the eccentric timing, bump cams positioning, and the piston rod length on the cross head and what do you know it started running.

I guess I wasn't so crazy after all and with all the encouragement to not give up on this from the members of Mad Modder I accomplished what I hoped.

You can have a double acting solenoid if you position the armature correctly when the electrical pule is applied.  Since the solenoid works by drawing a iron armature in to the center of the coils magnetic field, if you do that at the same position at each end if the coil and time your switch correctly the coil should pull in on the armature from each end on the coil.


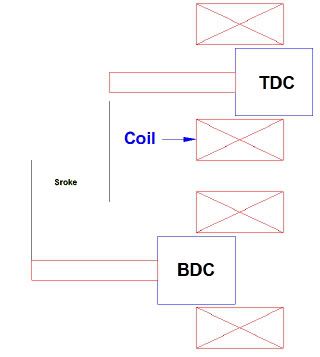
This switching has to be done just after TDC and BDC as several posters mentioned. Part of my problem was I was timed to actuate the switches a both ends of the stroke just prior to those points. You can get away with that on a IC engine because you're compressing a gas but not on a solenoid!

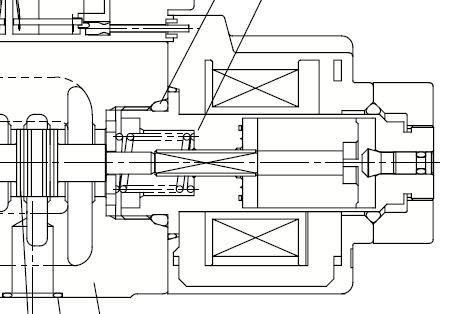
Another thing that was causing me grief was the solenoid I chose to use has a very narrow coil width since a hydraulic vale spool only needs to travel about .250 to .375 inch so it only needs to pull the armature that distance and it is spring offset the other direction.  Here is cross section off the solenoid I used. 


I believe this made the setting of the timing more critical since my total stroke is 1.500 inches.  Also, a rotatory cam would probably be better than my bum cams since you could better control the on time of the coil for more power.

Anyway, thanks for all the replies, suggestions, and encouragement. :bow:  I probably would have given up on it.  It's still not completely finished.  I want make wood base, mount a on/off switch, and fix the wobble in the flywheel among other things.
Also, I don't need the governor - it doesn't run that fast. ::) The coil heats up quite fast so running time may only be about 3 - 4 minutes.

Here is a video of actually running:


I skin cats my own way!

Offline Stilldrillin

  • Global Moderator
  • Hero Member
  • *****
  • Posts: 4972
  • Country: gb
  • Staveley, Derbyshire. England.
Re: Solenoid engine Build
« Reply #55 on: July 17, 2011, 03:45:25 PM »
Yay!! ....... That's Great Al!!  :ddb::ddb::ddb:

It even sounds right!  :thumbup:

Blummin well done!  :clap: :clap:

David D
David.

Still drilling holes... Sometimes, in the right place!

Still modifying bits of metal... Occasionally, making an improvement!

Offline foozer

  • Full Member
  • ***
  • Posts: 194
  • Camano Island WA
Re: Solenoid engine Build
« Reply #56 on: July 17, 2011, 04:42:57 PM »
Cool!!  now thats a runner


Robert
Ignorance is Bliss, thus I aim for Perfection

Offline John Hill

  • The Artful Bodger
  • Madmodder Committee
  • Hero Member
  • *****
  • Posts: 2016
  • Country: nz
Re: Solenoid engine Build
« Reply #57 on: July 17, 2011, 04:48:08 PM »
Excellent! Great sound too! :ddb: :ddb: :ddb: :ddb: :ddb:

So this is with AC?  Did you have to take a piece out of the end of the bore?

From the den of The Artful Bodger

Rob.Wilson

  • Guest
Re: Solenoid engine Build
« Reply #58 on: July 17, 2011, 05:26:04 PM »
 :bow: :bow: :bow: :bow: :bow: :bow: :bow: Way to go  Al  :ddb: :ddb: :ddb: :ddb: :clap: :clap: :clap: :clap:


Just new you would sort it  :zap:


Rob  :)

Offline DaveH

  • Hero Member
  • *****
  • Posts: 1413
  • Country: za
  • Kempton Park, South Africa
Re: Solenoid engine Build
« Reply #59 on: July 17, 2011, 06:02:17 PM »
Al,

 :bow: :bow: :bow:

Absolutely Fantastic

 :beer:
DaveH
(Ex Leicester, Thurmaston, Ashby De La Zouch.)

Offline Bernd

  • Madmodder Committee
  • Hero Member
  • *****
  • Posts: 3688
  • Country: us
  • 1915 C Cab
    • Kingstone Model Works
Re: Solenoid engine Build
« Reply #60 on: July 17, 2011, 07:40:47 PM »
Very nice Al to see her running finally.  :thumbup:

Bernd
Route of the Black Diamonds

Offline SPiN Racing

  • Madmodder Committee
  • Hero Member
  • *****
  • Posts: 506
Re: Solenoid engine Build
« Reply #61 on: July 17, 2011, 09:01:06 PM »
Awesome!! Glad to see and hear it chugging away!

 :headbang:
SPiN Racing

Offline winklmj

  • Jr. Member
  • **
  • Posts: 56
  • Country: us
Re: Solenoid engine Build
« Reply #62 on: July 18, 2011, 11:40:50 AM »
 :headbang: :bow: Wonderful build.
Mike

Offline ilia-45

  • Full Member
  • ***
  • Posts: 136
Re: Solenoid engine Build
« Reply #63 on: July 18, 2011, 12:31:45 PM »
I love it :bow: :bow: :bow:
Awesome :drool:

Offline PekkaNF

  • Hero Member
  • *****
  • Posts: 2523
  • Country: fi
Re: Solenoid engine Build
« Reply #64 on: July 18, 2011, 03:18:05 PM »
Really NEAT!

Pekka

Offline sjb

  • Jr. Member
  • **
  • Posts: 21
Re: Solenoid engine Build
« Reply #65 on: July 18, 2011, 03:44:44 PM »

Great job Al  :thumbup:
Steve

Offline CallMeAl

  • Jr. Member
  • **
  • Posts: 95
  • I came, I saw, I wondered how to do it!
Re: Solenoid engine Build
« Reply #66 on: July 18, 2011, 11:24:28 PM »
foozer, sjb, PekkaNF, winklmj, DaveH  : Thanks for nice comments and compliments.

SPiN Racing, Bernd : No one is more impressed than me that it runs - I had given it up for dead.

Rob.Wilson : I appreciate your confidence I would drag it into life.

John Hill:  Yes AC, it's surprising what might happen when you don't know better than to try something and hope it works.  I didn't have to do anything to the core tube besides bore out the entrance to get the armature out.  There was enough length to allow the armature to get the proper overlap on the coil.

Stilldrillin: Thanks, it does sound good - an unexpected bonus!
I skin cats my own way!

Offline John Hill

  • The Artful Bodger
  • Madmodder Committee
  • Hero Member
  • *****
  • Posts: 2016
  • Country: nz
Re: Solenoid engine Build
« Reply #67 on: July 18, 2011, 11:32:18 PM »
John Hill:  Yes AC, it's surprising what might happen when you don't know better than to try something and hope it worksaNF, winklmj, DaveH  : Thanks for nice comments and compliments.


Thanks Al, that is interesting as I am presently engaged in a little research on using AC solenoids for solenoid motors.  I hope I can post my finding soon. :coffee:
From the den of The Artful Bodger

Offline NickG

  • Madmodder Committee
  • Hero Member
  • *****
  • Posts: 1890
Re: Solenoid engine Build
« Reply #68 on: August 08, 2011, 05:18:16 AM »
Brilliant!  :thumbup:
Location: County Durham (North East England)

Offline madjackghengis

  • Hero Member
  • *****
  • Posts: 717
  • big engine
Re: Solenoid engine Build
« Reply #69 on: September 28, 2011, 12:12:46 PM »
That's really great Al, I was going to post it could easily be done with one solenoid, I seem to remember building one out of a magazine when I was a kid, and it just needs the flyweel to carry it.  I will also say they are considerably more efficient and effective double action, and that is the best switching setup I've ever seen.  The one I did had something like an armature and it wanted to move around.  What voltage are you running it on?  If it's 110 ac, you can stack two solenoids with a longer "piston", and run them in series and reduce the current in half, and get the same power with lots less heat.  DC is most efficient, but is most demanding of timing, while ac is at its most efficient if it is running at slightly below synchronous speed, and the switching is done via the alternating.  That demands setting up our of phase solenoids, and can easily become a four "pole" or solenoid, or more engine.  In any case, that is great, and perhaps the best version I've ever seen. :nrocks: :bow: :jaw: :beer:  Cheers, mad jack

Offline CallMeAl

  • Jr. Member
  • **
  • Posts: 95
  • I came, I saw, I wondered how to do it!
Re: Solenoid engine Build
« Reply #70 on: September 29, 2011, 11:04:52 PM »
Thanks madjackghengis, it is 110  VAC.  Since posted the video I rebuilt the crank trying take some of the wobble out without success, :bang: but it did take out some of the drag in the bearings and I redid the eccentric in steel instead of aluminum.  I also fine tuned the timing on the switching.  Now the dang thing takes of from half a turn on the flywheel and continues to build rpm till it concerns me and I pull the plug! This how I expected it would act when I first envisioned it and had planned to have it be hit and miss with a governor.  I am in the process of doing that now and hope to have it going  shortly.
I skin cats my own way!