Author Topic: Back to the shop... Elmer's #43  (Read 37316 times)

Offline Brass_Machine

  • Administrator
  • Hero Member
  • *****
  • Posts: 5504
  • Country: us
Re: Back to the shop... Elmer's #43
« Reply #25 on: April 29, 2011, 03:33:35 PM »
Looking good! Keep it up.
Science is fun.

We're all mad here. I'm mad. You're mad.

Offline saw

  • Hero Member
  • *****
  • Posts: 1003
  • Country: se
  • lucky amateur
    • Svenssons AckordsWerkstad
Re: Back to the shop... Elmer's #43
« Reply #26 on: April 29, 2011, 04:13:39 PM »
I realy like your'e kind of work, it's a good workmanchip.  :clap: :clap: :clap:
_________________________
Greetings / Benni
http://myprojecty.wordpress.com/category/steam-engine/

Offline arnoldb

  • Hero Member
  • *****
  • Posts: 515
  • Country: na
  • Windhoek, Namibia
Re: Back to the shop... Elmer's #43
« Reply #27 on: April 30, 2011, 01:55:36 PM »
Thanks Dave  :beer: - I'll have to polish up that perspex cover a bit though.  And the valve plate...  It should work, but it's just not up to the standard I expect from myself; I'm my own worst critic  :lol:

Eric, thank you; I will.  The engine is about 90% done now, so it will take another 60% as much time to finish...

Thanks Benni  :beer: - I'm still learning, but I'm trying hard to improve the finishes.  Its getting easier for me to machine to dimensions, so I can actually spend a bit more time trying to get good finishes now.

This afternoon I started on the cross head.  I used a bit of 16mm square brass bar that I have - and as it is already on size on the dimensions, I couldn't allow for any trimming off on the square bits, so I carefully clocked it up true in the 4-jaw chuck:

The overhang from the chuck is a bit long, but I didn't want to saw a bit off it - as that results in waste later on.  I only have this bit of 16mm square brass, so neither wastage nor failure was an option; it's a great incentive to get things done right the first time   :lol:

First I turned up and parted off the cylinder head.  That was a simple job - I didn't take any photos.  Then turned down the outside of the cross head to dimension; I love turning brass, as it's really easy to get a good finish on it:


The hole in the cross-head would have been easy to ream, but I don't have machine reamers; only hand reamers and those can't ream all the way into a blind hole because of the taper on the tips.  This hole must be smooth and accurate all the way through to the blind bore at the back.  Not feeling in any mood to make up a d-bit from silver steel for the job, I drilled the hole out to 7.5mm and used my small home-made boring bar to bore it out to 7.8mm.  The boring bar barely fit in the hole:


Before moving to the mill, I also cleaned up the back of the workpiece to 12mm - this is for leaving a register ring to fit in the cylinder bore and parting off later:


On to the mill; the excess square stock made it easy to clamp up the workpiece in the vise, so this was a quick and simple job, taking care not to take too heavy cuts as material was removed:


Finally back to the 4-jaw for parting off.  As the register was already turned, I could just part it off without completely re-centering the workpiece in the chuck:


The results of today's work:

The boss on the cover plate is not to plans - I left it to add something interesting to what would otherwise just be a square cover plate.

Regards, Arnold

Offline DaveH

  • Hero Member
  • *****
  • Posts: 1413
  • Country: za
  • Kempton Park, South Africa
Re: Back to the shop... Elmer's #43
« Reply #28 on: April 30, 2011, 04:08:30 PM »
Arnold,

Coming along very nicely :)

A clever bit of planning ahead worked well :clap:

DaveH
(Ex Leicester, Thurmaston, Ashby De La Zouch.)

Offline sbwhart

  • Global Moderator
  • Hero Member
  • *****
  • Posts: 3530
  • Country: gb
  • Smile, Be Happy, Have Fun and Rock Until you Drop
Re: Back to the shop... Elmer's #43
« Reply #29 on: May 01, 2011, 01:51:57 AM »
Looking Good  :thumbup:

Stew
A little bit of clearance never got in the road
 :wave:

Location:- Crewe Cheshire

Offline arnoldb

  • Hero Member
  • *****
  • Posts: 515
  • Country: na
  • Windhoek, Namibia
Re: Back to the shop... Elmer's #43
« Reply #30 on: May 01, 2011, 02:31:34 PM »
 :beer: - Thanks Dave.  Can you believe it; we're still getting rain here at this time of the year!  Getting a wee bit cooler now as well.

Thanks Stew!  :beer:

Today's little bitty bits...

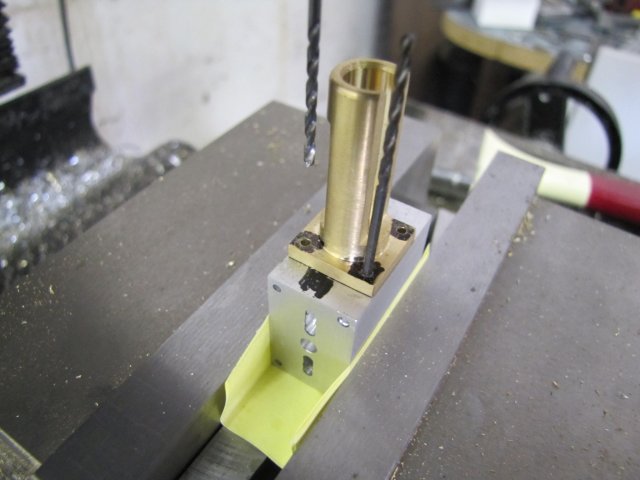
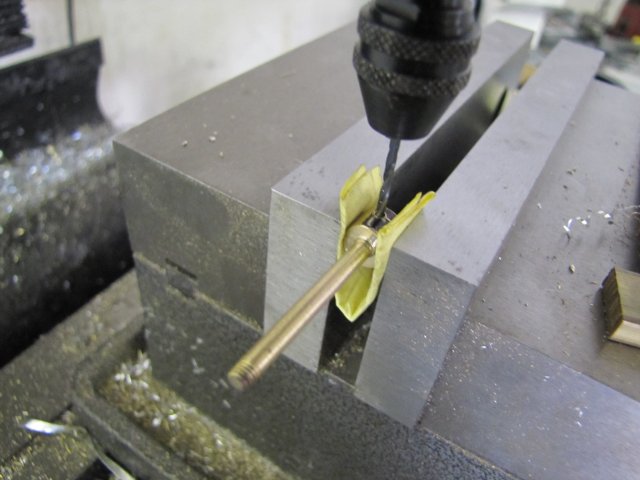
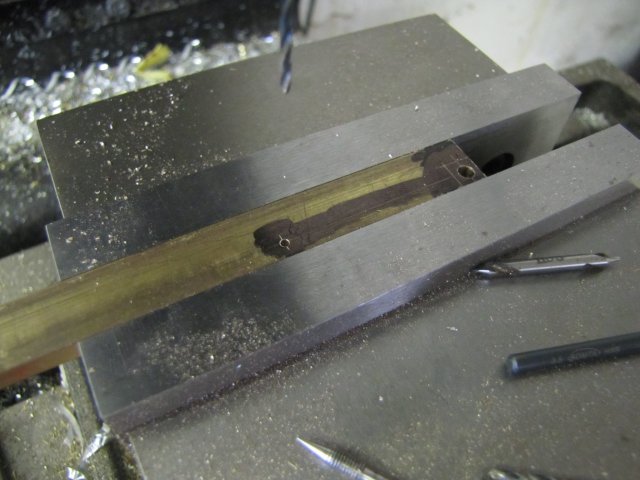
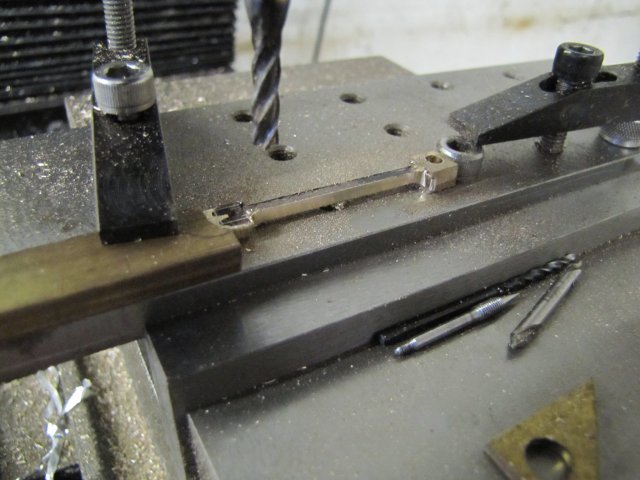
Drilling the mounting holes for the cross-head was a bit of a challenge.  The index on the back of it fits the cylinder bore tightly, so there's no room for movement and later "fudging" to adjust things.  And to make matters even worse, there was no way for me to center drill the holes first - I don't have spotting drills, and my center drills are all of the short variety...
In addition, the 1.6mm tap drill is barely long enough.  I ended up marking out the hole locations on the cross-head, and using my scriber pressing a deep indentation in each location. As the cross-head is a tight fit to the block, it would most likely stay put while drilling; I couldn't clamp it to the block.  I carefully drilled the holes by lightly pressing the drill bit into the indentations before starting up the mill motor.  After the first hole, I stuck another 1.6mm drill in the hole just to make sure things couldn't move:


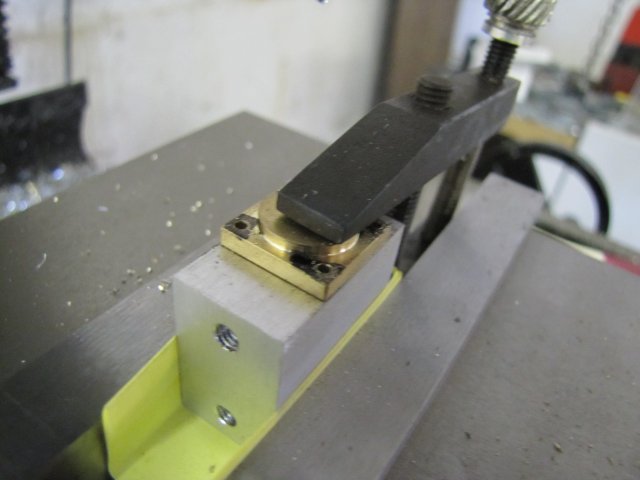
The cylinder head was a lot easier, as I could clamp it down:


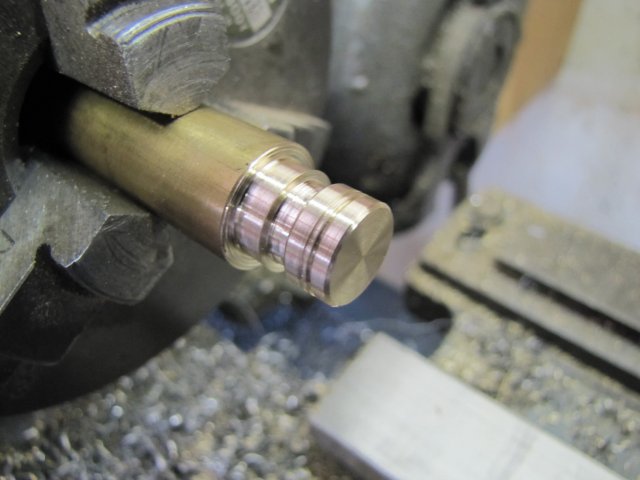
Turning up the piston was a really quick job.  Here it is half-way done and still 0.05mm over size, with the back side parted off partly, and a good chamfer added on either end.  Also, being the normal lazy rotter that I am, I couldn't be bothered to set up a tool to turn the oil grooves; I used a triangular needle file to add them - and got my dimensions slightly out; old eyeball MK1 didn't quite do it:

After adding the chamfers and oil grooves, I turned it down to size - 11.98mm to fit the 12mm bore.  Then I center drilled it, drilled it 2.5mm for M3 tapping, added a section drilled out to 3.2mm (I'll be using 3.2mm brazing rod as the piston rod) and tapped it M3 before parting it off fully.

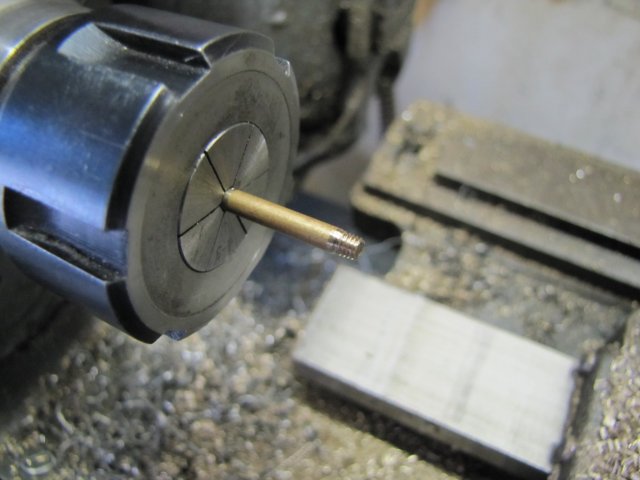
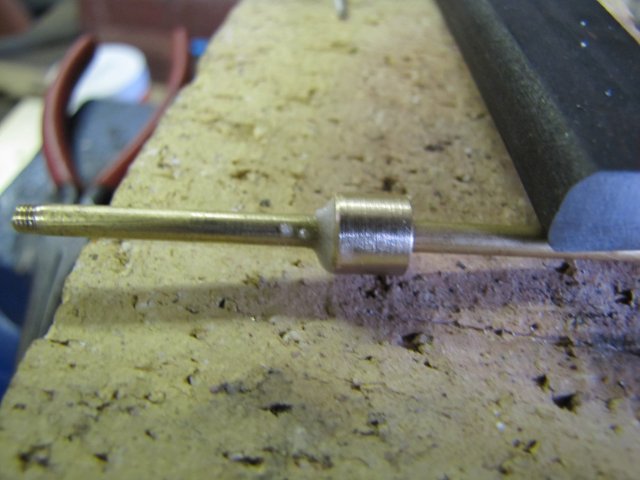
On to the piston rod - which was a bit of a challenge to make.  First, some 3.2mm brazing rod in the collet chuck, turned down to 3mm for 1/8" and threaded M3 with the tailstock die holder:


Then I turned a bit of brass down to a still-tight fit in the cross-head, and drilled it out 3.2mm with a generous chamfer in the start of the hole before parting it off.  I left the parted off side a bit rough around the center hole - which made the bit a tight slide along the brazing rod.  Seems a lot of boo-hah over a simple bit, but there's some method to my madness.  As I wanted to silver solder the brass bit to the rod, it would need cleaning up later, and if I made it a good fit in the cross-head, it would be too small after cleaning it up after the soldering process.  The chamfer was needed for a place for the solder to dam into and thoroughly join both parts, as the clearance between the hole and the rod was too small for the solder to properly wick in.  In retrospect, it would have been a better idea to file slight flats on the rod to leave more space for the solder to wick in; too late now though; the job's done.
Here it's fluxed up and ready for soldering:


I heated the lot from the right-hand side till it glowed dull red, and just touched the solder stick to it - job done:

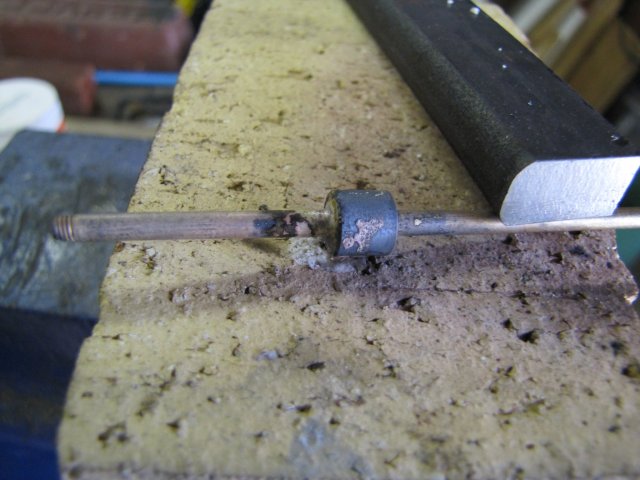
It looks horrible doesn't it ?  :lol:

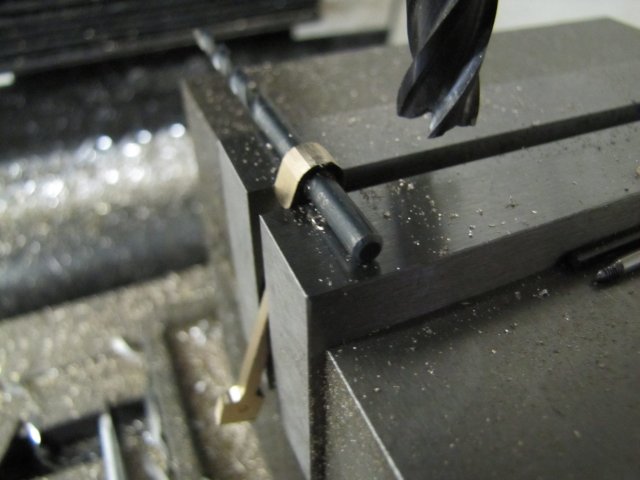
Oh well, after a bit of cleanup, it looked OK, and I could carry on - drilling the cross-pin hole:


Cut slots and flats with a slitting saw - very carefully, as this is not a very stable set-up:
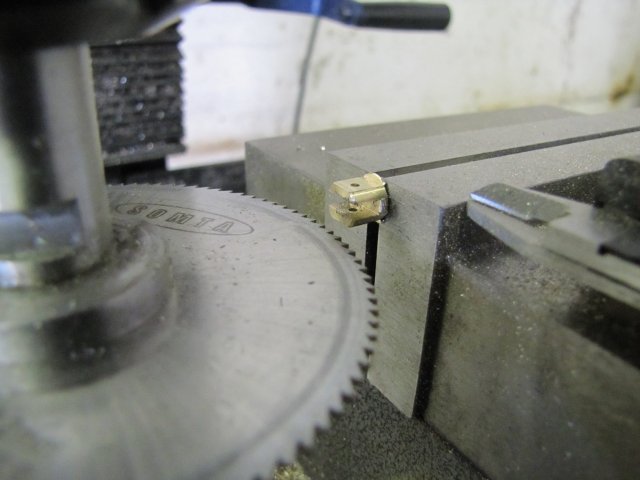

Piston rod done:


Some 4.8mm brass bar, and a couple of holes poked in it:


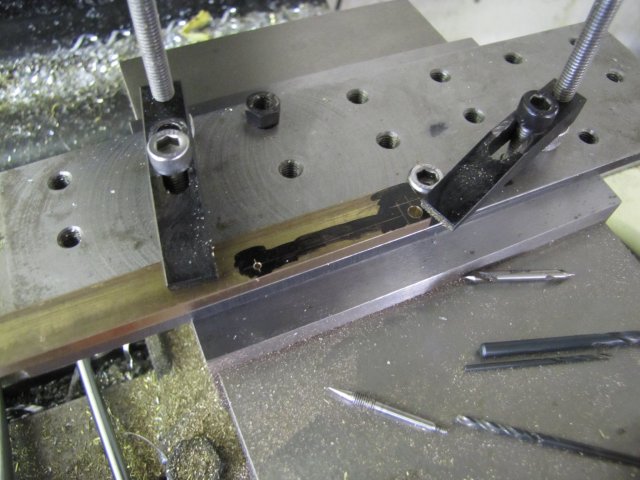
With the tooling plate installed in the vise, I clamped the lot down.  The cap screw screwed down on the right of the workpiece is acting as a stop, as the part needs to be flipped around for some up-coming machining.  I've mentioned before that I'm a lazy so-and-so, and this is more laziness   :coffee::

Oh, and have I mentioned how much I love this tooling plate ? - It's some of the most useful tool-making time I've spent  :ddb:

A bit of milling:


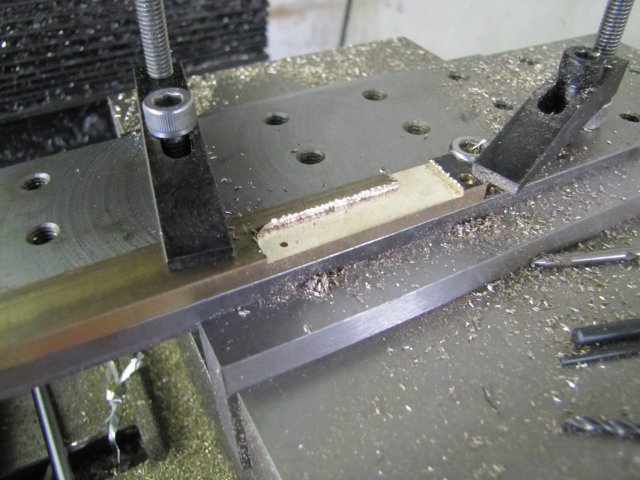
Flipped over after de-burring, and ready for some more:


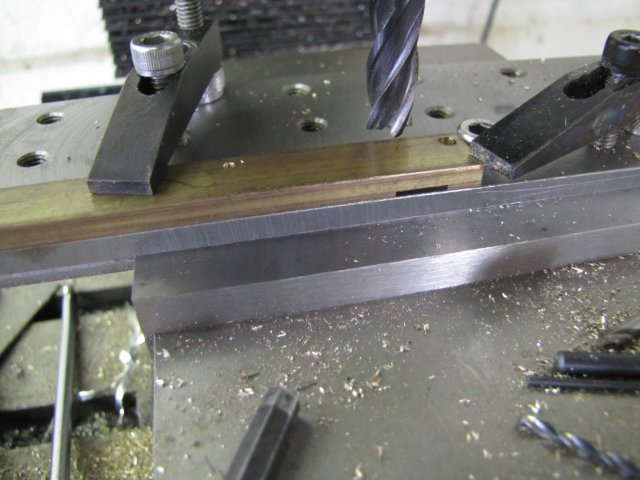
And even more milling - here I've already removed the clamp on the right; that was in place while milling:


A couple of facets milled off around the edges:


And a short while later after some filing and emery, I ended up with the connecting rod done:

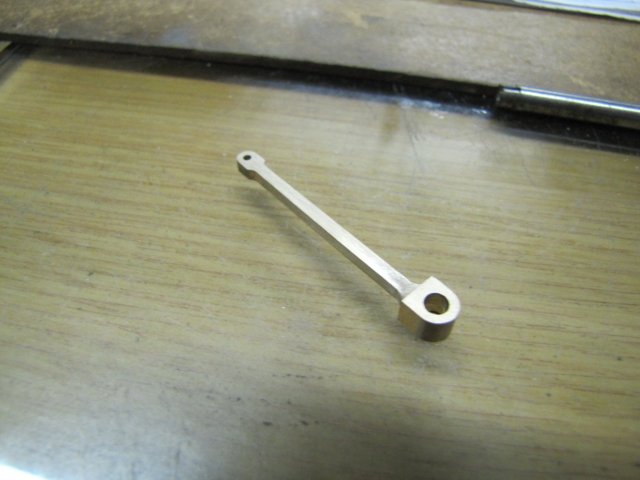
This was a quick job; took me just three hours to make, including a couple of smoke breaks, a visit to the kitchen for coffee, scratching Zorro's the mutt's head, time spent pondering the machining steps to take, and about 30 minutes actually machining it and 30 more with the files and emery  :lol:

The bits are coming together now - and they even seem to fit   :ddb:


 :beer:, Arnold

Offline saw

  • Hero Member
  • *****
  • Posts: 1003
  • Country: se
  • lucky amateur
    • Svenssons AckordsWerkstad
Re: Back to the shop... Elmer's #43
« Reply #31 on: May 01, 2011, 03:17:26 PM »
Arnold you are enormost fast and still fineworking. The engine realy comes fine.  :clap: :clap:
_________________________
Greetings / Benni
http://myprojecty.wordpress.com/category/steam-engine/

Offline DaveH

  • Hero Member
  • *****
  • Posts: 1413
  • Country: za
  • Kempton Park, South Africa
Re: Back to the shop... Elmer's #43
« Reply #32 on: May 01, 2011, 04:34:03 PM »
Arnold,

Coming along really well, it's going to look really nice. :thumbup: :thumbup: :thumbup:

Just keep away from the braai  :D

 :beer:
DaveH

(Ex Leicester, Thurmaston, Ashby De La Zouch.)

Offline arnoldb

  • Hero Member
  • *****
  • Posts: 515
  • Country: na
  • Windhoek, Namibia
Re: Back to the shop... Elmer's #43
« Reply #33 on: May 02, 2011, 01:20:28 PM »
Thanks Benni  :beer:

Dave, Thanks  :beer: - Now, keeping away from a braai for a Namibian is unthinkable  :palm: - I've had a couple in the last few weeks, fortunately "hands" stayed off the menu  :lol:

A single bit made for today, as well as the first boo-boo of the build.

First I turned some 2mm brazing rod down to 1.6mm for 3/8".  Brazing rod is tough to turn, and when it's this thin, the toolbit must be super sharp and dead on center:

The photo makes the turned piece look taper, but it is actually pretty close to parrallel with the tailstock side only 0.01mm thicker than the headstock side - that's from flexing, but is close enough for this bit.

The piece was extended further from the chuck, and I ran the 2mm die nut over it to add some threads:


Then I made the boo-boo - I cut it off too short after miscalculating the length, and had to re-do it.  The second one didn't come out as well as the first - the die nut caught on the turned-down bit, but I was in no mood to re-make it yet again, so I silver soldered a block of brass to the end, and finished the part.  It operates smoothly in the valve chest, so the light threads on the thin section won't be a problem:


Regards, Arnold

Offline lazylathe

  • Jr. Member
  • **
  • Posts: 54
  • Mastering the art of reducing metal into swarf!
Re: Back to the shop... Elmer's #43
« Reply #34 on: May 02, 2011, 07:36:05 PM »
Looking good Arnold!!!

Better take a break and have a Windhoek!!! :beer:

Andrew

Offline arnoldb

  • Hero Member
  • *****
  • Posts: 515
  • Country: na
  • Windhoek, Namibia
Re: Back to the shop... Elmer's #43
« Reply #35 on: May 03, 2011, 03:16:44 PM »
Thanks Andrew  :beer: - Oh - I take a break every evening to have a Windhoek  :ddb: - though it's now getting to that time of the year where the normal Windhoek Lager gets replaced with an Urbock  :D - Just gotta love the Namibian Breweries; both summer and winter beers of top quality :)

Today I started off on the valve - but before I started, I fashioned up a Rube Goldberg style air supply from the compressor.  There was lots of small milling going to go on, and I didn't buy the new compressor for nothing!  A block of bronze (the plans call for brass, but bronze would be just dandy) - and I started milling it to size; no mark-out or anything; this was going to be done by the mill dials only:


The 6mm end mill I used to trim the block down is definitely in need of replacement  :lol: - it left a lot of steps on the sides.  I used a 2mm end mill to mill the central slot, and the "other side" of the valve; the air flow was set to go over the workpiece, and this pulled the chips right out of the slots while milling:


After milling the cross-slot, I used a slitting saw to slice off the valve from the parent stock:


After a quick de-burr, I flipped the valve over and milled the port face with a 1.5mm slot mill; this is where the air supply really came into it's own.  Not much pressure; just 10 psi, but it cleared the chips out of that hole making it a breeze to finish:


After some quick flat-lapping with 800 emery on the glass plate:


And cleaning up on the sides, and ends, the valve was finished:


Then I started on the valve nut - once again no mark-out and just using the mill dials to size it on 3 sides and drill the tapping hole:


Tapped it M2 with my bad-looking handle and tap guide; Elmer specifies the tapping here as "Close", so instead of tapping all the way through with the last tap in the set, I stopped it when I felt it just starting offering less resistance to tapping torque before going all the way through:


Just for exercise, I used the junior hacksaw to saw off the nut:

And then filed it down to size on the sawn-off side.

After a light rub-down on emery, the nut came out to satisfaction:


The valve and nut fits just dandy in the steam chest, with about 0.1mm of free play on the valve to the nut   :ddb::


Then I turned up two crank screws from some 5mm hex brass rod:

To my horror, I just noticed some burrs left on them   :palm:

Things are finally getting to a point now; I laid out all the bits to check what's still missing:


The to-do list - surprisingly long still!!!
1. Obviously, the flywheel - I hope to get cracking on that tomorrow.
2. There's a couple of parts that still need cleanup to remove burrs and toolmarks.  The column actually still needs quite a bit of work now that I look at it.
3. The cylinder block needs to be tapped M2 in 12 mounting holes - Yes, I'll be doing studs 'n nuts again, and I can't do the studs before a final cleanup of the block.
4. Make said nuts from brass/bronze...  there's a lot of tapping and filing work in my future   :lol:  Fortunately I have quite a bit of M2 threaded bronze rod left.
5. A lick of paint - yes, this time some parts will get painted!
6. A final once-over with a buff on some parts and a bit of polymer car polish on those.
7. Wooden base - and all the work associated with that  ::)
8. Final assembly - hopefully it will run   :coffee:

Regards, Arnold

Rob.Wilson

  • Guest
Re: Back to the shop... Elmer's #43
« Reply #36 on: May 03, 2011, 04:25:26 PM »
Hi Arnold


Looks like you will have a runner soon at the rate your going ,, :clap: :clap: :clap: :clap: :clap:  nice going mate  :thumbup:


Rob

Offline saw

  • Hero Member
  • *****
  • Posts: 1003
  • Country: se
  • lucky amateur
    • Svenssons AckordsWerkstad
Re: Back to the shop... Elmer's #43
« Reply #37 on: May 03, 2011, 04:27:57 PM »
It's unfair, it goes to easy for you  :(
You wrote that you are going to use car polish, for what?? Will the part got more "bling"?
Nice built Arnold  :bugeye:
_________________________
Greetings / Benni
http://myprojecty.wordpress.com/category/steam-engine/

Offline DaveH

  • Hero Member
  • *****
  • Posts: 1413
  • Country: za
  • Kempton Park, South Africa
Re: Back to the shop... Elmer's #43
« Reply #38 on: May 04, 2011, 07:47:04 AM »
Looking good,  :D

At the speed you are going at will be soon up and running :D

Can't wait :thumbup:

 :beer:
DaveH
(Ex Leicester, Thurmaston, Ashby De La Zouch.)

Offline arnoldb

  • Hero Member
  • *****
  • Posts: 515
  • Country: na
  • Windhoek, Namibia
Re: Back to the shop... Elmer's #43
« Reply #39 on: May 04, 2011, 03:51:21 PM »
Rob, thanks mate  :beer: - it needs to get done now; my leave is nearly over and I want to get "cracking" on another project that has some gear - and boiler making involved :D  Oh, and I need to build a bridge as well  :lol:

Thanks Benni  :beer: - I promise you that even though it looks easy it's still a lot of hard work - more than 60 hours on this project, with only about a fifth of it machining, the rest just thinking through things, setting up, checking and double checking measurements and calculations and so on.  But it's a LOT of FUN  :D
The car polish I'll use on all the bits I want to keep shiny in the case of polished bits, and to prevent oxidisation (or "patina" as it's sometimes called) on bits with a brushed finish.  Just makes maintaining the models easier, as my collection is growing and I like them to look good - even if my first ones were not the best of examples.  The polish also helps to prevent rust on the steel and iron bits; I encourage visitors to handle the models, and there's nothing like sweaty fingerprints to make bits rust.

Thanks Dave  :beer: - I hope to have it running by the weekend.

Today the flywheel received attention...

I started off with a bit of 55mm cast iron I had lying about; slightly too large and a lot will be wasted, but that's what I had on hand:


My chuck's inside jaws can't open up large enough to safely hold it, so I had to use the outside jaws.  With the stock on the short side, I had to figure out a way to get in there to turn it, and also checked for adequate clearances all round so that I wouldn't run anything into the chuck jaws:


Turned down to size; not the greatest finish, as I used the toolbit shown in the previous photo "for the wrong job"   :loco: :


The normal toolbit I have for trepanning out flywheels was a bit big for this one, so I had to grind up a new narrower one.  Turned out OK, but I had a tiny bit of chatter in the rounded corners:


Then I just center drilled, drilled and reamed the flywheel to fit the crankshaft:


Then I flipped the flywheel in the chuck and cleaned down the other side and trepanned it.  I spent some time thinking about milling spokes in the flywheel, but decided against it, and just went for drilled holes.  To be a bit "otherwise" I went for seven instead of the traditional six - that meant calculating the odd angles and practising dialling those in on the rotary table:

I couldn't drill the holes all the way through, for fear of running into the chuck jaws, so I drilled them till I could just feel the drill bit want to run through.

Then finished the holes on the drill press with the cross-vise.  The drill press is much less rigid than the mill, so the drill bit follows the pre-drilled holes easier and hence much neater:


As a final step, I drilled and tapped a hole at an angle in the hub to take an M3 grub screw.  Elmer's plans show the grub screw through the outer rim, but I don't like that too much, hence the digression from the plans.  That completed machining on the flywheel:


 :beer:, Arnold

Offline saw

  • Hero Member
  • *****
  • Posts: 1003
  • Country: se
  • lucky amateur
    • Svenssons AckordsWerkstad
Re: Back to the shop... Elmer's #43
« Reply #40 on: May 04, 2011, 04:53:40 PM »
Thanks for explaning the car polish I will use it on my new project. :D
Very nice flyweel. :clap:
_________________________
Greetings / Benni
http://myprojecty.wordpress.com/category/steam-engine/

Offline DaveH

  • Hero Member
  • *****
  • Posts: 1413
  • Country: za
  • Kempton Park, South Africa
Re: Back to the shop... Elmer's #43
« Reply #41 on: May 05, 2011, 02:02:16 PM »
ooow   360 divided by 7    mmmm thats tricky :)
I would need my slide rule for that
looks good though :thumbup:


DaveH
(Ex Leicester, Thurmaston, Ashby De La Zouch.)

Offline arnoldb

  • Hero Member
  • *****
  • Posts: 515
  • Country: na
  • Windhoek, Namibia
Re: Back to the shop... Elmer's #43
« Reply #42 on: May 05, 2011, 05:58:19 PM »
Thanks Benni  :beer:

Cheers Dave !   :lol: Maybe I should have used logarithmic spacing to throw off he slide rule a bit... 

The last bits are always the hardest - and time consuming!

I gave the cylinder block the once-over with the set of M2 taps - which fortunately turned out well, then a final rub-down on emery in all the needed areas to get the finish I wanted and then started to add the studding - with a bit of thread retainer on each stud, and some stainless steel nuts to unscrew off the studs once cut to "clean" the threads:


While waiting for that lot to set a bit, I started making nuts.  The nuts in the previous photo are normal M2 stainless steel nuts, and while I could use those, they don't have pleasing proportions (at least to my taste).  So I went about the business of filing a bit of hex on some 3.2mm brazing rod, center drilling, drilling it 1.6mm and tapping it M2, and then parting off 2 nuts at a time with the jig-saw-blade parting tool. :

As usual, some nuts went flying while parting off, so the shop monster ended up with a selection of small nuts called "Dammit", "Sheisse" and so on - I hope he enjoys their company   :lol:  A simple process followed; make a couple of nuts, clip off studding on the block and add more to it and so on.

I eventually ended with a selection of nuts - four thicker ones for the cylinder cover, and eight thinner ones for the cylinder head - with an extra one that was christened "Lucky" - all still needing some de-burring:


As I started putting bits together, something became obvious... Steam or air would run through the valve chest, push down the valve and go through the port faces and so on - except for ? - Where the heck would it come from  :scratch:  I'd not make a steam connector!  And even worse, I never even made the hole in the valve chest to fit it to   :lol:  That was easily remedied with a quick bit of turning:


And a bit of drilling and tapping:


Now things are coming together:


Still quite a bit left to do though...  Like watching paint dry...  Again...  :doh: :lol:

Regards, Arnold

Offline saw

  • Hero Member
  • *****
  • Posts: 1003
  • Country: se
  • lucky amateur
    • Svenssons AckordsWerkstad
Re: Back to the shop... Elmer's #43
« Reply #43 on: May 05, 2011, 06:05:34 PM »
Good work looking very nice :clap: :clap:
_________________________
Greetings / Benni
http://myprojecty.wordpress.com/category/steam-engine/

Offline andyf

  • In Memoriam
  • Hero Member
  • *****
  • Posts: 1795
  • Country: gb
    • The Warco WM180 Lathe - Modifications
Re: Back to the shop... Elmer's #43
« Reply #44 on: May 05, 2011, 07:01:22 PM »
Quote
Arnold said: As usual, some nuts went flying while parting off, so the shop monster ended up with a selection of small nuts called "Dammit", "Sheisse" and so on - I hope he enjoys their company   

Grab a bit of thin (say 1mm) wire in the tailstock chuck, and stick it down the tapped hole in your hex stock. Then, each nut you part off will be left hanging on the wire.

Andy
Sale, Cheshire
I've cut the end off it twice, but it's still too short

Offline madjackghengis

  • Hero Member
  • *****
  • Posts: 717
  • big engine
Re: Back to the shop... Elmer's #43
« Reply #45 on: May 06, 2011, 11:31:09 AM »
Well Arnold, I got a bit behind on keeping up with this build, but on catching up, I see you're doing a very fine job of it, and it is looking very interesting, I expect it will be a real fine runner when she's done.  Saw, you work on what you know, you watch those you admire, and learn from their mistakes, and at some point, you look behind and find you're the one doing the neat and intricate work with followers getting comments.  I've been doing this sort of work for more than forty years, and I learn something almost every time I log on to mad modder, and watch someone do something I've never done before.  I say again, one of the things I enjoy the most about this site is the wide variety of places we all come from, and share our hobby and fascination with.  It is a real treat to watch one man building an engine in England, and then flip to another modeller building a completely different engine in Nambia, and each admiring each other's work and product.  As Benjamin Franklin said, "beer is proof that God loves us and wants us to be happy", note we all equate rasing a glass as the proper sign of success.   :beer:  Cheers all, and may God smile down upon your labors.  Jack

Offline arnoldb

  • Hero Member
  • *****
  • Posts: 515
  • Country: na
  • Windhoek, Namibia
Re: Back to the shop... Elmer's #43
« Reply #46 on: May 06, 2011, 03:04:58 PM »
Thank you Benni  :thumbup:

 :beer: Cheers Andy; normally I would use the bit of rod trick, but while making these nuts, it adds an extra step; in effect two tool changes; one to load the rod in the chuck, and the other to immediately load the tap again to clean up the threads in the remaining bit in the chuck after parting off.  It's a bit of a "swings and roundabouts" thing; takes time either way  :lol:

Thanks Jack  :beer: - those are some serious words of wisdom :bow:

I've been playing around with paint rattle cans in between for the last couple of days.  This was the lion's share of my learning experience on this build.  I planned to add a wooden base to the engine, but completely forgot to make mounting holes in the base for that, and only after I got a half-decent paint finish on it realised that, so for now the engine will remain without it.  I'll make the wood bit later; once the paint has cured well enough so that I can modify the engine base.

The flywheel and base went OK with the painting, but the column gave me hell; I ended up stripping and re-doing it three times...  It's still not quite up to what I'd like, but I just couldn't bring myself to do it another time :palm:  For the next paint jobs, I'll invest in better paint and get my airbrush up and running; the rattle cans just does not do it for me.  Also, I wanted a slightly lighter shade of blue; this one is bordering on black.

So for now, the engine is done  :ddb: :


A video of it running; this was just after I got it going, so things were a bit stiff; here running at about 7 psi for the most part.  Please excuse the dang dirty paws, painted fingernail and oil dripped everywhere on the engine  :coffee:


After about 10 minutes of running, it settled in nicely, and I could bring down the pressure to about 3 psi:


Thank you to all who followed along and all the nice comments and valuable input  :nrocks:.

Kind regards, Arnold
Darn - it's good to be back in the shop   :ddb:

Offline DaveH

  • Hero Member
  • *****
  • Posts: 1413
  • Country: za
  • Kempton Park, South Africa
Re: Back to the shop... Elmer's #43
« Reply #47 on: May 06, 2011, 03:05:14 PM »
Jack,

Anybody can build an engine in England :D

Building one in Africa is a real challenge :lol:

DaveH
(Ex Leicester, Thurmaston, Ashby De La Zouch.)

Offline DaveH

  • Hero Member
  • *****
  • Posts: 1413
  • Country: za
  • Kempton Park, South Africa
Re: Back to the shop... Elmer's #43
« Reply #48 on: May 06, 2011, 03:12:06 PM »
Arnold,

A supersonic post, build and finished engine :thumbup: :thumbup: :thumbup:

Runs great, luv the perspex cover :D I will have to remember that.

 :beer:

Dave
(Ex Leicester, Thurmaston, Ashby De La Zouch.)

Offline saw

  • Hero Member
  • *****
  • Posts: 1003
  • Country: se
  • lucky amateur
    • Svenssons AckordsWerkstad
Re: Back to the shop... Elmer's #43
« Reply #49 on: May 06, 2011, 03:46:36 PM »
Arnold my biggist congratulations. You have show how to build a fine engine and done it the only way, the right way.  :thumbup:
It's a plesure for me to be in this club and see birth of this wunderfull engine.
 :clap: :clap: :clap: :clap: :clap:
_________________________
Greetings / Benni
http://myprojecty.wordpress.com/category/steam-engine/