Author Topic: My First Stirling Engine  (Read 9425 times)

Offline NickG

  • Madmodder Committee
  • Hero Member
  • *****
  • Posts: 1890
My First Stirling Engine
« on: February 02, 2009, 05:35:03 PM »
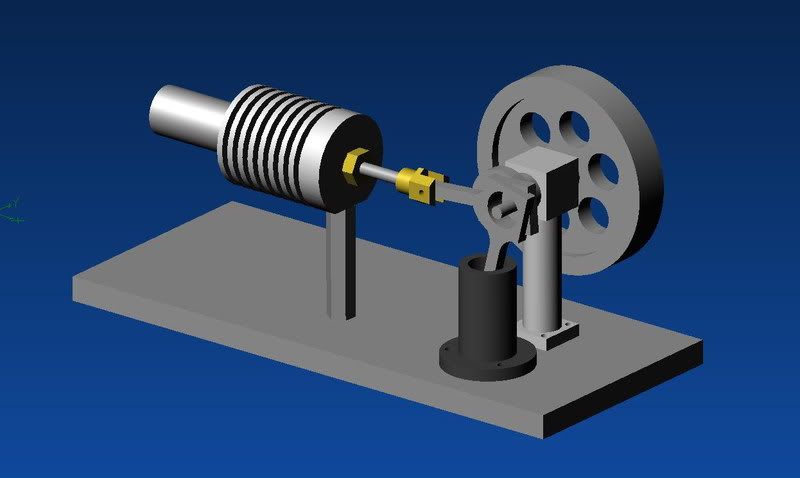
It was January 2008 before I got back out into the garage again, but I had been studying stirling engines on the internet for the best part of a year. First I got a hold on the theory, then set about working out a simple configuration, again using bits of off cuts I have in the garage. Since it had worked fairly well on the oscillating engine, I used the 3D CAD to aid the design again...

I chose this configuration so that I would only need 1 crank, identical con rods and I thought i'd be cunning and hide the transfer passage under the base!


At first, I couldn't get the engine to work, depite thinking I knew the theory, for some reason, I hadn't followed some of the design rules I knew I should! The ratio of swept volumes was much too small, I'd got carried away trying to use what I had and forgotten what parameters were needed to make the thing run!  :bang:  :doh:


So I modified the design slightly, doubling the ratio of swept volumes between displacement cylinder and power cylinder. Now the engine was trying to work, it would run with ice cubes on the displacer cylinder, so I assumed my problem was insufficient cooling and promptly built a water jacket that hadn't been planned for ... this proved difficult as the displacer cylinder was aluminium, it was a bodge, because the jacket had to be araldited in place, but it turned out alright. When testing with the water jacket however, the engine would not run, and after a bit of dialogue with Jan Ridders, it became apparant that the problem was only partly down to cooling, but the main issue was leakage. Jan said forget about cooling, take it out of the equation, if the engine is ever going to run, it should run from time zero. I.e. when the flame is first applied will pretty much be its best chance. That sounds obvious now, and when submerging the displacer assembly in water and pressurising (with a tube and my lungs) a big leak around the hot cap interface was revealed. This was sealed up with PTFE tape and instantly the engine felt different, I could feel a little springiness when turning the flywheel over!

http://smg.photobucket.com/albums/v287/NickG24/My%20Stirling%20Engine/?action=view&current=2008-07-2823-26-24_0008.jpg


This now looked promising and to my delight, the engine would now run for about 8 mins on the tiny spirit burner when the water jacket was filled with cold water. And the limiting factor was the amount of fuel it could hold, not the lack of cooling. At this stage I was using an old nylon shoelace as a wick, when I got some proper cotton wick, the performance improved 3 fold, it had previously run very slowly, now it was flying over! This all makes me wonder whether the water jacket was necessary now, I have not tried it without though!


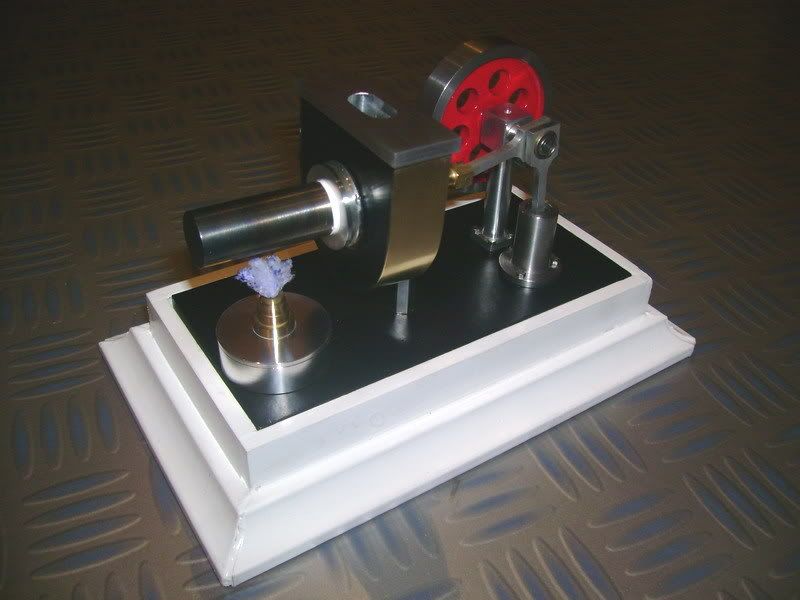
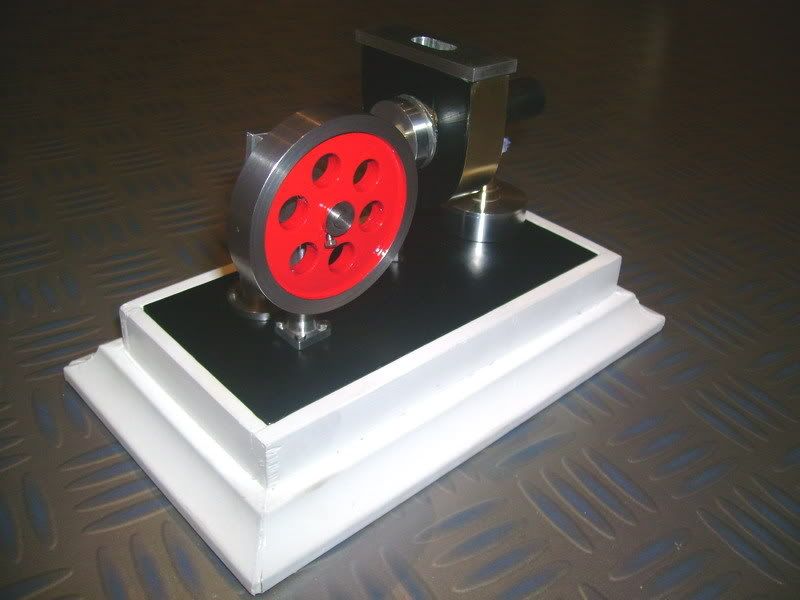
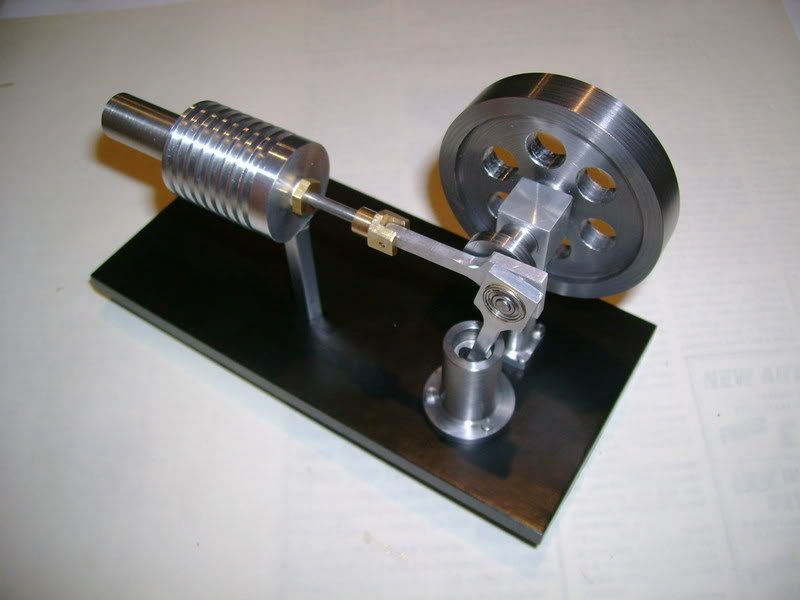
This engine was again mainly built using my old machines, and some machines at our club workshop. However, when I got my new lathe, I took a finishing cut off everything with the new one which improved the surface finish and looks dramatically!

I was very pleased with this project, although I didn't finish it until August 2008 when I was on Paternity leave after my wife having our second son! It was a massive step up from doing oscillating engines and very satisfying to get the engine to run, and run well. It also taught me many new techniques that I hadn't previously used, such as screw cutting, the crank shaft / disc / pin was turned from 1 solid piece, as well as many milling operations.

Nick

Location: County Durham (North East England)

Offline NickG

  • Madmodder Committee
  • Hero Member
  • *****
  • Posts: 1890
Re: My First Stirling Engine
« Reply #1 on: February 02, 2009, 05:40:39 PM »
ps. I never was any good at woodwork. I milled the inner bit of the base on my centec 2a horizontal mill with lapped joints, but because it was soft wood, it split. Then I decided to mitre some laminate floor edging strip and put that around to make it look more fancy but as you can see it went terribly wrong! The bases I make never seem to do the engine justice!

Nick
Location: County Durham (North East England)

Offline Brass_Machine

  • Administrator
  • Hero Member
  • *****
  • Posts: 5504
  • Country: us
Re: My First Stirling Engine
« Reply #2 on: February 02, 2009, 05:45:27 PM »
Again, Very nice. I still have yet to tackle a sterling engine. I plan too soon though!

Eric
Science is fun.

We're all mad here. I'm mad. You're mad.

Offline NickG

  • Madmodder Committee
  • Hero Member
  • *****
  • Posts: 1890
Re: My First Stirling Engine
« Reply #3 on: February 02, 2009, 05:57:35 PM »
It was without a doubt the most satisfying thing I've made! I still watch in amasement if I run it now! I think it's because it's virtually silent!
Location: County Durham (North East England)

Offline sbwhart

  • Global Moderator
  • Hero Member
  • *****
  • Posts: 3530
  • Country: gb
  • Smile, Be Happy, Have Fun and Rock Until you Drop
Re: My First Stirling Engine
« Reply #4 on: February 03, 2009, 07:26:42 AM »
Nice one Nick

Impressed with going from first principles and problem solving   :clap: the:- old RO guys would be proud of you.

Cheers

Stew :wave:
A little bit of clearance never got in the road
 :wave:

Location:- Crewe Cheshire

Offline NickG

  • Madmodder Committee
  • Hero Member
  • *****
  • Posts: 1890
Re: My First Stirling Engine
« Reply #5 on: February 03, 2009, 11:04:00 AM »
Cheers guys,

Yeah, I could have ordered one of the may kits but I thought it'd be nice to come up with my own design to suit the materials I had! Then it wouldn't matter when I mess things up either! I'm still not confident enoough to start chewing into expensive castings, the only success I've had with castings are the pony wheels and hand pump I made for sweet pea (that is all I have done!!)

Nick
Location: County Durham (North East England)

Offline sbwhart

  • Global Moderator
  • Hero Member
  • *****
  • Posts: 3530
  • Country: gb
  • Smile, Be Happy, Have Fun and Rock Until you Drop
Re: My First Stirling Engine
« Reply #6 on: February 03, 2009, 11:14:17 AM »
Hi Nick

I'm slowly becomming anti casting. (should that be uncle casting  :hammer:)  quality of casting on the market are not too good. I built a beam engine from a casting set and had to get some of them changed, and with my loco build I've had to change change some castings, quite often you don't know you've a problem until you've spent time maching it.

If I can avoid using a casting in future I will do.

Cheers
 :wave:
Stew
A little bit of clearance never got in the road
 :wave:

Location:- Crewe Cheshire

Offline NickG

  • Madmodder Committee
  • Hero Member
  • *****
  • Posts: 1890
Re: My First Stirling Engine
« Reply #7 on: February 04, 2009, 04:08:47 AM »
Stew,

That's a good point, I don't like machining them either, nothing is definite, the lack of datums etc means it takes a lot of work to get it right. As you say, quality is another issue, someone in our club has had the same experience as you. He was building a twin cylinder I.C engine and the head castings were rubbish. One was porus and the other he couldn't get the correct dimensions out of it. They changed them twice and they were still no good, he ended up making it from the solid and it looks better anyway!

That's another reason I'm not looking forward to sweet pea! There looks an awful lot of metal to take off those castings!

Cheers,

Nick
Location: County Durham (North East England)

Offline SPiN Racing

  • Madmodder Committee
  • Hero Member
  • *****
  • Posts: 506
Re: My First Stirling Engine
« Reply #8 on: February 05, 2009, 09:11:33 PM »
Really nice looking engine, and congrats on solving all the little issues preventing her from running right!
SPiN Racing