Author Topic: Harrison L5 rescue  (Read 132737 times)

Offline Ned Ludd

  • Full Member
  • ***
  • Posts: 207
Re: Harrison L5 rescue
« Reply #25 on: July 10, 2012, 11:44:00 AM »
Hi Mick,
If you have proper 3Ph wired to your workshop, then that is the way to go. If, however, you are using a converter to power  say a mill, with power feeds, suds pump etc, then a converter is a problem, unless it is a rotary one, because of the risk of burning out the smaller motors if the main motor is off. You can obviously wire up the smaller ones to only come on when the main is running, but this can be a hassle.
Faced with this situation I would be tempted to VFD the main motor, but run the smaller ones, which don't necessarily need infinite speed control, from a converter. I know this means two power feeds but could be the best of both worlds.
Ned
PS I am jealous of your machines but most all jealous of the space you must have to fit them all in. :D
Anybody know tonight's lottery winning numbers? :lol:
I know enough to do what I do, but the more I know the more I can do!

Leafy suburbs of NW London

Offline micktoon

  • Hero Member
  • *****
  • Posts: 797
  • Country: gb
Re: Harrison L5 rescue
« Reply #26 on: July 10, 2012, 05:54:06 PM »
 Evening all , I have got that jig block done and been stripping the lathe more , here is a photo of the jig and the original one I copied, not that its up to much compared to most things on the forum but will do the job fine.


 I have spent more time moving things so the Harrison was in the middle of some floor space to get all around it, its now in spot I can get to everything and see what I am doing. I am reaching a stage where I will have to decide how far to go with stripping back.......... Ummm its a tricky one as on the one hand I want to just keep dismantling and do a ground up job, like I would if it was a car but I dont really know enough about lathes to know if I am going too far and will be no better off for it nad setting up things on reassembley. I have already forund out the causes of a few niggles , half the noise is the motor as thats rumbling , it looks like 1939 date on it if thats possible ? and also only 3/4 horse power I am swapping that anyway for 1.5Hp three phase with inverter. The clutch is also rattling and the brass pins are loose in the plates. The power feed engage lever used to drop out and that was crap previous repair, a small plate the lever is meant to latch over but it was just catching the edge of it. Here are a couple of photos anyway.


I had fitted the suds tank when I got the lathe, I think I will remount it on the tailstock end of the lathe this time so I can get to it.


The headstock all looks ok except for the usual mushrooming of the edges of cogs where the kids have tried changing speeds when running, the saddle was the same , I diamond filed all the burrs on them gears and they mesh smooth now. The headstock gears need this too but will mean the whole lot coming out to do it  :bugeye: would I be  :loco: to do that of daft not to ?


You can see gears better on this shot they are fine once selected but the burrs make selecting harder than it should be.


The tailstock is rough inside , I bought a 3MT reamer but it would not touch it , anyone know the best way of going about cleaning it up ?

Thats it for tonight , the post has taken ages as I got a bit tangled up in the photo department  :palm: so have been on hours sorting out what is what. Ned I dont think I could get three phase here as it stops quite a distance from the house and its overhead cables, not to mention the cost, so its inverters and single phase  :doh:
  Cheers Mick.

Offline AdeV

  • Madmodder Committee
  • Hero Member
  • *****
  • Posts: 2434
  • Country: gb
Re: Harrison L5 rescue
« Reply #27 on: July 10, 2012, 06:05:47 PM »
You've presumably already read the lathes.co.uk entry on the L5, so I'm guessing you already know that the lathe and cabinet have a very carefully set up relationship that is best left undisturbed.... Other than that, I'd say a lathe is easy compared to a car.

So long as you remember what cog goes where, and how all the springs fit together, it's a doddle  :lol:
Cheers!
Ade.
--
Location: Wallasey, Merseyside. A long way from anywhere.
Occasionally: Zhengzhou, China. An even longer way from anywhere...

Offline micktoon

  • Hero Member
  • *****
  • Posts: 797
  • Country: gb
Re: Harrison L5 rescue
« Reply #28 on: July 10, 2012, 07:05:16 PM »
  Aye cheers Ade, I would definitely remember when I took it apart but then be thinking ....Ummm :scratch: was that this way ....or this way  when it came to putting it back together :palm: I had read the lathes uk pages and would not take the headstock from the bed or bed from the cabinet , its more should I strip the lot out,  gears , spindle, norton box, lead screw saddle etc and inspect , repair anything that looks suspect then paint then re assemble so I know its right or just leave it unless its definitely broken, I am more worried about tollerences and alignment side of things and the fact that if anything breaks taking it apart it will probably have to be made.
  Hopefully there might be some forum members with previous experience, it seemed a bit noisy before but the motor is really noisy and the clutch rattles as the brass pins are loose in the plates, i will trial fit the new motor and try to fix the clutch and see if it seems smooth and quiet then.
  Cheers Mick.

Rob.Wilson

  • Guest
Re: Harrison L5 rescue
« Reply #29 on: July 11, 2012, 11:43:42 AM »
Hi Mick

Do have a tapper turning attachment ?  you could re-turn the tapper in the  tail stock  barrel  :dremel:

Lets see a photo of your other lathe  :poke: 

Rob

Offline micktoon

  • Hero Member
  • *****
  • Posts: 797
  • Country: gb
Re: Harrison L5 rescue
« Reply #30 on: July 11, 2012, 02:19:18 PM »
Hi Rob , I will take photo of the Binns and Berry lathe tomorrow and post, I dont have taper attachment, thats something else I would like for the Harrison to be honest. I am not home tonight but have managed to get to the photos I uploaded yesterday so will put a couple on. 


 This is the alloy chip guard cover for the crossslide screw, I have attached a steel plate with countersunk screws so you can place magnetic dial guage or suds base to it as there is not much flat space on the lathe before I did this.


This is the top of the crossslide before a clean up


This is it after, the top surfaces that had been abused , no doubt by kids when it was a school lathe dont act as a bearing surface so I draw filed them till they looked decent and made a small stainless steel plate to replace the battered up thing that used to catch as you passed over it.

 Mick.

Rob.Wilson

  • Guest
Re: Harrison L5 rescue
« Reply #31 on: July 12, 2012, 01:54:35 PM »
Evening all , I have got that jig block done and been stripping the lathe more , here is a photo of the jig and the original one I copied, not that its up to much compared to most things on the forum but will do the job fine.


  Cheers Mick.

Apart from the anodizing Mick i can see no difference , looks great  :clap: :clap: :clap: I take it it if for dressing the wheels on a bench grinder  ? being angle so that the point can be rotated to a fresh edge ?


Rob

Offline micktoon

  • Hero Member
  • *****
  • Posts: 797
  • Country: gb
Re: Harrison L5 rescue
« Reply #32 on: July 12, 2012, 02:28:58 PM »
 Aye you got it spot on Rob, such a simple idea but it works really well, that recess cut out on the bottom just has to about the right size for your grinder rest. I have got more stripped off the lathe today so will take a couple of photos as I clear up and post later on .
  Cheers Mick.

Offline micktoon

  • Hero Member
  • *****
  • Posts: 797
  • Country: gb
Re: Harrison L5 rescue
« Reply #33 on: July 12, 2012, 06:11:08 PM »
 Todays progress , not much done really just scraped lots of old grease /oil off , took a few more bits of and started to work out what needs done to get the new motor fitted. Here are photos of the Binns & Berry 7 1/2 inch centre height, 36 inch between centres 1959 lathe for Rob and anyone else interested, this had clean up and paint years ago now  :thumbup:


 This is the Harrsion after todays stripping session.


Hope to get the new motor on tomorrow for a trial run  :D
  Mick

Offline Jonny

  • Hero Member
  • *****
  • Posts: 780
Re: Harrison L5 rescue
« Reply #34 on: July 13, 2012, 08:48:54 AM »
They dont make them like they used to and these machines were about three times dearer than Colchester at the time.
In many ways they are better than an M300, wider cross and top slide, greater cross travel i really miss, not forgetting that superb clutch.

Looks very little change to the newer 11" and later 140 i scrapped last year.
Main difference is the L00 taper, 140 had squarer head stock, 1000 rpm, metric in 1965 thats about it.

Your current motor is physically a bit small, they are massive around 18" diameter with jacking feet.

Shame junked a full set of change wheels, faceplate, 11" 4 jaw chuck, 6 1/4" 3 jaw, specialist C spanners, peg spanners, coolant, etc wanted it out the way. Now lives up County Durham some where.

Normal for 3ph on the 11" is a 2hp motor, its a 1 1/2hp on the rare single phase i had.

Better option rather than faff about with VFD is to lash out on an inverter that will run the Bridgy, Binns & Berry and anything else 3ph in the shop, all at same time if need be.

Lead screw bronze nut should have a slot in it. Two cap head screws pulling or pushing apart to take up the play. Both look original though.

Mick has it the typical Harrison trait of a clutch that rattles. For those that dont know its like a car clutch with proper friction disc, its this you can hear.
ATF in the head stock upon refit.

Offline NickG

  • Madmodder Committee
  • Hero Member
  • *****
  • Posts: 1890
Re: Harrison L5 rescue
« Reply #35 on: July 13, 2012, 11:29:21 AM »
Hi Mick, nice work on the L5 .. I have the same lathe and have found it to be superb! Mine doesn't have the gap bed and a has a different topslide with a crappy single tool post unfortunately!

The 4 jaw chuck is unfortunately too big for the stuff I do too, tried selling at one time - probably worth a bit to the right person but too much to post!

Nick

PS, my clutch rattles!
Location: County Durham (North East England)

Rob.Wilson

  • Guest
Re: Harrison L5 rescue
« Reply #36 on: July 13, 2012, 01:23:12 PM »
Cheers for posting the Binns and Berry Mick :thumbup:

It looks a good solid bit of kit  :dremel:


Rob

Offline airstream

  • Jr. Member
  • **
  • Posts: 14
Re: Harrison L5 rescue
« Reply #37 on: July 13, 2012, 02:25:27 PM »
They dont make them like they used to and these machines were about three times dearer than Colchester at the time.
In many ways they are better than an M300, wider cross and top slide, greater cross travel i really miss, not forgetting that superb clutch.

Looks very little change to the newer 11" and later 140 i scrapped last year.
Main difference is the L00 taper, 140 had squarer head stock, 1000 rpm, metric in 1965 thats about it.

Your current motor is physically a bit small, they are massive around 18" diameter with jacking feet.

Shame junked a full set of change wheels, faceplate, 11" 4 jaw chuck, 6 1/4" 3 jaw, specialist C spanners, peg spanners, coolant, etc wanted it out the way. Now lives up County Durham some where.

Normal for 3ph on the 11" is a 2hp motor, its a 1 1/2hp on the rare single phase i had.

Better option rather than faff about with VFD is to lash out on an inverter that will run the Bridgy, Binns & Berry and anything else 3ph in the shop, all at same time if need be.

Lead screw bronze nut should have a slot in it. Two cap head screws pulling or pushing apart to take up the play. Both look original though.

Mick has it the typical Harrison trait of a clutch that rattles. For those that dont know its like a car clutch with proper friction disc, its this you can hear.
ATF in the head stock upon refit.


who wanted all those junked changewheels jon :bugeye:

Offline micktoon

  • Hero Member
  • *****
  • Posts: 797
  • Country: gb
Re: Harrison L5 rescue
« Reply #38 on: July 13, 2012, 06:06:43 PM »
 Evening all, Well a proper Friday the 13th day today , nowt went right  :scratch: and it took ages to happen too, plenty distractions along the way mind that dont help. I made four alloy spacer blocks for the motor mounting brackets, the new motor has different spindle center height from the feet so made the spacers the same amount longer as the difference in height so the motor would line up with the hole in the belt housing case. Since I got the Harrison , I have hardly used the Binns and Berry ( hence it looking so clean ) so had to remember what was what with it. It would appear I have been spoilt rotten with a quick change tool post and a camolck type tailstock, as everything seemed more strife to do, anyway got them sorted. The pully then needed bored out as the new shaft is larger, managed to get it spot on true in the three jaw ( by fluke ? ) and taking it really easy as it had key way gently bored it out, then when I still had a bit to go due to back lash and the micrommeter dial sticking took a bigger cut than I wanted off and bored the pully oversize  :palm:  :bang:, so I could sleave it but then the keyway would take up the depth sleave, thicher sleave would be getting too close to bottom of Vees bla bla bla, anyway my mate Dave thinks he might have a pulley that will do the job so will check that before doing anything. I then mounted the motor with my new spacers and its not in the center of the hole in the casing ? :palm: :scratch: , aye the old one must not have been either, I assumed it would have been  ( assume nothing EVER  :lol: ) the old motor position was ok and this one will be too but annoying when i could have just made the spacers the right length with the same work. Still these things happen and its what makes you look closer the next time  :lol:.


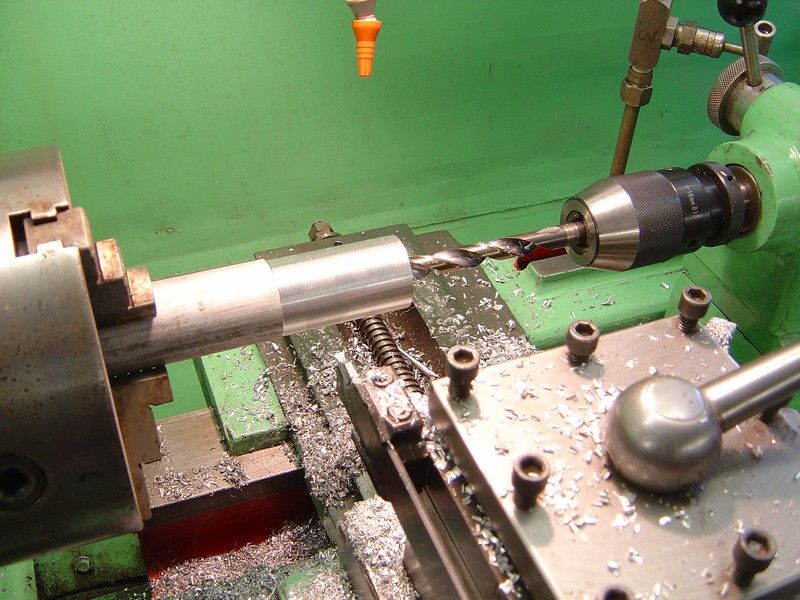
Making spacers sticking out a bit far but wanted two at a time , did it no problem.


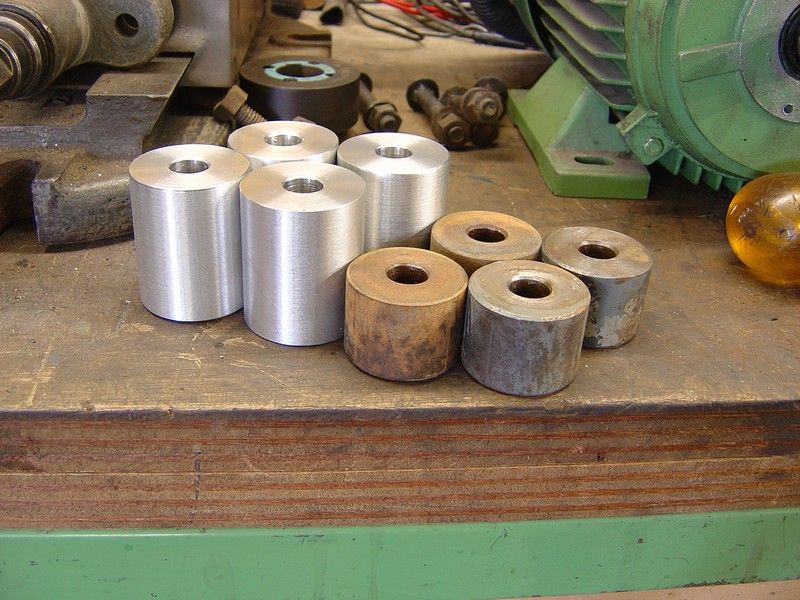
The new spacers beside the old ones, should have been say 25 -30mm longer  :palm:


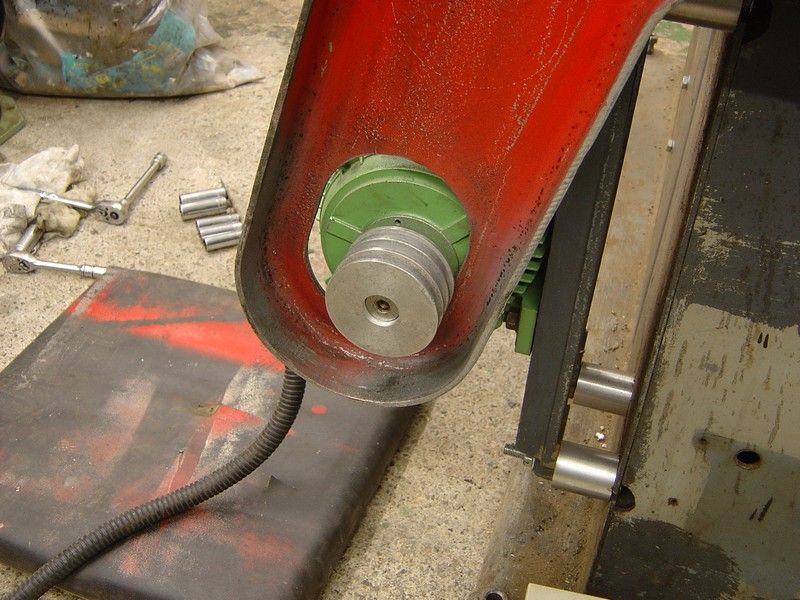
The motor fitted , it can move vertical up and down but should be central side to side  :palm: , the pully is just placed on for show , one gust of wind and it will be away  :lol:

 Cheers Mick.

Offline micktoon

  • Hero Member
  • *****
  • Posts: 797
  • Country: gb
Re: Harrison L5 rescue
« Reply #39 on: July 13, 2012, 06:22:46 PM »
 I did not  mention peoples comments there sorry,
  Jonny , the clutch does not rattle that much but the plates are loose on the pins so either should or will soon, it bites a bit too quick so going to look at it anyway.
I was suprised the Harrisons were that much more than the Colchesters , I had a bantam and it looked as good quality in build etc but no clutch, you are right not much change between the later ones until the 'M' series.
  Nick , as mentioned above the clutch is not too bad at the moment but you can hear it, what spindle does your L5 have ? the Harrisons seemed to change spec all the time. Glad you are impressed with yours, the way I look at it once sorted out this L5 should see me out so worth doing.
  No Problem with the photos Rob , the Binns and Berry is a solid sturdy thing but a bit like tapping a tack in with two handed sledge hammer once you try smallish stuff on it. Those barcket CAD's look good, I look forward to seeing them turn into metal  :thumbup:

 Has anyone else ever seen a similar Binns and Berry ??? , the only one I have ever seen was at the royal armouries in Leeds the Gunsmith in the basement type area has one but the gunsmiths place was closed so never got to speak to him about it. I have looked on the net etc and only huge industrial type stuff is mentioned ?

 Cheers Mick.

Offline AdeV

  • Madmodder Committee
  • Hero Member
  • *****
  • Posts: 2434
  • Country: gb
Re: Harrison L5 rescue
« Reply #40 on: July 13, 2012, 06:47:28 PM »
Nice to see a bit of swarf on that lathe there Mick - nothing worse than a polished and pristine lathe*  :D except when it's new out of the box, of course....  :med:

Regarding the spacers... can't you just turn up a bit more bar to the right lengths? If you want them to positively locate, then I'd suggest thinning down say 1/2 inch of your new spacers by 1/4"; and hollowing out the top of the extension spacer to the same dimension, so the one slides into the other.

Or, probably a bit easier, get some plate/block & make a pair of rectangular/square bar spacers, that go between the motor feet & mounting plate?

As for the pulley, sounds like it's basically scrap now? So why not bore & sleeve it? You could always make a thin taper bush, if you're feeling brave?


* That's my excuse anyway...
Cheers!
Ade.
--
Location: Wallasey, Merseyside. A long way from anywhere.
Occasionally: Zhengzhou, China. An even longer way from anywhere...

Offline micktoon

  • Hero Member
  • *****
  • Posts: 797
  • Country: gb
Re: Harrison L5 rescue
« Reply #41 on: July 13, 2012, 07:12:43 PM »
  Hi Ade, as you say I can extend them spacers or do new ones, there is bar left so just as easy to do new ones as do extension pieces .......... the idea about spacing under motor feet might be the best ( easiest ), I will have to see what bits of metal are lying about..... or I could maybe at a push use the old spacers under the motor as they are about the right height, even easier still   :D , of course I have just sawn the ends off the coach bolts I had  :palm: that would have been the ideal length with the spaces in.
  I think I will give the tapered thin bush a miss mind Ade , if I cant even bore that one out I dont have much chance there  :lol: I will hoope the pully my mate has will fit or I think I could at least make a sleave out of it that would already have the keyway built into it and thus leave enough 'meat' on the old pully to still use it............ Watch this space as they say  :thumbup:
   Just one of them days, hopefully all will fall into place on my next attempt  :)
 Mick.

Offline NickG

  • Madmodder Committee
  • Hero Member
  • *****
  • Posts: 1890
Re: Harrison L5 rescue
« Reply #42 on: July 14, 2012, 07:17:06 AM »
Hi Mick, mine is 1 1/2" x 6 TPI 3MT, what's yours?
Location: County Durham (North East England)

Offline micktoon

  • Hero Member
  • *****
  • Posts: 797
  • Country: gb
Re: Harrison L5 rescue
« Reply #43 on: July 14, 2012, 01:34:03 PM »
  Hi Nick , mine is the bigger bore spindle, its the 2 1/4 6tpi threaded type , its the same through bore through the spindle as the L00 fitment oneone but the internal taper is 4 1/2 morse taper so was hard to find bush/ reducing sleave for it, managed to get on in the end.
  Mick

Offline NickG

  • Madmodder Committee
  • Hero Member
  • *****
  • Posts: 1890
Re: Harrison L5 rescue
« Reply #44 on: July 15, 2012, 04:31:41 AM »
That sounds a lot more useful Mick once you found the bush ... I was surprised at mine for the size of the lathe. The gap bed could come in handy too, I won't be able to swing more than 9" in mine which again, considering it's overall size is quite small capacity. Guess people with ML7's can probably do that in the gap!

Nick
Location: County Durham (North East England)

Offline micktoon

  • Hero Member
  • *****
  • Posts: 797
  • Country: gb
Re: Harrison L5 rescue
« Reply #45 on: July 15, 2012, 05:25:24 AM »
  Hi Nick, I have heard it mentioned by a few people that for the overall size of the lathe it had limited capacity and this is why they in the later models made the spindle larger bore. I think the lack of capacity was probably due to them being a training type lathe for schools ?

 Mick.

Offline NickG

  • Madmodder Committee
  • Hero Member
  • *****
  • Posts: 1890
Re: Harrison L5 rescue
« Reply #46 on: July 15, 2012, 11:07:53 AM »
Yeah probably ... mine only has the low range of speeds too, probably for the same reason but it hasn't bothered me, it still seems to give cracking results.

Nick

Location: County Durham (North East England)

Offline micktoon

  • Hero Member
  • *****
  • Posts: 797
  • Country: gb
Re: Harrison L5 rescue
« Reply #47 on: July 17, 2012, 05:15:52 PM »

 Evening all, Well the new pully fitted and was the same diameter , keyway etc, except for only having two not three vee's so put another vee in it and turned the original motor bracket spacers down and put them under motor feet so its now sitting in the right position ( easiest solution Ade  :clap: ). Tested the inverter and motor it is running fine and much more quiet than before too  :thumbup:


I stripped the change gears off and gave the cover a clean off.


 Took the alloy cover off and removed the clutch, pretty manky behind the cover as you would expect after god knows how many years.


Looking a bit better after a clean off and I can see what is what now.


Next job is to take spindle out and de burr the mushroomed edges on the gear teeth, the only drawing I have is very poor and hard to make out, so not too sure exactly the top and intermediate shafts are retained or what is the best way of getting them out  :scratch:. A friend may have a better Harrison manual with better drawings so will keep my fingers crossed for that to turn up as could save a  :palm: incident.

Mick.

Offline micktoon

  • Hero Member
  • *****
  • Posts: 797
  • Country: gb
Re: Harrison L5 rescue
« Reply #48 on: July 19, 2012, 06:30:18 PM »
 Evening all , not got too much done due to other things getting in the way but have removed spindle and the pile of bits on the bench is getting bigger !


I had thought that the main cone shaped bull wheel gear would have been able to have been removed once the spindle was out , it looks like it would fit through the casing but the lower gear shaft will have to come out too so it can be tilted enough to get out the top of the headstock casing. I should be getting better drawings of what is holding what together tomorrow so have not gone any further up to now.


This is the part that will not fit through the gap. I am busy with other things again tomorrow so will post when more has happend  :D

Mick.

Offline micktoon

  • Hero Member
  • *****
  • Posts: 797
  • Country: gb
Re: Harrison L5 rescue
« Reply #49 on: July 23, 2012, 06:12:54 PM »
More parts have been stripped and the lathe now looks like this


This is most of the internal parts and the apron and Norton box, once the headstock was stripped I thought I might as well go the whole hog and strip the lot bare  :bugeye: :bugeye:


The worst part of stripping the headstock was a taper pin at the clutch end of the top gear shaft had to be knocked through this one here that has ground flush head.


The problem was it knocked almost out but not enough to fall out the shaft and jammed against a rib in the casting making it impossible to rotate the shaft and impossible to knock through any further or get back in :palm: :scratch: so after a bit thinking and trying to wiggle with pliers etc and no access to grind the far end of the pin shorter so it could get knocked through decided I would have to drill the casting to allow an exit hole for the pin


It worked a treat , I then tapped the hole 1/4 BSP


Then fitted taper plug kindly donated by my mate Dave to block the hole


Seems to have got the job done and if the pin did ever have to come out again could be taken back out for access. The only things that seem to need attention so far is the rear spindle bearing sounds a little noisey and a couple of the power feed take off gears look a bit chipped, I am going to clean and inspect everthing better tomorrow.
  Cheers Mick.