Author Topic: Harrison L5 rescue  (Read 132756 times)

Offline trevoratxtal

  • Full Member
  • ***
  • Posts: 183
  • Country: england
  • Torbay, South Devon, England
Re: Harrison L5 rescue
« Reply #50 on: July 26, 2012, 02:06:18 AM »
I have been following you post since you started, I have nothing but praise for what you are doing and the documentation of you progress.
 :lol:
I have a Harrison L5A, I call it Beauty as it is all I ever want in a lathe.
 My wife refers to her as my mistress in the garage.
I fell in love with a L5 in in 1960 and had to wait 45 years before I could own one.
I am now a happy man with two ladies, one does everything I ask and the other very little apart from cook and she must be the worlds best. :beer:.
Light hearted but not quite  :offtopic:

Trev


Offline micktoon

  • Hero Member
  • *****
  • Posts: 797
  • Country: gb
Re: Harrison L5 rescue
« Reply #51 on: July 26, 2012, 10:54:11 AM »
  Hi trev, thanks for the positive comments about the posts and L5 project  :thumbup: I hope your wife does not see your post or you might be doing your own cooking for a day or two ha ha.
  I am wondering would you have waited 45 years for your wife Trev or would I go to all this trouble to strip my wife down and rebuild her  :lol: ........... Ummm, probably questions better to be left unanswered :D

  I have not had a chance to do anymore but plan to get stuck in next week so watch this space

Cheers Mick

Offline trevoratxtal

  • Full Member
  • ***
  • Posts: 183
  • Country: england
  • Torbay, South Devon, England
Re: Harrison L5 rescue
« Reply #52 on: July 26, 2012, 01:19:25 PM »
Love your reply Mick  :D :D :D
And I will follow your progress
Trev

Offline micktoon

  • Hero Member
  • *****
  • Posts: 797
  • Country: gb
Re: Harrison L5 rescue
« Reply #53 on: July 30, 2012, 07:45:24 PM »
  Not been able to get too much done but a little progress. I am trying to get the main cabinet, castings , splash guard etc all cleaned off and do various mods to them before painting. I have drilled and tapped the casing for a bracket for the work lamp and inverter housing, the four bolts in the photo are the new mounting points


  Who says todays young -uns are not keen  these days :lol: , my three neices were here today , I made a rope swing from a tree in the garden with them and plenty on TV but the only thing they wanted to do was muck in and help with the lathe  :thumbup: so many hands make light work ! Grace 9 , Lily 6 ( & a half ) and Sadie 4 all getting stuck in scraping the old paint from the splash guard, they put a couple of hours in and still were not bored  :clap: They are off to Butlins holiday camp for a week but said they will sand down / prepare for paint once they are back and maybe get the gearbox sorted if they have time  :ddb: Anyway well done for helping girls  :clap: :clap: :clap:


The splash guard was stripped totally of paint as it looks like old synthetic stuff that might wrinkle if painted over.  Before  photo.


After photo, I am going to weld a few holes up and maybe weld studs to the bottom edge and drill the drip tray so once its bolted up it will be more solid and not rattle.


The general thing is starting to look more prepared now, the end gear casing cover hinges have been welded before and it wont line up right so I am going to re do the repair and get it squared up, I also intend to make the headstock end into a cabinet with shelves and door.


Cheers Mick

Offline micktoon

  • Hero Member
  • *****
  • Posts: 797
  • Country: gb
Re: Harrison L5 rescue
« Reply #54 on: July 31, 2012, 04:34:57 PM »

       I have managed to get some more 'bodywork' done today. Welded up various surplus holes in the splash guard then cut off the hook type hangers that supported the splash guard to the rear of the drip tray, this used rattle and drive me mad  :loco:. So I have drilled through the drip tray and splash guard and welded studs to the splash guard so it will sit tight to the drip tray and not rattle, the studs rather than bolts are so its smooth along the bottom for cleaning out swarf without catching bolt heads.

The original hook fixings.


A tip to weld studs like this is make the hole a bit bigger than the stud ( just bolt with head cut off to length you want ) put a copper washer over it and nut to the right place so when held in place the stud sticks through the hole to the same height as the panel its passing through, the nut and washer keep it square and the copper washer keeps any weld buldging through the back so its tidy around the stud so it will sit square when bolted onto the panel. This photo the bolt still has the head on it , once cut to length the cut end is the one fed through the panel so you keep the nice end for the nut to go on.

The stud with copper washer.


Held in place ready for tack weld, tack it then pool the weld around the stud ( without still holding it  ):thumbup:


The stud welded, just leaves small bit to grind flush.


The guard in place with welds ground off.


The row of bolts now keeping the guard nice and rattle free and much more solid too.


Only other progress was to make the hole in the cabinet that was already there for switch panel, larger to convert that end into a cupboard for tooling. I will be able to have two shelves with eight inches space above each so worth doing. The shelves will be metal plate welded like the other side of the cabinet.

The hole that was standard.


The new improved hole, the semi circle in the top corner has been patched but took the photo before it was done. I will have to make templates for the shelves out of ply wood as there are rounded corners and a vee shape cuts into the rear of them too, I will make one plywood then use that to draw around to cut the metal plate.


 Cheers Mick

Offline doubleboost

  • Madmodder Committee
  • Hero Member
  • *****
  • Posts: 1619
  • Country: gb
  • Newcastle Upon Tyne
Re: Harrison L5 rescue
« Reply #55 on: July 31, 2012, 04:55:26 PM »
Looking great Mick
 :thumbup: :thumbup: :thumbup:
Like you say once you have it this far down , do a propper job :thumbup: :thumbup:
The storage  shelves are a good idea
John

Rob.Wilson

  • Guest
Re: Harrison L5 rescue
« Reply #56 on: July 31, 2012, 05:35:08 PM »
Looking good Mick   :thumbup:,,,,,,,,,now thats just cheating having three midget helpers  :lol: :lol: :lol: :lol:


Rob

Offline AdeV

  • Madmodder Committee
  • Hero Member
  • *****
  • Posts: 2434
  • Country: gb
Re: Harrison L5 rescue
« Reply #57 on: July 31, 2012, 05:53:04 PM »
Mick, this is looking very tidy indeed. Nice tip about welding the studs, I'd have just welded around the bolthead & then ground the whole lot flat, but I'm a masochist like that (and a rubbish welder to boot). Your method will probably last a lot longer than mine too....

Nice idea about the shelves, wonder why Harrison never did that  :scratch:

This lathe is going to look spectacular when its finished - almost too good to dirty with oil & swarf...
Cheers!
Ade.
--
Location: Wallasey, Merseyside. A long way from anywhere.
Occasionally: Zhengzhou, China. An even longer way from anywhere...

Offline micktoon

  • Hero Member
  • *****
  • Posts: 797
  • Country: gb
Re: Harrison L5 rescue
« Reply #58 on: July 31, 2012, 06:19:57 PM »
Cheers lads  :beer:,
  John , I am still trying to look at the long term picture , especially when I spending all day grinding a hole for shelves that will be a luxury lol, its all stuff you would never do if the lathe was up and running so might as well get it done now eh  :thumbup:
  Rob , its just a same that they are off to Butlins, its a week wasted in my book  :whip:, still there will be three weeks of the school holidays still left once they return for duty lol.
  Ade , that stud thing works good with the copper washer as you can burn right into the stud so its nicely welded into the panel but without the big snot of weld at the back thats hard to grind off and normally also runs down the stud wrecking the threads :palm:. I dont know why Harrison never made that end another storage area especially as the one that is there is not up to much, the top shelf has the suds sump taking up most of it, the middle one is ok and the bottom one has a vertical tall lip at the front so akward to get heavy stuff in and out. I am just trying to think of ideas as I go to make the finished lathe better and nicer to use. I hope it does look too good to use when its done  :D  but it will be getting used dont worry about that  :thumbup:

  Cheers Mick.

Offline buffalow bill

  • Jr. Member
  • **
  • Posts: 86
  • Country: scotland
Re: Harrison L5 rescue
« Reply #59 on: August 01, 2012, 05:30:53 AM »
Hi Mick,
Being a fully paid up member of the old fart’s club I’m confused. The position of the copper washer is between the splash guard and the nut. With the cut end of the bolt through the splash guard for welding? It’s just that the 2nd photos has the copper washer on the other side of the nut (the nice end of the bolt!).
Gravity will hold the stud in place when on the bench?
Not trying to be a pain, just don’t want to look a pillock when applying the method!!!

Cheers Bill  :beer:

PS the smallest of the three helpers looks to be doing most of the work.
Helensburgh, Argyll & Bute

Offline micktoon

  • Hero Member
  • *****
  • Posts: 797
  • Country: gb
Re: Harrison L5 rescue
« Reply #60 on: August 01, 2012, 08:37:09 AM »
  Hi Bill , I took the photo of the washer without thinking really and it was just 'staged' to show the washer idea, I did have them the right way around when I actually welded them.
     You are right when you actually want to weld one cut the end off a bolt and wind a nut onto it, then as you say stick the rough cut off end through the washer and panel, then adjust the nut so the studs cut end just sticks through flush, while holding it up tight and square give it a little tack weld then leave go and weld around the stud  :thumbup:.
     I only had one washer so had to take apart with pliers as it was hot to do the next one, if you had a few washers it would be quicker doing a few tacks then welding them up one after another. Bill when you say gravity will hold the thing in place on the bench , it would but you would then have to weld them upside down doing it that way. The nut is not holding anything its just acting as a depth stop and also keeps your stud nice and square , once you push it against the backside of the panel, I would do them like in photo three pushing the stud up till tacked, this way your weld pool around the stud is much easier to do as you are welding with gravity on your side :thumbup:
  The other thing I forgot to mention is the panel you are welding has to be about 2mm thick really if its too thin the weld will probably crack when you tighten the nut on the final job.
  If you take your time and grind/ sand flush or even fill the ground off area you can hold things together with no visible fixings  :D

  Cheers Mick.

Offline buffalow bill

  • Jr. Member
  • **
  • Posts: 86
  • Country: scotland
Re: Harrison L5 rescue
« Reply #61 on: August 01, 2012, 09:24:58 AM »
Hi Mick,
Yep that’s all clear now. But gravity – With stud through hole and splash guard on top, all on bench, so the splash guard is holding the stud in position onto bench top.
It’s a great tip, thanks.  :headbang:
Real great job you are making of the L5, be better than new with the personalised parts.  :bugeye:

Cheers Bill
Helensburgh, Argyll & Bute

Offline 9fingers

  • Jr. Member
  • **
  • Posts: 75
  • Country: gb
    • Info on Induction motors (Heavily UK based!)
Re: Harrison L5 rescue
« Reply #62 on: August 01, 2012, 05:24:35 PM »
Mick,

If you need any help with inverters/converters etc just shout. It is one of my (few?) areas of expertise. I've normally got quality used inverters on the shelf and help with programming etc at sensible prices.

http://homepage.ntlworld.com/bob.minchin/Induction%20motors%20-%20Issue2.pdf

Rgds

Bob

Offline micktoon

  • Hero Member
  • *****
  • Posts: 797
  • Country: gb
Re: Harrison L5 rescue
« Reply #63 on: August 02, 2012, 02:03:01 PM »
 Thanks for that offer Bob , I might just give you a shout as have a few inverters to fit on things so will see how I go and if what I have will do the jobs intended.

  Some more progress on the lathe cabinet to report. I decided that the plywood idea for shelf was not needed as the cabinet was not as tricky a shape as I first thought. I marked out on some 3mm galv plate I had lying about and cut it out with the plasma cutter, its single phase weldspares 3500 and 'meant' to cut up to 10mm  :lol: it only just does the 3mm really, anyway got the two shelves and the door cut out then cleaned the cut edges up with grinder and file.


The bottom shelf fitted , I welded two posts to the center of the cabinet base so the shelf wont sag under weight and made the front edge level so chucks can be slid out without lifting over a lip.


Second shelf  also welded in this one has angle iron cleats welded to the sides and back and a 10mm x 40mm strengthening brace under the front set back a bit.


The hinges for the door are from RS components, I have used them before , they come in four sizes this is the third biggest 16mm diameter and 80mm long, they weld on and have a brass washer and fixed pin in lower section and once welded on the door can be lifted off in need be.


I used magnetic blocks to get the door held in the right spot, then just hold the hinges where you want then and tack weld, the tacks are enough to be able to try the door just to double check it swings open ok.


Then welded the hinges paying attention to do the bottom section of hinge to cabinet and top section to door lol, it would be easy to loose concentration and wed to both on the same section of hinge !


The fitted door closed, just the handle /catch to do will have to see whats lying around.


The door open , lots more room to store stuff now  :thumbup:


Cheers Mick.

Offline NickG

  • Madmodder Committee
  • Hero Member
  • *****
  • Posts: 1890
Re: Harrison L5 rescue
« Reply #64 on: August 02, 2012, 02:25:50 PM »
Nice 1 Mick, looks just right. There is a bit of wasted space even when the switchgear is there I guess.

Nick
Location: County Durham (North East England)

Offline doubleboost

  • Madmodder Committee
  • Hero Member
  • *****
  • Posts: 1619
  • Country: gb
  • Newcastle Upon Tyne
Re: Harrison L5 rescue
« Reply #65 on: August 02, 2012, 04:07:12 PM »
Looking good Mick
I like those hinges
You cant beat a bit of galvie plate for shelves  :lol: :lol: :lol: :lol:
John

Offline jb3cx

  • Jr. Member
  • **
  • Posts: 86
Re: Harrison L5 rescue
« Reply #66 on: August 02, 2012, 04:21:46 PM »
nice 1 micky ,not bad for a wood butcher.
peter

Offline steamer

  • Jr. Member
  • **
  • Posts: 86
  • Country: us
Re: Harrison L5 rescue
« Reply #67 on: August 02, 2012, 11:42:25 PM »
Nothing wrong with that door and shelves!

 :thumbup:

Dave
"Mister M'Andrew, don't you think steam spoils romance at sea?"
Damned ijjit!

Offline micktoon

  • Hero Member
  • *****
  • Posts: 797
  • Country: gb
Re: Harrison L5 rescue
« Reply #68 on: August 05, 2012, 03:35:21 PM »
  Thanks for the comments lads :thumbup:

    Bill I am with you now about the gravity thing, you could do it with the plate on top as you say  :thumbup:, Mine would not have balanced anyway so did it the holding the stud method.
    Nick , I am not sure exactly what the original switch gear looked like as mine did not have it but there would still be room for one shelf under it I think, or if you thought it was worth the hassle and wanted two shelves you could move the switch gear to panel mounted above the headstock ?

  I have got some more bodywork done on the cabinet. The end cover that goes over the change gears had at some point in the past had the hinges welded back on and was misaligned , it also had an extra two holes drilled in it where a school must have bolted a small plate across the cover so kids could not open it, there was also a big gap at the top edge of the plate when it was held in the right position. The cover is alloy so more of a pain to put right as it needed T.I.G welded.

The previously welded repair to both hinges, the welding was ok but it had not been held in the right position when welded and the outsides of the welds were messy.


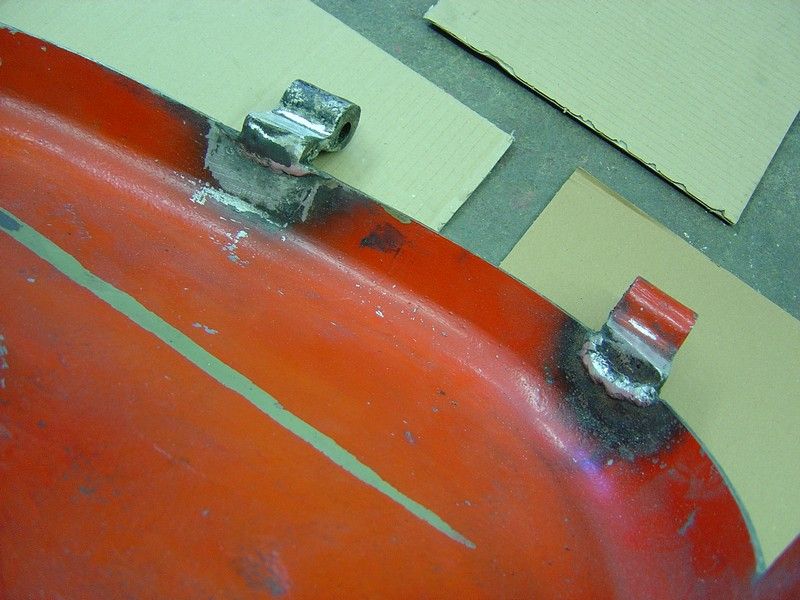
I cut the hinges off the cover and cleaned up both the hinges and cover with grinder.


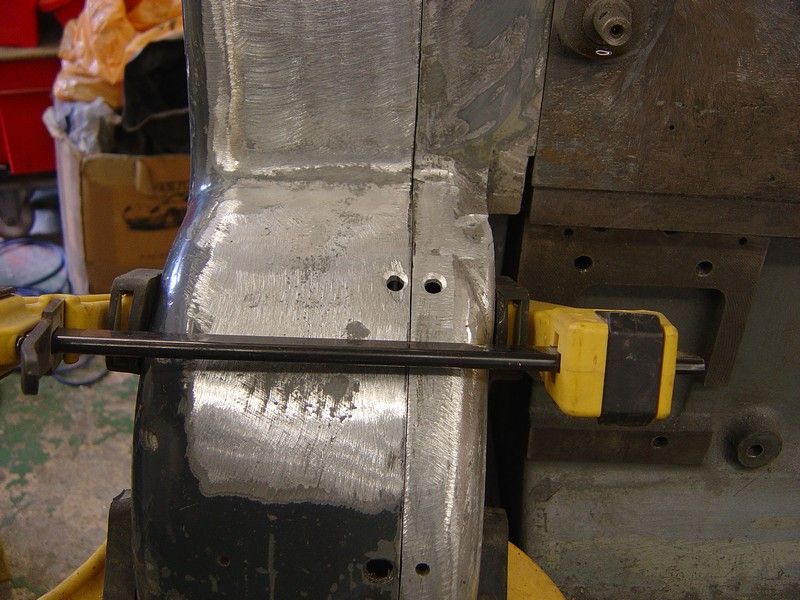
After tinkering with the cover and the casing that it mated against till it matched nicely I clamped the door in place then tacked the hinges back on in the right position. This photo shows them ready to tack.


I then took the cover back off and welded up the hinges on the bench, it was not good stuff to weld and ended up welded but not pretty so I have dressed them up with the grinder and a soft disc, the finished job looks ok.


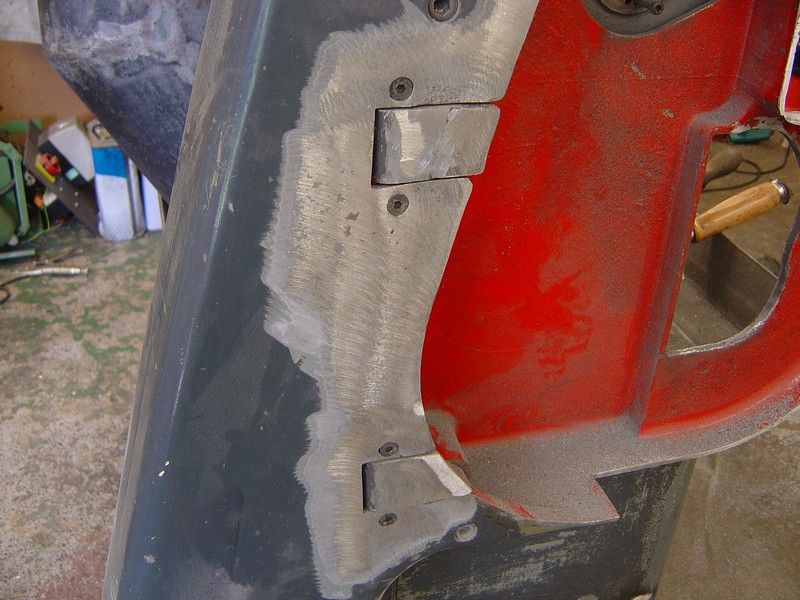
This shot shows the two extra holes that had been drilled in the housings above the clamps holding things in the right place, I have countersunk then ready to weld, the holes near the bottom of the shot are the proper ones where the spring latch fits.


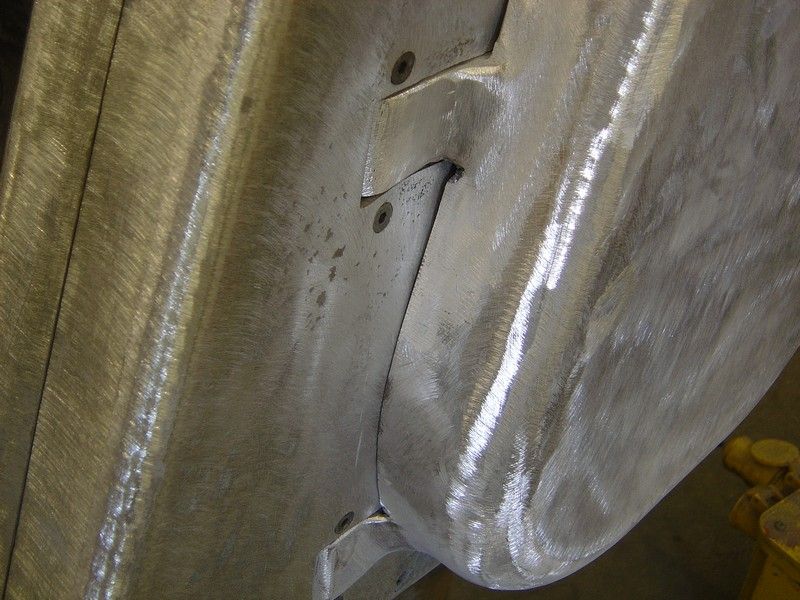
This is them after they are welded up.


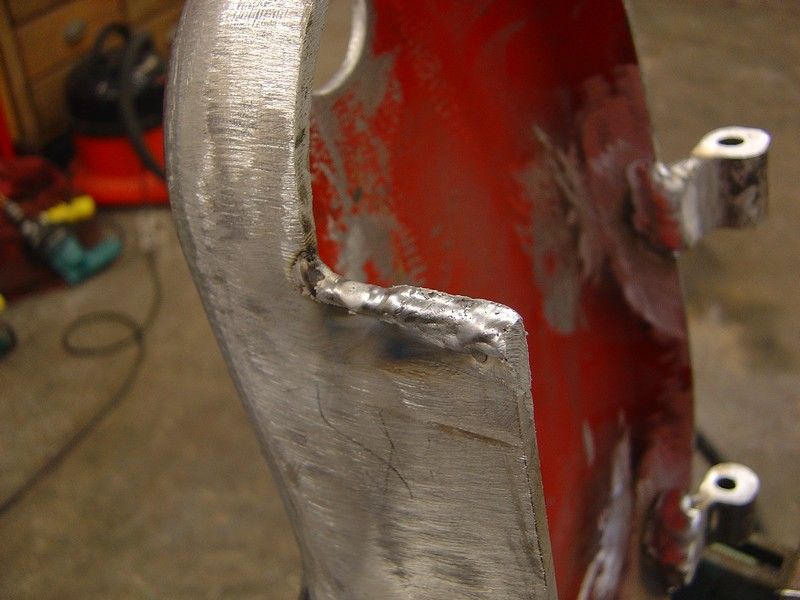
This is the top edge that left a gap when fitted in place , I have built the edge up by running a couple of beads of weld along the top, I will file it flat and square so it fits with better gap.


There is still a few bits to do on the cabinet but its getting there  :thumbup:

   :beer: Mick.

Rob.Wilson

  • Guest
Re: Harrison L5 rescue
« Reply #69 on: August 05, 2012, 04:43:30 PM »
Nice repair Mick , your defiantly going to toon on it  :)


You got  good /cheep supplier for 2K ?   


Rob   

Offline John Stevenson

  • In Memoriam
  • Hero Member
  • *****
  • Posts: 1643
  • Nottingham, England.
Re: Harrison L5 rescue
« Reply #70 on: August 05, 2012, 06:29:27 PM »
Nice find on those hinges. Didn't realise that RS did them, I've been making my own when needed.

I have done the same on my TOS at the headstock end, it did have a cover but was screwed on because the motor is in there but still loads of space round it for the spare chucks.
John Stevenson

Offline micktoon

  • Hero Member
  • *****
  • Posts: 797
  • Country: gb
Re: Harrison L5 rescue
« Reply #71 on: August 05, 2012, 06:35:58 PM »
  Hi John , they are really handy hinges, I forgot to mention in the post that they are £1.20 + VAT for a pair in that size so not worth making your own even if you can make them  :thumbup: Its more the ease of fitting them that makes them cheap too very easy to line up tack, check then weld  :thumbup:

  Cheers Mick

Offline micktoon

  • Hero Member
  • *****
  • Posts: 797
  • Country: gb
Re: Harrison L5 rescue
« Reply #72 on: August 06, 2012, 03:59:47 PM »
I have got a bit more done to the end gear cover and cabinet, not much to show for how long its taken, just basically got it to line up nice now and it closes on the proper catch, I have just ground all the paint off the covers and cabinet. From past experience its better to start with bare metal than try to cover over old paint at least that way you know what you are putting on and should not get any nasty surprises, like standing back thinking ....umm thats looking good  :thumbup: :clap: then seeing wrinkling start to appear all over  :bugeye: :bugeye: :bugeye: and its back out with the scraper  :bang: :bang: :bang: lol.

The end cover lined up and cleaned up.


This is shot of the edge that was built up with Alloy weld after its been filed up, its about 3mm higher than it was to close the gap above it up.


The rest of the day was spent trying to work out if the coolant tank would fit on the end of the lather rather than the back, it won't really so is going back on the raer of the lathe , I will just have to leave enough gap behind to get to it. I have also been trying to work out my bracket for mounting the inverter and switch gear and move the work light as it kept knocking the chuck guard down when moved which was doing my head in so will have to be changed.

Cheers Mick.

Offline AdeV

  • Madmodder Committee
  • Hero Member
  • *****
  • Posts: 2434
  • Country: gb
Re: Harrison L5 rescue
« Reply #73 on: August 06, 2012, 04:05:58 PM »
Looking good there Mick, some nice work going on.

I find it's worth leaving enough space behind the lathe so you can get in there & retrieve the part that just flew out, and in your case went over the swarf tray hit the wall behind & landed behind the lathe...
Cheers!
Ade.
--
Location: Wallasey, Merseyside. A long way from anywhere.
Occasionally: Zhengzhou, China. An even longer way from anywhere...

Offline micktoon

  • Hero Member
  • *****
  • Posts: 797
  • Country: gb
Re: Harrison L5 rescue
« Reply #74 on: August 07, 2012, 05:09:08 AM »
   Hi Ade, lol you are right a bit space behind is well worth having to retrieve half done items, also if I put with no access to behind the lathe I am assuming from previous experience that every single component at the rear of the lathe will fail in a random order at differing times :Doh: so even though there is not really space I will have to leave a gap............. or put it on castors  :loco: :palm: just joking  :D

  Cheers Mick