Author Topic: Home-brew 120mm rotary table  (Read 91721 times)

Offline ksor

  • Sr. Member
  • ****
  • Posts: 316
  • Turn off the TV - life ain't replayed !
    • Keld's hjemmeside
Re: Home-brew 120mm rotary table
« Reply #25 on: August 16, 2012, 09:57:41 AM »
Really nice work  :bugeye:
Best regards
KSor, Denmark
Skype name: keldsor

Offline sdezego

  • Jr. Member
  • **
  • Posts: 38
  • Country: us
Re: Home-brew 120mm rotary table
« Reply #26 on: August 16, 2012, 10:55:18 AM »
Very nice work and write up this far  :beer:

Offline arnoldb

  • Hero Member
  • *****
  • Posts: 515
  • Country: na
  • Windhoek, Namibia
Re: Home-brew 120mm rotary table
« Reply #27 on: August 16, 2012, 11:27:43 AM »
Keld, sdezego - Thanks Gents  :beer:

25 May 2010

 I made the hand wheel and adjustable scale; quite a bit of shop time, but came out OK, and the only interruption I had was a friend pitching with some meat to stock the freezer - that was most welcome!
 
 Started off with a hunk of aluminium:
 
 
 That I then turned down into the handwheel shape, with a boss on the front where the scale would locate on. Here it's all done and ready to part off:
 
 
 Soon after starting the parting cut, I ran into chatter problems, but only on one section - the next photo shows the bit with chattering, while the rest of the groove is nice and smooth. I noticed while turning that there was a section in the aluminium rod that was harder or softer than the rest, and this is in that section:
 
 
 To overcome the problem, I slowed the lathe down to the next lower speed, and also started a "double parting" cut; this particular parting cut would be pretty deep - from about 50mm diameter down to 6mm and a double parting makes things a lot easier, even if wasting some material:
 
 
 I didn't want the finish on the part ruined when it dropped off on breaking through on the parting cut, so I shoved a slightly smaller rod mounted in the tailstock chuck into the hole when things were getting close:
 
 
 After parting; not very neat on the cut side:
 
 
 I cleaned up the untidy face by lightly gripping the part in the chuck with some soda can "protectors" and lightly facing off the offending bit. Then I mounted it on the RT for some final measurements. The face closest to the camera was the "bad" one above:
 
 
 Next I started on the graduation wheel. Some 40mm aluminium rod with the end counter bored for a light push fit with the boss on the handwheel, and then just slightly cleaned up on the diameter, and with the parting tool a light groove turned to about 39mm diameter, so that I could knurl the projecting bit:
 
 (  :palm: I REALLY need to make a cleaner-looking and less sloppy knurling tool! )
 
 After that, I parted the graduation wheel on length from the parent stock. Then I mounted the handwheel and graduation wheel together with a cap screw, and mounted the lot in the 3-jaw, protecting the handwheel bit with some more soda can strip. My 3-jaw's outside teeth are still pretty accurate (less than 1/2 thou run-out on most diameters) - so good enough for here without resorting to the 4-jaw and centering. Next I turned the excess off the diameter and most of the face of the graduation wheel:
 
 
 The dividing head was still set up in the mill, so I transferred chuck and all to that. A quick check, and I needed the dividing plate with the 45 hole circle. Mounted that, and then set to marking the graduations. The one and 1/2 degree marks were easy; my DH has a 60 tooth worm, so for the "one's" its "start at zero; graduate, 12 full turns, graduate; repeat". To get the halves, just crank six turns and repeat as for the tens. For the 0.1 degree marks, it was a bit more work; 1 1/5 turns per mark - but a LOT quicker than the 10s and 5s on the main table  :D - Here I took a break from counting and marking the 0.1s to take a photo - My mind was starting to wander so some timeout to restore focus after a careful note of current settings:
 
 
 The handwheel still needed drilling and threading for a grub screw to mount it on the shaft. Here I'm using the old trick of using a flat plate (old feeler gauge plate) to find the center on the circumference to drill:
 
 This method can be pretty accurate, but there are caveats...
 In many descriptions of this method, a rule is used to do this. I don't like using a rule, as the engraved markings on a rule can have a negative effect. (anyway, good rules costs money  :coffee: )
 One needs to check with the drill bit rotated to a couple of different angles and judge the "average" level.
 A new spot on the plate should be selected for every test.
 Don't move the workpiece while the drill press is under pressure; lift away the drill bit, move the workpiece or rotate the chuck and retry.
 The smaller the diameter of the workpiece, the more accurate this method becomes (if you choose new bits on the plate for pressing down on, and don't use a rule where the engraved markings can cause a problem, and check with the chuck rotated a couple of times).
 Gravity does have an influence if you're working with light pressures; try and have the plate balanced on the workpiece before starting.
 
 Getting ready to knurl the handwheel - simply fit to the collet chuck with a cap screw from the back, and a nut pulling the wheel up to the chuck face. My biggest knurling job to date on a VERY "iffy" setup... This is at the extreme capacity of my rough knurling tool, and to boot, a knurling job wider than the knurling wheels... There's a LOT of sideways slop in that tool  :palm: :
 
 LOTS of coolant/lubrication from the synthetic soluble cutting oil squirt bottle (mostly to wash away any swarf build up) and the job was a good 'un; not perfect, but entirely acceptable for me for now.
 
 Next up I turned a shaft from 6mm silver steel, threaded M5 male one end and M5 female on the other (to accept an M5 cap screw), roughly turned, and finished with a file & emery a handle and drilled and counterbored it to take said cap screw and shaft, and parted it off 0.2mm shorter than the shaft. A bit of stiff spring salvaged from an old printer, shortened with the Dremel and ground down to length on the bench grinder, a couple of washers, a grub screw, and a short length of brazing rod all resulted in today's collection of parts:
 
 
 And duly assembled as a handwheel with zero-able scale:
 
 I'm quite happy; that lot came together rather well. The scale takes a "nice" amount of effort to adjust and does not slip on the handwheel at all.
 
 Making the vernier scale on that zero collar is going to be a bit of a challenge, but I have some ideas around that  :med:

 :beer: , Arnold

Offline ksor

  • Sr. Member
  • ****
  • Posts: 316
  • Turn off the TV - life ain't replayed !
    • Keld's hjemmeside
Re: Home-brew 120mm rotary table
« Reply #28 on: August 16, 2012, 03:39:22 PM »
In fact your BEEP weldings inside doen't matter with that outside - a perfect tool ! :clap: :clap: :clap: :clap: :clap:
Best regards
KSor, Denmark
Skype name: keldsor

Offline arnoldb

  • Hero Member
  • *****
  • Posts: 515
  • Country: na
  • Windhoek, Namibia
Re: Home-brew 120mm rotary table
« Reply #29 on: August 17, 2012, 03:10:32 PM »
 :beer: Thanks Keld - it's far from perfect though!

29 May 2010

I faffed around with the vernier collar and some number punches - and ended with a mixed bag of results...
 
 Having done the calculations for the vernier collar, I set out to make a template to mark it off it from. I cheated a bit, and instead of manually laying out the template with a pair of compasses, I did it with CAD and printed it. I know my old HP laserjet 6L prints very nice and accurate circles from QCAD, so no worries there. (A couple of years on, and my old Laserjet 6L still prints great :headbang: )
 
 Next I cut a "round" piece of plate from an old computer casing - here it is roughed out with some tin snips:
 
 I just took it to the bench grinder to get it nice and round and without sharp edges - no finesse with a file, as this is a quick 'n dirty...
 
 I used the compass to cut out the template from the printed page as well; I keep my compass fairly sharp, so it does cut paper albeit a bit crudely. At one point, I made a booboo and let the center slip, but not too much of a concern:
 
 
 The paper template needed to be glued to the round plate... I didn't have any suitable glue on hand, so I used an ancient can of clear lacquer I've had for years (12 to be precise!) to spray a thick coating on the plate, and then stuck the paper template to it while the paint was still wet. Just for the heck of it, I ran another coat of lacquer over the top:
 
 I didn't bother cleaning my hands so there are oily smudges all over the paper  :palm:
 
 After leaving that lot in the sun for about 20 minutes to dry, I centered and clamped it on the drill press. Thoroughly. I needed to drill a 16mm hole through the center, and plate is a bugger on break-through:
 
 
 All drilled; no fuss or drama  :headbang: :
 
 
 Next I turned a mandrel from some 20mm aluminium rod - to mount the vernier plate on one side, and a 16mm shank to grip in my collet chuck on the other side, with the template between the collet nose and the shoulder on the mandrel - here the vernier plate is already mounted on the mandrel:
 
 
 I fully intended to take photos of how I clamped this lot together on the collet chuck... and promptly forgot to take any  :palm: . I mounted the collet chuck on the lathe, pushed the mandrel through the plate and into the collet in the chuck, and used the tailstock to press on the mandrel while tightening the collet closer. This kept the plate tight between the shoulder on the mandrel and the collet nose; I didn't want it to rotate later on.
 
 Then I took the collet chuck with its contents off the lathe, and screwed it to the dividing head still mounted on the mill. For this job, the dividing head is useless for making the graduations (that's why all the fuss with a template) - but is useful as a handy mounting to make things go around.
 Needing a way to index off the template, I taped my scriber securely to the magnetic base arm with some insulation tape, and set the lot up on the mill - with the scriber point very nearly, but not quite, touching the template:
 
 
 Then I milled the markings; I made the template to conveniently show the lengths, so this was pretty much a no-brainer to do - except to get the scribe point as accurately on the line for each graduation as possible. I ended up with this:
 
 
 Quite proud of my achievement in making a vernier scale, I put it on the RT and tried it out....     :doh: :doh: :doh: :bang:
 The scale is good - for working to 0.01 degrees. Those short 0.005 degree markings are completely useless... Had I stopped earlier this week and really thought things through, I would have realised it... The handwheel collar does not have 0.05 degree marks to align the vernier marks to in the 1/10th scale I made it at. To get the 0.005 vernier scale to work, I either have to put on the 0.05 marks on the handwheel collar, or I have to stretch the vernier makings through 18 divisions on the handwheel...

 
 At that point I didn't know whether to kick my own butt, or to cry. Instead I ended up having a good laugh at myself for being too clever for my own good, and I'll leave things as is. The small half-marks on the vernier plate can serve as a future reminder that it's possible to do some nice work off a crude template and setup, that I need to think things through more clearly, and that sometimes I just need to laugh at myself. If the marks bother me in future, I'll make a new vernier plate. With my tests, I found that it would in any case be very difficult to index to 0.005 degrees using the 72 tooth gear wheel on this size. The 0.01 degree marks are good to use, and when I set out on this project, that was what I had in mind anyway.
(I still laugh at myself to this very day for this silly mistake
:lol: - every time I look at that vernier collar.  the 0.005o accuracy would have been a waste anyway; I've not needed accuracy greater than 0.01o :D )

 Next up, I marked my set of 3mm (1/8") number punches with a permanent marker. The numbers on the punches are oriented so that when the punch is held upright, and I can read the number, the punch is the correct way around to stamp the number properly:
 
 
 What, no 9  :scratch: - here it is; it's on the "other" side of the 6 punch  :coffee: :
 
 
 And another crude jig to stamp the numbers. A slot milled through the face of some scrap HRS, and mounted on the magnetic base, mounted on my steel workbench serves as a punch guide. A small drill vise clamped to the table to hold down the workpiece, and I aligned the work with the end of the fixed jaw in the vise to set the depth:
 
 It worked sort of OK - Ideally I should have stamped the numbers on the workpieces while they were all still mounted in the lathe chucks, but I'd rather take some slight misalignment on the numbering than damage my chucks and so forth by hammering on work items in them.
 
 Result of some stamping on the table itself:
 
 The two 3's on the 330 looks badly formed, but they are OK; I forgot to rub a dirty finger over them to fill up the recesses to improve contrast, and the lighting is playing havoc.
 
 Some more of the numbering:
 
 By no means perfect, but it will have to do for now.
 
(Heck, back then it was adequate, and it still is :ddb: )
 
  :beer: , Arnold

Offline doubleboost

  • Madmodder Committee
  • Hero Member
  • *****
  • Posts: 1619
  • Country: gb
  • Newcastle Upon Tyne
Re: Home-brew 120mm rotary table
« Reply #30 on: August 17, 2012, 05:35:10 PM »
Great job you have made of that  :thumbup: :thumbup: :thumbup:
The letter stamping "jig" is a great idea
I have seen much worse numbering on mass produced units  :bugeye: :bugeye: :bugeye:
I see you have acess to the "shiney camera " as well
John

Rob.Wilson

  • Guest
Re: Home-brew 120mm rotary table
« Reply #31 on: August 17, 2012, 06:04:01 PM »
Very sharp Arnold  :clap: :clap: :clap: :clap: :clap:


Rob  :thumbup:

Offline Pete49

  • Sr. Member
  • ****
  • Posts: 353
  • Country: au
Re: Home-brew 120mm rotary table
« Reply #32 on: August 17, 2012, 11:58:20 PM »
Arnold is there an chance the drawings would be available to us more slow people? It looks like I could afford that one :drool:
Very nice work and the welds dont even get seen :clap:
Pete
oops..........oh no.........blast now I need to redo it

Offline Dgrallying

  • Newbie
  • *
  • Posts: 1
Re: Home-brew 120mm rotary table
« Reply #33 on: August 18, 2012, 04:21:48 PM »
I have to say that I am blown away with the real craftsmanship that has been shown here.

Not knowing how old you are I would suggest that the skill you have is a real treasure which is hard to be found these days and something I would love to have.

Keep up the great work

Offline dsquire

  • In Memoriam
  • Hero Member
  • *****
  • Posts: 2275
  • Country: ca
  • Kitchener, Ontario, Canada
Re: Home-brew 120mm rotary table
« Reply #34 on: August 18, 2012, 05:48:26 PM »
I have to say that I am blown away with the real craftsmanship that has been shown here.

Not knowing how old you are I would suggest that the skill you have is a real treasure which is hard to be found these days and something I would love to have.

Keep up the great work

Dgrallying

Welcome to MadModder

When Arnold started out he was the same as everyone else and knew nothing. Arnold has learned by doing, by reading, by watching and by asking. Everyone has the same opportunities and can learn as much as they wish. It is almost 3 years ago that Arnold joined MadModders with this post http://madmodder.net/index.php/topic,1623.msg15945.html#msg15945 He has came a long was in that time but that is achievable for any member of this forum if they wish.

If you could please go to http://madmodder.net/index.php/board,3.0.html and click on New Topic and post an introduction it would be very much appreciated and be the next step to achieving what Arnold and many others have accomplished. We look forward to your continued participation in the forums.

Cheers  :beer:

Don

Edit:change forum
« Last Edit: August 19, 2012, 09:02:59 AM by dsquire »
Good, better, best.
Never let it rest,
'til your good is better,
and your better best

lordedmond

  • Guest
Re: Home-brew 120mm rotary table
« Reply #35 on: August 19, 2012, 04:21:17 AM »
I have to say that I am blown away with the real craftsmanship that has been shown here.

Not knowing how old you are I would suggest that the skill you have is a real treasure which is hard to be found these days and something I would love to have.

Keep up the great work

Dgrallying

Welcome to HMEM MadModder.

When Arnold started out he was the same as everyone else and knew nothing. Arnold has learned by doing, by reading, by watching and by asking. Everyone has the same opportunities and can learn as much as they wish. It is almost 3 years ago that Arnold joined MadModders with this post http://madmodder.net/index.php/topic,1623.msg15945.html#msg15945 He has came a long was in that time but that is achievable for any member of this forum if they wish.

If you could please go to http://madmodder.net/index.php/board,3.0.html and click on New Topic and post an introduction it would be very much appreciated and be the next step to achieving what Arnold and many others have accomplished. We look forward to your continued participation in the forums.

Cheers  :beer:

Don

Don

 I thought I was looking at Madmodder  not HMEN?
Stuart

edit: changed forum ds
« Last Edit: August 19, 2012, 09:06:42 AM by dsquire »

Offline arnoldb

  • Hero Member
  • *****
  • Posts: 515
  • Country: na
  • Windhoek, Namibia
Re: Home-brew 120mm rotary table
« Reply #36 on: August 19, 2012, 04:22:15 AM »
Cheers John  :beer: - the camera is slowly turning "shinier" with time  :D

Rob, Cheers mate  :beer:

Thanks Pete  :beer: - I worked mostly off Dean Williams's design - and Steve Campbell drew up the plans for that; you can download the plans from Dean's site here.. Some bit's like the threaded split-collar collar to adjust the bearing tension I just did on the go, so there are no drawings for that; I'll dig through my paperwork later today to see if I made any scetches (C-o-Cs) back then.  Attached are some crude pdf's of CAD drawings I did for the eccentric and zero-able handle back when I built the RT.  There are no measurements on them; like I said, I did things off the cuff.  The zip file contains dxf CAD drawings for both.

Thank you dgralying :beer: - Welcome to MadModder  :thumbup: .  Don hit it spot on - I've only been machining for about 3 1/2 years, and just jumped in and tried while learning from others.  It's not for me to rate my level of craftsmanship; I have always and still do just try my best at any bit of machining I attempt, be it the simplest task like making a toolmaker's clamp or a more complex job like building this rotary table.  Sometimes it can be hard work and one wonders if it's worth it; that's the point when I just grit my teeth and dig deeper - some people run marathons, others climb mountains; for me it's making tools and model engines.  I've on purpose shown throughout this build there are mistakes and booboos; those will happen.  Anybody can do what I do; I'm really not special.  Just jump right in and give it your best shot  :thumbup:


30 May 2010
Well, not much to report for the day; I spent most of the day getting to my mill's spindle (I finally could after getting circlip pliers!), disassembling it, cleaning everything thoroughly, and re-assembling and adjusting the bearing pre-tension. No photos of the process though; my hands were too dirty to use the camera  :palm: .
 
 And boy-oh-boy, what have I been missing out on! Once adjusted and re-assembled, I played around with bits of scrap to see how much of a difference the cleaning and adjustments made, and I was totally surprised! MUCH better cuts, and MUCH improved finishes, even when cranking at a good clip. A difference between night and day.
 
 One of the scraps of HRS I practiced on became the two locking clamps for the RT. After testing the flycutter on some scrap I decided it was worthwhile to jump in and fully flatten and square up the side on which the RT will be used in the vertical position. Standing on edge it was close to, but not fully square, and I ended up using a 0.05mm feeler gauge plate to shim it to clamp it down nice and square. More "no photos", but I took a short video clip while starting a flycut on the surface. If you are prone to seasickness, please do take some Dramamine or ginger first; I was holding the camera in my right hand and cranking the table with my left hand:


 Then I drilled and tapped the top of the base M6 to mount the locking clamps - here is a view of the flycut face and one of the clamps mounted; the other one is on the opposite corner of the table:
 
 
 So, not much to show, but a whole lot gained, for the day's bit so I'm confident that I can now start on the T slots in the table for the next step.


02 June 2010

I decided to make the thumb screw to operate/retain the eccentric. Originally I was going to make it from some scrap HRS bar, but I decided to make it match the handwheel assembly, and opted for an aluminium unit, with a length of 5mm threaded rod screwed and loctited in:
 
 
 The thumb screw went so quickly that I wasn't satisfied... I had an itch and it needed scratching.
 
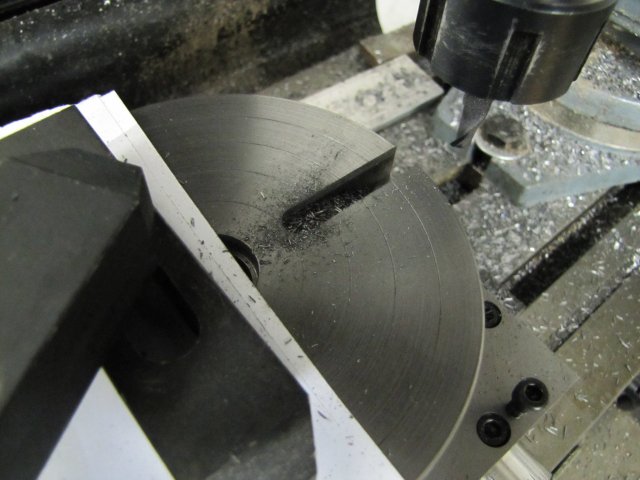
 So I decided to start setting up the table for machining the T slots. I've thought through and visualized the machining steps for cutting these slots over and over in my head, and nothing seemed out of whack. First I placed the rotary table roughly in the spot I wanted it for machining, and cranked the mill to roughly center it below the spindle. I took careful note of the direction I was moving the handwheels and zero'd those.  Then I cleaned the mill table thoroughly, put a piece of paper below the RT, and with a bit of 16mm silver steel (to match the deep hole in the RT center) gripped in the mill's collet chuck , I lowered the quill to center the RT and locked the quill:
 
 
 With the RT held on center from the mill spindle, I then used an engineer's square against the side of the RT base I flycut in a previous post to get the RT base square to the mill table - flipping the square over while checking, as well as checking from both edges of the mill table. This is not a very precise method - it would have been better to use a DTI to test, but I felt this was one of those jobs where "good enough" is, well, good enough. T-nuts are not all that precise... , especially if I made them!
 
 Then I clamped the RT base down solidly on all sides, set the RT and it's handwheel to zero degrees, locked the RT table with it's own clamps, and as an added safety precaution, added an additional clamp on top of the table. I don't want anything to budge. I also scribbled down all the necessary readings, directions of feed, and a couple of things to check regularly while machining on a bit of paper:
 
 
 Maybe I should have stopped there, but the temptation was too big. I decided to go for the first cut... a new 8 mm slot mill, mill set to it's lowest high speed range, 2.5mm depth of cut, and at the start something felt wrong; way too much vibration, and the milling bit wasn't really cutting well... Normally I slow down when this happens, but I had a "gut feeling" that in this instance I was going too slow... I've started to trust that "gut feeling". So, next speed up, I started feeding slowly, and things went much better. Then I started cranking the handle a bit more quickly, and everything came together; I had nicely shaped chips coming off and no heat that I could detect  :ddb: The first pass done and with a nice finish as well:
 
 
 After 3 more passes at 2.5mm DOC and a last pass at 1.8mm DOC, I was down to depth  :ddb: :
 

The swarf magnets and my tummy was insisting at that point to have dinner, so I stopped there, with the needed settings added to my list of notes.


03 June 2010

I rushed home from work this afternoon! And finished milling out the centers of the T-slots - without rushing. I followed the check list I made and the readings I jotted down to the last drop - including checking between each slot that nothing had come loose from vibration anywhere. On cutting the third slot, I had a bit of a scare; at one point the milling sounds started sounding different from the previous slots - and the feel on the handwheel was "less positive" for lack of a more "tactile" description - so I punched the emergency stop, and checked everything through again. I found that the drawbar had worked slightly loose. I try not to over tighten the drawbar on my mill's MT4 spindle; well, I'd under-tightened it, and the collet chuck had come loose in the spindle... Fortunately I caught the problem in time, and just re-tightened the drawbar; I could not even see any abnormality to the slot caused by the chuck coming loose, so I carried on. The result:
 
 
 Finishing the three slots left after yesterday's one took me less than 45 minutes to do, and I was feeling both alert and relaxed at that point, so I decided to push on. I changed to the T-slot cutter. To find zero on the Z axis after changing the cutter, I unlocked the feed wheel, and used the drilling arms to lightly pull down the quill to the point where the cutter touched a piece of paper on the RT. Then, without locking the Z feed wheel, I cranked it to zero (in down-feed direction to compensate for some backlash) and then locked it on, and used it to reverse the quill. My mill's Z feed is not zero-able otherwise... I guess I'll be making another zero-able handwheel in future!:
 
 
 My T-slot cutter's diameter is too small for my exact requirements, and it also cuts a slightly too high undercut for the slots. I wanted the slots on the RT to match my Myford's slots, and I had to have a compromise. Well, if I made the cutter myself that would not have been necessary, but with the bought one it was. With the smaller cutter diameter, I had to offset the cuts to get enough undercut on both sides, rather than finishing in one pass.
 For one pass, things were A-OK; I could feed in on the Y axis and do the pass with a nice conventional cut. The opposite side was a problem; I would be climb-milling. I dug in with the first cut, and to try to get a conventional cut on the return on the opposite side, I tried back-feeding on Y while at the deep end of the cut on X. Things just did not feel right, and the cutter was "complaining"... So I reversed the Y back-feed, brought the cutter out on X and tried the climb cut with two passes on Y. It worked with a slow and steady feed  :D - and I finished the first T-Slot:
 
 
 The other three T-slots were formalities, except the last one... I had to keep telling myself to "Keep it steady; don't rush; pay attention" on the last cut; it seemed to take forever but was at the same speed as the others!
 Everything came out well though, and this is the result:


 For those who swallowed the obligatory Dramamine or ate a bit of ginger:
[ Invalid YouTube link ]

 The RT is now pretty much operational; I will still finish it with a bit of lapping like Dean demonstrated in his build, as well as add a couple of other "touches". In fact, I'm pretty pleased with the outcome up to now, and with not much left to go wrong, I broke out the VSOB and had a good glass of Chivas on the rocks to celebrate  :beer: - My apologies if this post was a bit "under the influence"  :coffee:
 
 The "chuck adapter" for the RT to take my lathe chucks will still be quite a bit of work though!

 :beer: , Arnold

Offline saw

  • Hero Member
  • *****
  • Posts: 1003
  • Country: se
  • lucky amateur
    • Svenssons AckordsWerkstad
Re: Home-brew 120mm rotary table
« Reply #37 on: August 19, 2012, 06:00:42 AM »
Very well build  :bow: :bow: :bow:
_________________________
Greetings / Benni
http://myprojecty.wordpress.com/category/steam-engine/

Offline NickG

  • Madmodder Committee
  • Hero Member
  • *****
  • Posts: 1890
Re: Home-brew 120mm rotary table
« Reply #38 on: August 19, 2012, 08:28:17 AM »
Unbelievable work there Arnold - well done.  :thumbup: Don't use it though, it might get dirty!  :lol:
Location: County Durham (North East England)

Offline DaveH

  • Hero Member
  • *****
  • Posts: 1413
  • Country: za
  • Kempton Park, South Africa
Re: Home-brew 120mm rotary table
« Reply #39 on: August 19, 2012, 02:09:19 PM »
Arnold,
A very nice piece of work  :thumbup: :clap: :bow: A good looking rotary table.
Great post and photo's as always - Excellent  :bow:
 :beer:
DaveH

(Ex Leicester, Thurmaston, Ashby De La Zouch.)

Offline fatal-exception

  • Jr. Member
  • **
  • Posts: 78
  • Country: ca
Re: Home-brew 120mm rotary table
« Reply #40 on: August 20, 2012, 10:32:33 AM »
Wow! What a nicely planned and executed project! Congrats!  :D

Offline Ray

  • Jr. Member
  • **
  • Posts: 95
Re: Home-brew 120mm rotary table
« Reply #41 on: August 20, 2012, 12:51:25 PM »
 :thumbup: :clap: :bow:  Wow Arnold.  That is some machining.  Great job.  I want one.  My Birthday is coming up (again) this year. hint, hint.

Really, that is a very nice rotary table and you did an outstanding job on it.  Hope it serves you well.

Ray
Waco, Texas

Offline rleete

  • Madmodder Committee
  • Hero Member
  • *****
  • Posts: 534
  • Country: us
Re: Home-brew 120mm rotary table
« Reply #42 on: August 20, 2012, 01:01:07 PM »
How bad is it going to hurt when he miscalculates and puts a divot in that finely machined surface?

I could never make something so nice, I'd be afraid to use it!
Creating scrap, one part at a time

Offline arnoldb

  • Hero Member
  • *****
  • Posts: 515
  • Country: na
  • Windhoek, Namibia
Re: Home-brew 120mm rotary table
« Reply #43 on: August 21, 2012, 06:38:18 AM »
Thanks Benni  :beer:

Cheers Nick  :beer: - it gets used all the time, and has gotten dirty - and a spot of surface rust  :Doh:

Dave & fatal-exception - Thanks gents :beer:

 :beer: Cheers Ray - I guess you'll just have to bite the bullet & make your own birthday present  :D

Rleete, it's a lot of fun to spend some time to make a good-looking tool and then use it; it makes shop sessions much more rewarding  :thumbup: .  Fortunately no divots in it yet; in fact, I'm a bit anal when it comes to that sort of thing, and not one of my machines or vises have markings from tool overrun.  The markings visible on the 3-jaw chuck jaws was done by a previous owner...


05 June  2010

While the RT is pretty much finished (just needs a tear-down for cleaning, a quick lap of the table to the base with some grinding paste, and (maybe) some paint), I do need an adapter to mount my lathe chucks on it. This is not much of a build; it must just be made accurately, and easy to mount on center on the RT (where I'll most likely use it most of the time), but also off-center if need be, as I have some ideas of machining operations where this might be very beneficial.
 
 My raw materials were running a bit low, but I had ~5 meters of 60x10mm flat bar left - so a bit of that was fine for the chuck adapter base. I was pretty much out of ideal round bar for making the nose for my screw-on chucks; the only bit I could find was not quite as large in diameter as I would have liked, but it had to do.

 The bit of flat bar with 6mm slots milled in it for clamping to the RT, centered in the 4-jaw for facing and boring a hole in it:
 
 It's chucked with the jaw edges - not because the slots would interfere, but to be able to use the lower parts of the jaws to keep it flat on the surface of the steps on the jaws.
 
 I then faced the plate, and drilled and bored a 25mm hole in it, with a good chamfer on the face edge of the hole. Then I turned the bit of rod I have to _just_ clean off the crud on the OD, and then turned a section on the front down to match the hole bored in the plate with a fairly close under-size fit (0.02mm / 0.0005" smaller) I could have gone for a press fit, but rather chose to silver solder this joint - hence the bit of "looseness":
 
 I didn't go for nice finishes on this; the visible parts will be turned down further and the rough finish at the plate end will help wick the silver solder through the joint.
 
 Then I fluxed up both pieces, and placed two bits of silver solder on the plate. The plate is suspended on two bits of fire brick, so that I can heat the joint from the bottom with the oxy-butane torch; with the solder on top and the heat coming from the bottom, the solder would want to flow down into the joint - towards the flame:
 
 
 These are big bits of metal for my small torch, so I set my little butane "plumber's" torch to heat the top bit of rod to get some heat into it without the flame directly playing on the flux, and played the oxy-butane torch with a good blue flame on the bottom. It still took about 3 minutes for the flux to start to flow, and another minute after that for things to reach enough heat for the solder to melt and flow. The rod bit dropped down when the solder melted, with nearly no solder appearing at any of the edges of the joints, so I used just about the right amount :
 
 I couldn't be bothered to pickle that lot after soldering; when it cooled down to black, I just shoved it under a running garden tap to cool down. Very little to clean up, and most surfaces will be machined again...

06 June 2010

I started by turning a ring from some scrap HRS rod - for a light push fit into the "register" hole I bored in the RT's table. Here, it's done and I'm about to part it off:
 
 The ring's purpose will become clear later...
 
 Then I chucked the assembly I made yesterday in the 4-jaw, and roughly centered it - checking that I would need to remove a minimum of metal from the bottom to face it. I then faced it, drilled and reamed a 12mm hole through the center, and bored out a section to fit the ring made earlier, but with the ring a slightly tighter push fit; easily removable, but not inclined to fall out on its own:
 
 
 Next I cheated a bit. The workpiece has to be accurately turned around and re-mounted to keep both concentricity and axial alignment to the mounting face. I know that my lathe's tailstock and drill chuck is VERY close to perfect alignment with the spindle - less than 0.005mm out on offset, and extremely accurate in line - I can't even measure this. So instead of setting the job up in the 4-jaw and centering it, I mounted the face plate, and with a bit of 12mm silver steel chucked in the tailstock, used it to mount the workpiece to the face plate. No mess, no fuss, and as well aligned as I could have made it with the 4-jaw; just a LOT quicker :
 
 
 Then I proceeded to face this side of the mounting as well; not really needed, but does look neater, and then turned a spindle nose replica of my lathe on the front section, leaving a bit of clearance so that a mounted chuck will not come into contact with cap screws used for mounting the adapter to the table. I didn't take photos of the process, as I thought I'd just link to a similar adapter I made when I built my collet chuck Turns out, back then I forgot to take some photos.
 
 This was the end result of the operations:
 
 
 Just for fun, I put the RT to use to clean up the ugly ends of the adapter:
 
 I'm very glad I did this trial run; it uncovered some hiccups - easily addressed once I do a strip and re-assembly of the RT. For one, the pre-load on the bearing is not enough as it is assembled now. I had the grub screws holding the worm and the wheel come loose from vibration, so at next assembly, I'll use some thread locker on them.
 
 This is what the lot looks like with my 3-jaw chuck mounted on it:


 :beer: , Arnold

Offline Ed ke6bnl

  • Jr. Member
  • **
  • Posts: 25
  • Country: 00
Re: Home-brew 120mm rotary table
« Reply #44 on: June 27, 2016, 06:14:48 PM »
I need to make one for my Bridgeport rotary table that was used with a motor drive and I have no scale or dial to rotate the table. Just made a quicky handle to turn it.
1950 Ford F1 streetrod
1968 ecotec powered Baja Bug kink coil overs
1953 Chevy AD ready for 4 cyl. cummins and nv4500

Offline shipto

  • Hero Member
  • *****
  • Posts: 809
  • Country: gb
  • Redditch, UK
Re: Home-brew 120mm rotary table
« Reply #45 on: June 28, 2016, 05:14:33 PM »

 I removed the 4-jaw from the lathe with the table-in-making still mounted on it, and set it aside. The 3-jaw went on, and I started on the main shaft. First off, cut a bit off the big bolt from the first photo in this thread:
 
I really like the clamp extension plates on the saw  :thumbup: I might nick that idea and never seen it before I usually put a bit the same size in the back of the clamp.
 
 
Turns out this life c**p is just one big distraction from death but a good one. For the love of god dont give yourself time to think.
https://myshedblog.wordpress.com/