Author Topic: Grinding Rest  (Read 14395 times)

Online RussellT

  • Hero Member
  • *****
  • Posts: 520
  • Country: gb
Grinding Rest
« on: February 14, 2013, 11:52:40 AM »
I've been meaning to make a grinding rest since I bought a grinder but have managed with freehand grinding.  I've been spurred into action by noticing the tearing on one flank of a thread I was cutting and decided that the remedy was more accurate tool grinding.

I looked at some designs many of which seemed overcomplicated, and most needed resetting to the wheel after adjusting the angle.

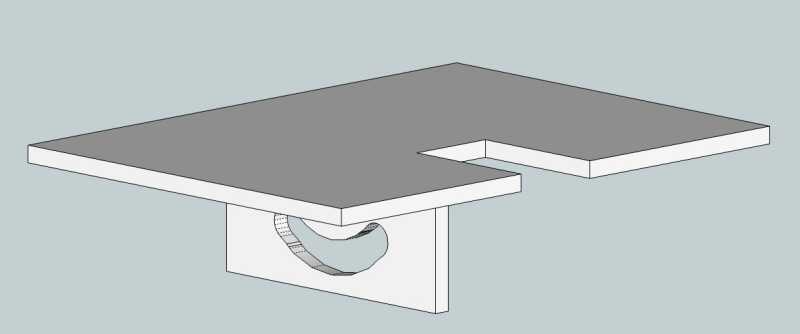
I thought it might be possible to make one that would stay set to the wheel as you adjusted the angle by making the edge nearest the wheel the centre of rotation for angle adjustment. :scratch:

I thought about adding pivots to the side of the rest but realised they would have to stick up above the surface and may get in the way. :scratch:

I thought about a curved slot (and even drew it) before I realised that it would tend to pivot about the bolt rather than slide in the slot. :scratch:

I thought about half a tube resting on two support rods with a clamping rod inside before I realised that the rods would have to go through the grinding wheel. :scratch:

I've finally come up with a design I'm going to try.  I don't know if it's original but I've not seen one like it.  There may be a good reason for that. :lol:

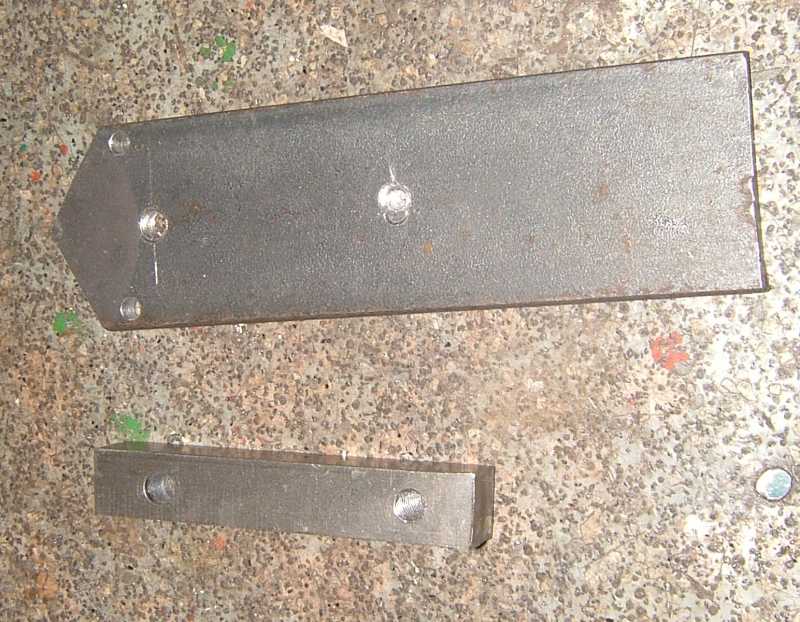
First I drilled two holes in a 2.25" piece of 1" angle and used them as guides to drill another piece of angle and two scraps of the steel I plan to use for the top of the rest.


Then I bolted them together, set them up in the lathe and turned them to 2".


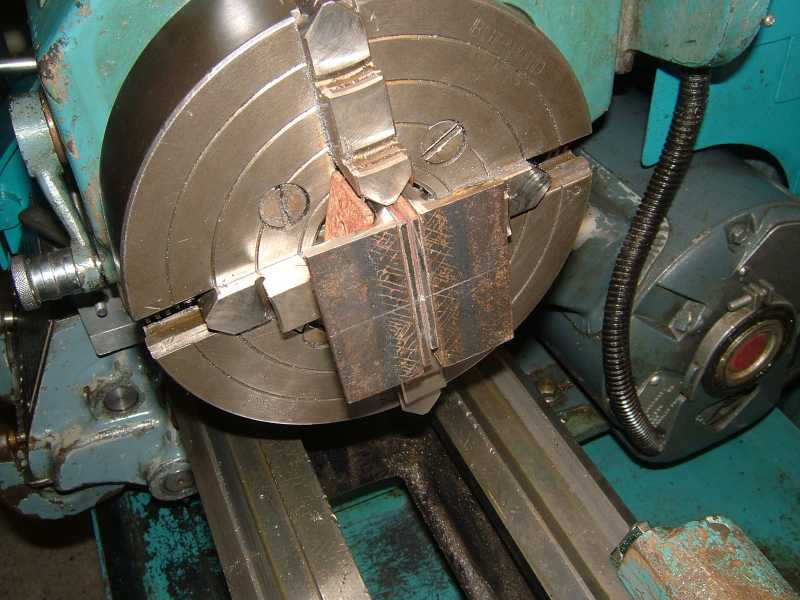
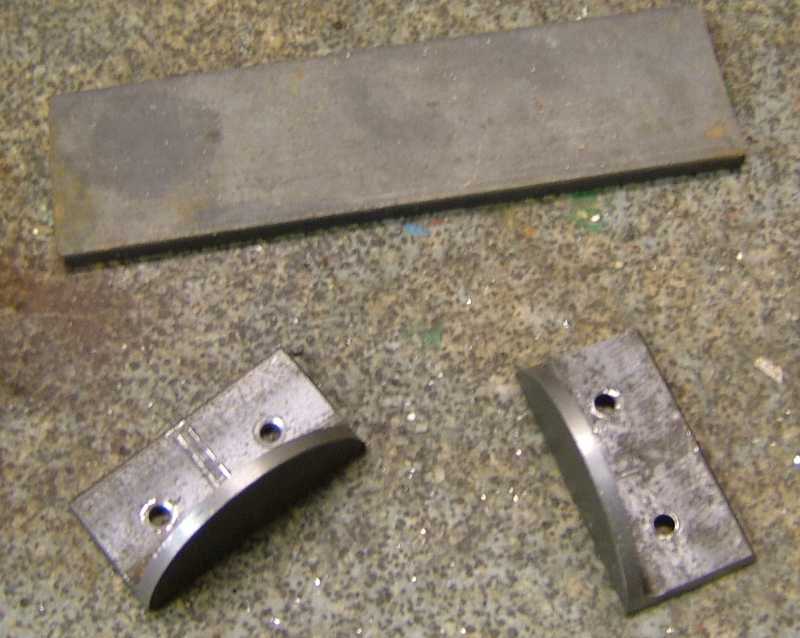
I filed the edges to match as these are not critical.


This was the result.


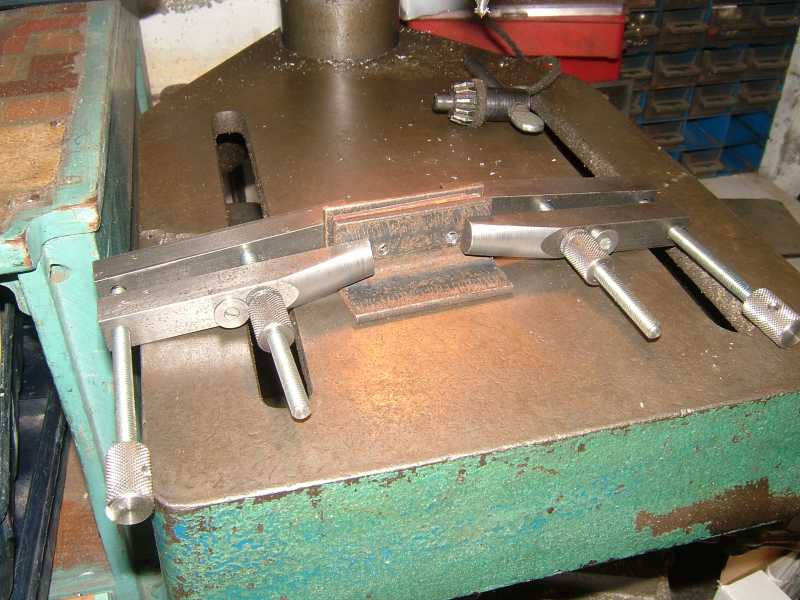
I took a couple more pieces of stock and drilled and tapped some holes.


Then came the trial assembly.  Here is the progress so far.


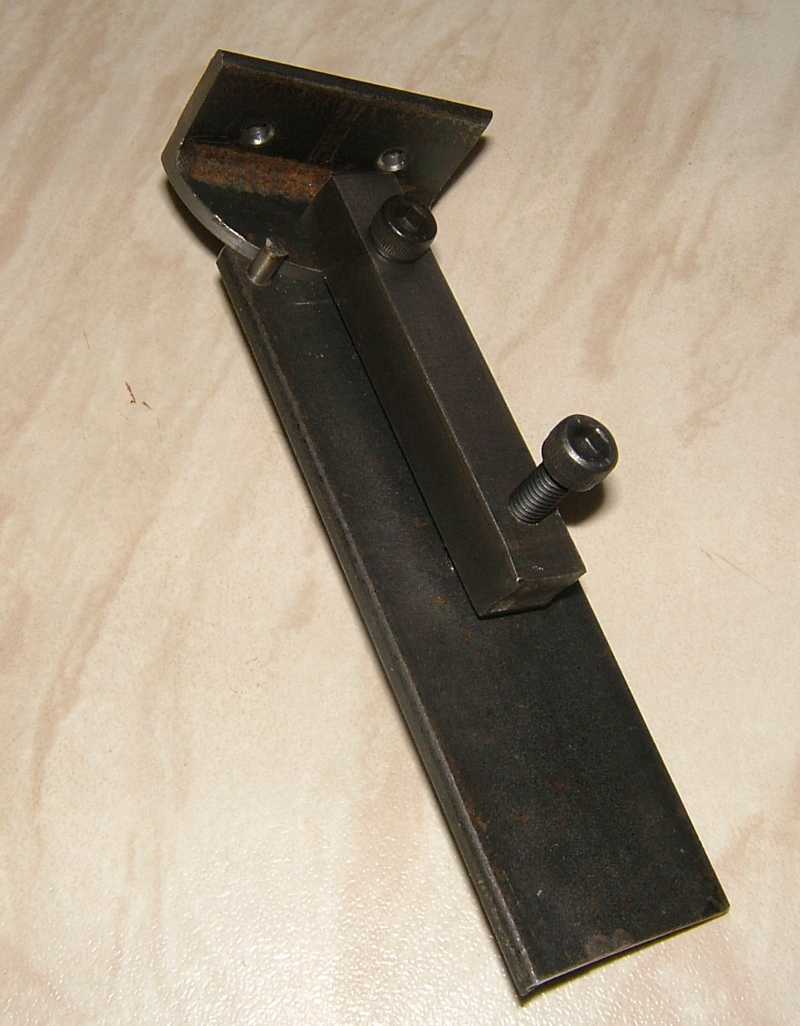
The square stock and the bolts are configured like a toolmaker's clamp and when slackened the angle slides on the two pins inserted in the upright.  It looks like it might work, I can tighten it with my fingers just enough to lock it solid and the angle adjusts OK.  The upright is too thin as it tends to bend under the clamping force and I could get the mounting nearer the centre of the top plate without fouling the grinding wheel if I configure the clamping screws to work from the other side.

More to follow soon (I hope). :D

Russell
Common sense is unfortunately not as common as its name suggests.

Offline Fredbare

  • Full Member
  • ***
  • Posts: 169
  • Country: gb
  • Fakenham, Norfolk
Re: Grinding Rest
« Reply #1 on: February 14, 2013, 04:29:53 PM »
Thanks for sharing Russell, I have been looking at making a grinder rest for some time, and this looks like one I could tackle,will be watching with interest.

John

Rob.Wilson

  • Guest
Re: Grinding Rest
« Reply #2 on: February 16, 2013, 03:17:31 AM »
keep the photos coming Russell  :thumbup: 


Rob

Online RussellT

  • Hero Member
  • *****
  • Posts: 520
  • Country: gb
Re: Grinding Rest
« Reply #3 on: February 16, 2013, 11:05:57 AM »
Thanks for your interest John and Rob. :nrocks:

I've made a bit more progress.  As I suggested in the last instalment I decided to make the upright thicker to reduce bending and move the table mounting toward the centre of the table and I've also been trying to work out how to make a rigid mounting and see if it will foul the machine's existing guards. :scratch:

I briefly considered a mounting along the lines of the existing rests but ruled it out as being far two floppy.  The experiment shown in the photo convinced me that it was unlikely ever to be firm enough if it was mounted to the grinder - and it was getting over complicated too - so I decided to mount it to the baseboard.


I decided to mount it at centre height - I'm not sure whether there's any reason to as the whole point is that the angle can be adjusted.  In the photo the rest is level with the top of the nut.  The nut is 19mm so it needs to go down 9.5mm.


I hunted through the "come in handy" pile for a bit of angle to mount it to the baseboard and chose this one as it already had a hole in the right place for the clamping screw.  It won't go rusty either as it's stainless.


I cut the angle in half with the angle grinder (obviously what it's for :lol:)and here's the progress so far.  Did I mention I was making two?


More to follow.

Russell
Common sense is unfortunately not as common as its name suggests.

Offline Chuck in E. TN

  • Hero Member
  • *****
  • Posts: 572
  • Country: us
  • USAF Retired
Re: Grinding Rest
« Reply #4 on: February 16, 2013, 11:34:37 AM »
Great project, Russell. Following closely to see how it comes out.
Chuck
Chuck in E. TN
Famous TN last words: "Hey ya'll, watch this..."
MicroMark 7x14, HF X2 mill, Green 4x6 saw. Harbor Freight 170A mig

Offline sparky961

  • Hero Member
  • *****
  • Posts: 844
  • Country: ca
Re: Grinding Rest
« Reply #5 on: February 16, 2013, 01:59:58 PM »
I like the setup you used to round off the angle iron.  I wouldn't have thought of that.

-Sparky

Offline AussieJimG

  • In Memoriam
  • Sr. Member
  • *****
  • Posts: 381
  • Country: au
Re: Grinding Rest
« Reply #6 on: February 16, 2013, 02:46:08 PM »
 This is looking interesting. It could be my next distraction.

Jim

Rob.Wilson

  • Guest
Re: Grinding Rest
« Reply #7 on: February 17, 2013, 04:54:07 AM »
Looking good Russell  :thumbup:

Just a thought , change the grinding wheels ,those Clark wheels are really not the best ,they turn to dust quicker than remove metal  :Doh: ,, still worth keeping hold of if you have a die grinder as you can use them to re-shape mounted grinding points .


Keep the photos coming  :thumbup:


Rob

Offline vtsteam

  • Global Moderator
  • Hero Member
  • *****
  • Posts: 6466
  • Country: us
  • Republic of Vermont
Re: Grinding Rest
« Reply #8 on: February 17, 2013, 10:29:27 AM »
I've been following this one, and enjoying your progress and photos. Might build one myself wen you're done. Keep it coming!  :coffee:
I love it when a Plan B comes together!
Steve
https://www.youtube.com/watch?v=4sDubB0-REg

Online RussellT

  • Hero Member
  • *****
  • Posts: 520
  • Country: gb
Re: Grinding Rest
« Reply #9 on: February 17, 2013, 11:59:52 AM »
Thanks for your interest vtsteam, Rob, Jim, Sparky and Chuck.

There's a bit more progress today.  A bit of drilling and tapping to secure the upright to the mounting.  Then I cut out the top surfaces and cut a couple of notches with angle grinder, chain drilling and file.  I extended the holes in the bottom of the base to make adjustable mounting slots.  These are deliberately a bit wide to allow some adjustment.

Here's the progress now.


The cutouts around the grinding wheel are deliberately a bit tight to allow for fitting after they're fixed to the pivots.  So far it seems as though it will work OK.  I can't see any in and out movement of the edge against the grinding wheel when I adjust the table with the edge about 0.5mm from the wheel.  The aspect that I have been struggling with a bit is how much movement I need to build in to allow for wear in the grinding wheels without fouling the guards on the grinder and I was considering having the table wrap less around the side of the grinding wheel.

Rob's comments on grinding wheels were helpful and I decided that it was better to replace them sooner rather than later so I made the notch in the table 25mm deep and I made the slot in the base long enough for 15mm of in/out adjustment - which is enough to take a six inch grinding wheel down to 4 3/4".  I can always take a bit off the table or the guards if there is a problem.

Here's a picture showing how the parts fit together.  Bolts will be reduced in length.


The only remaining tasks are to fix the table to the mounting and fasten the rest to the grinder baseboard.  I'm thinking about how to do that - my plan was to use some countersunk Allen bolts from the bottom but I'll have to buy some before I can do that.  I might just weld them instead.

Sparky, I'm glad you liked my setup, it worked OK but would have been better if I'd bolted all the bits together a bit over size and then cut them down together before I put them in the lathe.  That way I'd have had a flat surface for all the jaws to seat on.

That's all for now.

Russell

« Last Edit: February 17, 2013, 12:32:03 PM by RussellT »
Common sense is unfortunately not as common as its name suggests.

Offline Alan Haisley

  • Jr. Member
  • **
  • Posts: 65
  • Country: us
Re: Grinding Rest
« Reply #10 on: February 17, 2013, 12:34:23 PM »
I cut the angle in half with the angle grinder (obviously what it's for :lol:)and here's the progress so far.  Did I mention I was making two?

I thought you were making a bracket for each side of one wheel. I was waiting to see how you fit the upright and bracket in the area between the motor and wheel guard.
Much clearer now.
Alan

Online RussellT

  • Hero Member
  • *****
  • Posts: 520
  • Country: gb
Re: Grinding Rest
« Reply #11 on: February 18, 2013, 12:23:20 PM »
Thanks for your interest Alan.

A little more progress today.

I decided (impatience won) to risk distortion and weld the tables to the mountings.  The results were OK.  There was a little bit of a bump opposite the welds near the middle but a few minutes work with a file made it acceptably flat.  Just one picture today.


More to follow.

Russell
Common sense is unfortunately not as common as its name suggests.

Offline Stilldrillin

  • Global Moderator
  • Hero Member
  • *****
  • Posts: 4972
  • Country: gb
  • Staveley, Derbyshire. England.
Re: Grinding Rest
« Reply #12 on: February 18, 2013, 06:01:17 PM »
Thanks for showing this project Russel.  :thumbup:

I have the same grinder.
It's under the bench, somewhere. Cos we just don't get on! The wheels didn't cut. Neither did others which replaced em........  :bang:

Until I can locate a supply of proper wheels, it will stay under the bench........  :(

David D
David.

Still drilling holes... Sometimes, in the right place!

Still modifying bits of metal... Occasionally, making an improvement!

Offline Meldonmech

  • Hero Member
  • *****
  • Posts: 933
Re: Grinding Rest
« Reply #13 on: February 21, 2013, 11:52:05 AM »
Hi David,
               I bought a similar grinder 10 yrs ago with useless wheels, and was advised to contact www.peterchild.co.uk. on his site he gives advice pics and prices. I do cabinet making and wood turning as well as metal machining and require a cool and fast cutting wheel, as some tools are only high carbon steel and are easily burnt. I visited his work shop and show room, and tried one of his pink wheels, which at the time was the best he stocked. The wheel cost me £20 about the same as the 1/2 hp grinder.
 However it turned out to be a great deal, cuts very well and cool, plus very little wear, several months later I bought a pink fine wheel as they cut HSS very well. The wheels he stocks now are the best available, but it depends what you want.

                                                                      Definitely worth look    Cheers David

Online RussellT

  • Hero Member
  • *****
  • Posts: 520
  • Country: gb
Re: Grinding Rest
« Reply #14 on: February 22, 2013, 11:50:46 AM »
Thanks for your interest David.  I don't have quite as bad an opinion of the wheels as you.  Perhaps my expectations of a cheap grinder weren't very high.  The coarse one isn't very good in fact the fine one may be quicker but there have been several occasions when I've touched something to the wheel to take a little off and taken off too much.  Better wheels might be nicer but I think I only paid £14.99.

I do regret not getting a grinder with a bigger motor as it's very easy to slow it down if you're trying to take off a lot of metal.

I've finished off the grinding rests.  I've shortened some sticking out bolts, and found some knurled nuts and bolts to hold them to the base board.


I've replaced one of the clamping screws with a stud and a nyloc nut so it stays adjusted and I've made a knurled knob for the other.


Then I've tried it.  This composite picture shows the tables at different angles.  The bases weren't moved and the grinder is running.


This is the table set up to grind a lathe tool.


So, does it do what I wanted it to?  Yes, definitely.  It is easy to adjust.  The tables tend to ride up on the support pins as I alter the angle but it's easy to push them to the correct place.  The angle can be adjusted without altering the in/out adjustment.  Construction was simple.

I have got some ideas that could make it even simpler - for example using a single piece of angle for the base and cutting a large washer in half to make the bearing surface.

I will probably make one or two extra bits and pieces as time goes on.  I could cut some angle setting gauges from a few bits of card or thin sheet metal.  A couple of scraps of square bar bolted together would make a gauge that would slide along the front edge of the table to set a tool at an angle.

That's all for now.

Russell
Common sense is unfortunately not as common as its name suggests.

Offline mhh

  • Jr. Member
  • **
  • Posts: 74
  • Country: dk
Re: Grinding Rest
« Reply #15 on: February 22, 2013, 12:59:06 PM »
Looking really good!  :thumbup:

I like the way you clamp it!

Offline rdhem2

  • Jr. Member
  • **
  • Posts: 25
  • Country: us
  • I LOVE SWARF!!!
Re: Grinding Rest
« Reply #16 on: March 02, 2013, 10:59:38 AM »
RussellT--RussellD here;  Some really great ideas.  Mind if I copy/borrow a bunch of them?  Have been in the hunt for a tool grinder for some time now and your ideas got my frontal lobes functioning like the waves on the ocean.    :drool:   My only suggestion is to change one side to accomodate a cup wheel so you can create a truly flat facet if needed.  And maybe a mitre gauge?  Keep the old bean a workin.  Thank you my man.  Time to make SWARF!!!      :ddb:
Russ

Offline Fredbare

  • Full Member
  • ***
  • Posts: 169
  • Country: gb
  • Fakenham, Norfolk
Re: Grinding Rest
« Reply #17 on: March 02, 2013, 02:35:46 PM »
Thanks Russell, well done and photographed.

John

Online RussellT

  • Hero Member
  • *****
  • Posts: 520
  • Country: gb
Re: Grinding Rest
« Reply #18 on: March 03, 2013, 12:06:26 PM »
mhh, RussellD, John.  Thanks for taking an interest.

mhh - I think the clamp is crucial to being being able to minimise the rest of it.

RussellD - Feel free to use ideas - perhaps we could have a Russell grinder series.  Let us all see how you get on.

Thanks for looking.

Russell
Common sense is unfortunately not as common as its name suggests.