Author Topic: 3d metalcasting test  (Read 23141 times)

Offline tom osselton

  • Hero Member
  • *****
  • Posts: 1255
  • Country: ca
3d metalcasting test
« on: August 03, 2014, 06:30:57 AM »
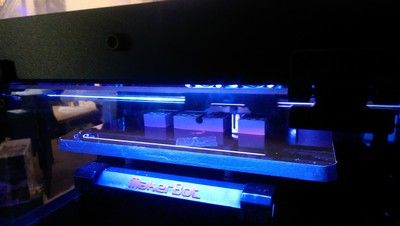
I have been playing with my 3d printer I have seen a utube video a while ago using pla plastic to cast metal. The finishes on the castings seem quite good but they say to burn out the plastic (2 - 4 hr's) then give it a shot of air to clear the residue.


I have found this molding rubber at PMS Hobby it melts in the microwave and can be used for internal or external molds it is soft and spongy and I figured if it isn’t ridged enough I could pierce it with thin brass rod or tubing that should melt into the pour it is more ridged when cold.

http://www.composimold.com/


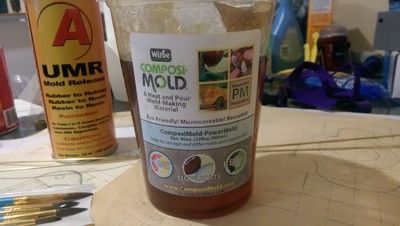
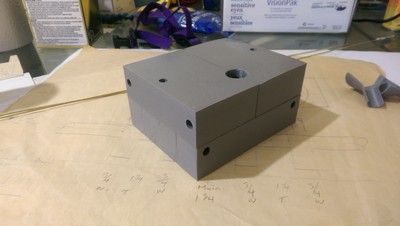
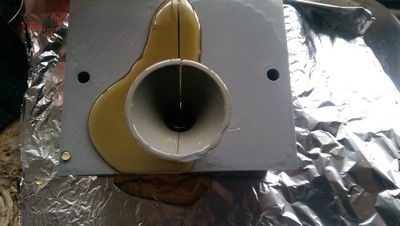
So this is a 5 piece mold that I made, the 3 main parts are on the bottom with two glands one on each side, the top piece wasn't really necessary but I made it anyways it’s a gate connecting  the two glands for pouring.


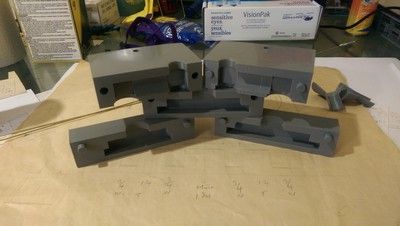
I didn't use any release agent on the first attempt and it didn‘t release very well, on the second I used pam cooking spray wiping off the excess spray making removal of the cast possible.


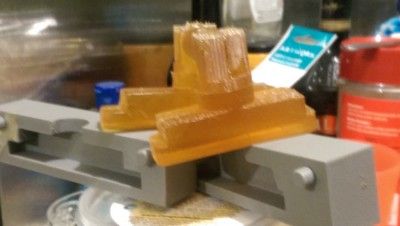
As you can see there is some leakage at the seams but it is quite thin and easily removed the glob on top is from the funnel I printed it in two halves (it leaked) the idea was to use it for a sprue it’s walls should have been thicker.


 I could have used threaded rods to press them together as the pin holes go straight through but for coming straight from the printer (including pins) I'm impressed how well it seals.
I'm going to try casting brass and see how it goes.
Here is the rubber set in plaster /sand a 50/50 mix when it dry's out I'll melt out the rubber (200 degrees F) and open up the passage a little for the pour with a rasp I don’t think I‘ll need a riser as the brass is quite heavy.
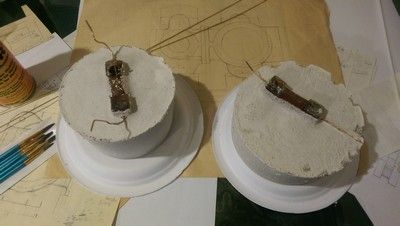


  I’ll let you know how it turns out!

Offline vtsteam

  • Global Moderator
  • Hero Member
  • *****
  • Posts: 6463
  • Country: us
  • Republic of Vermont
Re: 3d metalcasting test
« Reply #1 on: August 03, 2014, 07:24:38 AM »
Very interesting Tom. Looking forward to this one.... :coffee: :coffee: :coffee:

I've done some lost foam casting in the past with aluminum, with mixed results. A couple good castings, about as many bad. The problem was the time and effort in the pattern, which goes up in smoke. I was just thinking about trying it again with constructed fanfold foam CNC routed patterns, and about lost wax/investment from molded patterns, which I've never tried. But yours looks like another option.
I love it when a Plan B comes together!
Steve
https://www.youtube.com/watch?v=4sDubB0-REg

Offline vtsteam

  • Global Moderator
  • Hero Member
  • *****
  • Posts: 6463
  • Country: us
  • Republic of Vermont
Re: 3d metalcasting test
« Reply #2 on: August 03, 2014, 07:39:15 AM »
I'll be curious to see how the sand and plaster mold goes at brass heat -- is it a special plaster?
I love it when a Plan B comes together!
Steve
https://www.youtube.com/watch?v=4sDubB0-REg

Offline mattinker

  • Hero Member
  • *****
  • Posts: 1316
  • Country: fr
Re: 3d metalcasting test
« Reply #3 on: August 03, 2014, 10:57:29 AM »
I'll be curious to see how the sand and plaster mold goes at brass heat -- is it a special plaster?

Plaster is the base of "lost wax" casting, it resists the heat very well. The sand, or Grog (frequently crushed brick) gives it inert body. The thing that is critical is baking it right through over 600°C long enough for the plaster, CaSO4·2H2O + heat → CaSO4·0.5H2O + 1.5H2O to loose the the water molecules that would create steam instantly when coming into contact with the molten metal. This steam will create a gisor of molten metal, not the desired affect!. Pouring into a mold that is over 600°C slows the cooling of the metal which makes it flow better.

Regards, Matthew

Offline awemawson

  • Global Moderator
  • Hero Member
  • *****
  • Posts: 8966
  • Country: gb
  • East Sussex, UK
Re: 3d metalcasting test
« Reply #4 on: August 03, 2014, 11:20:03 AM »
I experimented with lost wax casting when my youngest daughter was doing an art project at school some years ago - she modelled a rather good recumbent lion in clay, from which I took a vinamold cast to make wax cores which I set in 'Investment Plaster' from a jewellery supply house.

The plaster was good for aluminium, brass and copper. I made some iron ones using sodium silicate sand round the wax core. My 'burn out furnace' is an ordinary pottery kiln.

As Matthew suggests, I poured metal straight into the moulds removed from the glowing kiln. I had bent up some steel bands to surround the block to give enough strength to handle with tongs.
Andrew Mawson
East Sussex

Offline vtsteam

  • Global Moderator
  • Hero Member
  • *****
  • Posts: 6463
  • Country: us
  • Republic of Vermont
Re: 3d metalcasting test
« Reply #5 on: August 03, 2014, 12:27:31 PM »
Thanks Matt but I meant in asking whether Tom was using a metal casting investment plaster or whether it was ordinary plaster of Paris.
I love it when a Plan B comes together!
Steve
https://www.youtube.com/watch?v=4sDubB0-REg

Offline tom osselton

  • Hero Member
  • *****
  • Posts: 1255
  • Country: ca
Re: 3d metalcasting test
« Reply #6 on: August 03, 2014, 03:25:32 PM »
I'm just using ordinary plaster of paris although I did buy some high strenth plaster too but decided to try ordinary plaster first. The first thing I have to do is get it to dry out, it is still moist after being poured 22 hours ago. I have a kiln so I will do a meltout and slowly raise the temperature till it is dry after that they could be heated up over the furnace while the metal is melting.

Offline mattinker

  • Hero Member
  • *****
  • Posts: 1316
  • Country: fr
Re: 3d metalcasting test
« Reply #7 on: August 03, 2014, 03:55:05 PM »
The thing about plaster is that when it's "dry" there are still one molecule of water out of four that can detach it's self and generate steam. It should be heated in such a way as to get the entire piece up to 600° C and kept there to make sure it's cooked! Pour when hot. The sand should be silica sand. Plaster is plaster, additions in the form of sand or brick dust etc make it stronger. Ordinary plaster when completely dry will resist non ferrous temperatures.

Happy casting, regards, Matthew

Offline tom osselton

  • Hero Member
  • *****
  • Posts: 1255
  • Country: ca
Re: 3d metalcasting test
« Reply #8 on: August 03, 2014, 04:17:02 PM »
Thanks Matthew I'll keep that in mind, I know steam would be the main problem but it would not be hard to make a preheat chamber something say with a removable top so it could be poured on the spot. I have some fiberwool left over from my furnace build so it should not be a problem (fingers crossed)

Offline vtsteam

  • Global Moderator
  • Hero Member
  • *****
  • Posts: 6463
  • Country: us
  • Republic of Vermont
Re: 3d metalcasting test
« Reply #9 on: August 03, 2014, 06:00:17 PM »
Matt have you cast in plaster of Paris before?
I love it when a Plan B comes together!
Steve
https://www.youtube.com/watch?v=4sDubB0-REg

Offline mattinker

  • Hero Member
  • *****
  • Posts: 1316
  • Country: fr
Re: 3d metalcasting test
« Reply #10 on: August 03, 2014, 06:35:45 PM »
Yes, I've cast smal sculptures Aluminium Bronze in plaster using crushed brick as grog. It's the time honored investment plaster mix. I used a potters kiln to dry out the mold pouring into the mold hot. My foundry was hard pressed to get the metal up to temperature, despite my dissolving the Cu into the Al. Unfortunately I haven't got any photos, which is a pity. I'd like to do some more!

Regards, Matthew

Offline vtsteam

  • Global Moderator
  • Hero Member
  • *****
  • Posts: 6463
  • Country: us
  • Republic of Vermont
Re: 3d metalcasting test
« Reply #11 on: August 03, 2014, 07:06:13 PM »
I have some fine grog Matt, I might have to give this a try soon.  :thumbup:
I love it when a Plan B comes together!
Steve
https://www.youtube.com/watch?v=4sDubB0-REg

Offline tom osselton

  • Hero Member
  • *****
  • Posts: 1255
  • Country: ca
Re: 3d metalcasting test
« Reply #12 on: August 05, 2014, 07:25:59 AM »
I pulled out my supper yesterday and popped in the molds to melt out the rubber yesterday and was impressed as how clean it was inside the mold (you can do this stuff without a better half)  :D and there was no odor to speak of either nor any visit from the fire brigade (alarm's wired in).


Today I put them both in the kiln to see what the effect of heat had on the plaster/sand mix and went from 250C to 450C and finally 700 degrees C over a period of 6 hours then letting it cool down at the same rate as the kiln both the molds are doing fine and there seems to be no sign of cracking although I haven’t handled them yet.


My concern now is if they are to be preheated I have to be able to handle them, so far for casting I have been using welding gloves and on a couple occasions have had to do that hand shaking thing.

Anyways here is the start of some tongs for handling the molds. Strange design I know but you will always have inward pressure lifting by the bottom part of the handle it’s weight should help hold it and they are not that heavy, after all it worked fine for the iceman. I’m thinking the bottom will be curved in the center with a flat section on either side for round or flat molds or I could weld on something so the grippers are interchangeable then flat or round would make no difference which is probably the way to go.


Offline vtsteam

  • Global Moderator
  • Hero Member
  • *****
  • Posts: 6463
  • Country: us
  • Republic of Vermont
Re: 3d metalcasting test
« Reply #13 on: August 05, 2014, 02:59:52 PM »
If preheating is wanted could you just make a circular metal plate to fit the bottom of the kiln, with a rigid bail for lifting both molds out at the same time? You could even tack some short pipe "cup holders" onto the plate to keep them from shifting. A hook inserted into the bail could lift the whole deal out, or replace it if necessary
I love it when a Plan B comes together!
Steve
https://www.youtube.com/watch?v=4sDubB0-REg

Offline tom osselton

  • Hero Member
  • *****
  • Posts: 1255
  • Country: ca
Re: 3d metalcasting test
« Reply #14 on: August 06, 2014, 07:32:26 AM »
vtsteam yes I could do that and set some eyelets directly into the casting I`ll use that as a last resort for now I have done this, so far it seems to be not too bad and seems to have a decent grip but would never use it on a crucible.


well the kiln had cooled off and I pulled them out to take a better look and to use a rasp to open up the entrance better for the pour. The molds looked good no cracks and clean inside.


I`m not sure what the powder is possibly talkum anyways it is slippery and I dropped one and could not catch it, my right arm has nerve damage when they put me back together (arm broke in 5 places) along with the other bones lol. anyways here is what it looked like inside after being fired at 700 degrees c.


As you can see the sand is evenly distributed and did not settle prior to the setting of the plaster and what is left of the mold has good surfaces. I was curious about any residue left in the remaining mold  and blew it out with compressed air the pressure was too high and exposed some of the underlying sand so if you try this turn the pressure down lower. Now I have one mold and figure what the H and load up the crucible with scrap and fire the furnace well it starts to smoke and I figure it is the zinc being burnt off and take a look there are some white flames in the crucible and start to think magnesium well the metal is molten and you are a bit in panic mode so I pulled the crucible and made the pour without even thinking about skimming! Now the mold is round and the pattern is square and it ruptures on the side so this is what I got one side totally wasted the other is not that bad and if I skimed it could be useful although the bottom half does dip in the middle it would be machinable but next time I will try it with some thin wall tubing or brass wire to keep it`s structure intact. I`m heading off on holidays tomorow and will take my puter with me so I will try again in two weeks with the addition of a pla plastic mold to compare with. So test one was a cluster F..k test two has to be better I just have to remember `you can`t put a square peg in a round hole! :D

Oh and the casting looked more silver than brass if that means anything to you.


Offline vtsteam

  • Global Moderator
  • Hero Member
  • *****
  • Posts: 6463
  • Country: us
  • Republic of Vermont
Re: 3d metalcasting test
« Reply #15 on: August 06, 2014, 07:54:43 AM »
Tom the white fumes and flames were zinc burning off from the brass. As John doubleboost said, brass is tricky compared to bronze. Temperature control and timing is important, covering the crucible can help, etc.

I have a hard time seeing what you are making in these photos as well as most others you post because they are so small. When I go to Photobucket to see if they are available larger, they don't seem to be. Just wondering if that's a problem with my anti-script add-ons, or if your photos are really just very low resolution. If they are just small, can you post them 640 pixels wide? Cropping to the object of interest and then posting the cropped image that wide would also really help

From what I can see, it looks like maybe you're casting a slide valve? I can't really tell -- or see surface finish of the pattern or casting. That would help figure out what's going on.
I love it when a Plan B comes together!
Steve
https://www.youtube.com/watch?v=4sDubB0-REg

Offline S. Heslop

  • Hero Member
  • *****
  • Posts: 1154
  • Country: gb
  • Newcastle Upon Tyne
Re: 3d metalcasting test
« Reply #16 on: August 06, 2014, 03:55:00 PM »
I suppose you already know, but it's worth repeating. But you should be careful not to breathe the zinc fumes. They can make you fairly ill, with flu like symptoms. There's even been cases of people dying from it.

Interesting thread though. It's nice to see people using 3d printers for useful stuff since i'm sick of seeing people using them to make ugly statues or things that'd be easier to make without one.

Offline tom osselton

  • Hero Member
  • *****
  • Posts: 1255
  • Country: ca
Re: 3d metalcasting test
« Reply #17 on: August 06, 2014, 06:15:25 PM »
Ok I never knew zinc burned with a white flame I thought it burned off as the white smoke, in the test melt the other day we didn't see the white flame. We are using the furnace outside so the fumes are not too bad and usually there is a bit of a breeze.
I could post them at 640 that's no problem I read on here that some have pics off to load faster and was trying to find a happy medium.

Offline vtsteam

  • Global Moderator
  • Hero Member
  • *****
  • Posts: 6463
  • Country: us
  • Republic of Vermont
Re: 3d metalcasting test
« Reply #18 on: August 06, 2014, 06:57:53 PM »
The zinc flame usually looks white to me -- maybe a little greenish, with definite voluminous white smoke. Keeping air out of the crucible with a clay cover can help, and pouring at the lowest temp reasonable that will fill the mold. I notice many people overheat aluminum in videos I've seen, and skim too much, so get a lot of oxidation. I imagine the same is true of brass.

In a charcoal furnace embers inevitably fall into the melt and float on top. This actually reduces oxidation as the burning carbon absorbs it. That, and the usually reducing atmosphere of a pile of charcoal means the aluminum doesn't burn. I don't skim the embers off until pouring. and I get little real dross and shiny castings. I think propane is more convenient to most people, but the tendency with many is to overheat and oxidize the melt with that powerful flame.

I've done a few small brass melts with charcoal, and they worked out well, though fuel has to be added during the melt. I don't know how that compares with a propane melt of brass.
I love it when a Plan B comes together!
Steve
https://www.youtube.com/watch?v=4sDubB0-REg

Offline mattinker

  • Hero Member
  • *****
  • Posts: 1316
  • Country: fr
Re: 3d metalcasting test
« Reply #19 on: August 07, 2014, 12:41:19 AM »
The Zinc actually boils at 907°C and a melting point of 460°C it's not burning it's boiling. The melting point of brass is 900 to 940°C, so keep get to melting point and pour, hot molds will help keep the fluidity up longer. I have no experience of casting brass, it's not very attractive!

Regards, Matthew
« Last Edit: August 07, 2014, 01:10:12 PM by mattinker »

Offline tom osselton

  • Hero Member
  • *****
  • Posts: 1255
  • Country: ca
Re: 3d metalcasting test
« Reply #20 on: August 07, 2014, 02:25:42 AM »
Ok thanks for the info I'll try again in 2 weeks I'm just having a coffee at Denny's then hitting the highway for Victoria BC should hit the ferries in 12 hours or so.

Offline vtsteam

  • Global Moderator
  • Hero Member
  • *****
  • Posts: 6463
  • Country: us
  • Republic of Vermont
Re: 3d metalcasting test
« Reply #21 on: August 07, 2014, 08:17:38 AM »
The Zinc actually boils at 907°C and a melting point of, it's not burning it's boiling. The melting point of brass is 900 to 940°C, so keep get to melting point and pour, hot molds will help keep the fluidity up longer. I have no experience of casting brass, it's not very attractive!

Regards, Matthew

Zinc burns, Matthew!  :doh:

Ignition temperature of zinc dust is only 600C. Zinc vapor is similar. What do you think happens when you boil it? If you boil zinc in the presence of oxygen It WILL burn.

I've done it and seen it.. The flame is greenish. The voluminous white smoke is zinc oxide from burning it, not elemental zinc. Anyone else who has ever overheated galvanized metal or brass with a torch can attest to this. There are flames.
I love it when a Plan B comes together!
Steve
https://www.youtube.com/watch?v=4sDubB0-REg

Offline mattinker

  • Hero Member
  • *****
  • Posts: 1316
  • Country: fr
Re: 3d metalcasting test
« Reply #22 on: August 07, 2014, 01:15:35 PM »
The Zinc burning is a respiratory problem, the boiling of zinc when melting for casting is another problem. Zinc mixed with molten copper does not have a supply of oxygen, melting brass leads to zinc loss. You will loose zinc without it necessarily burning.

Regards, Matthew

Offline vtsteam

  • Global Moderator
  • Hero Member
  • *****
  • Posts: 6463
  • Country: us
  • Republic of Vermont
Re: 3d metalcasting test
« Reply #23 on: August 07, 2014, 04:26:06 PM »
Zinc mixed with molten copper does not have a supply of oxygen.

It does on the surface and when vaporized!

A cup of gasoline also doesn't have much oxygen, internally, but I wouldn't suggest lowering one into a running furnace!

There's plenty of oxygen in there. Since the atmosphere inside a brass furnace exceeds zinc's ignition temperature, any free zinc vapor will oxidize instantly, ie. burn and produce the characteristic white smoke that is zinc oxide.

Visible zinc flames erupting from the surface during brass founding are called "flaring" in foundry parlance. Can we stop debating whether the flames Tom saw when melting brass was due to zinc burning?  :bang:

I love it when a Plan B comes together!
Steve
https://www.youtube.com/watch?v=4sDubB0-REg

Offline mattinker

  • Hero Member
  • *****
  • Posts: 1316
  • Country: fr
Re: 3d metalcasting test
« Reply #24 on: August 07, 2014, 05:01:02 PM »
I'm not debating whether the flames Tom saw when melting brass was due to zinc burning, I'm pointing out a practical difficulty of melting a substance that boils at around the melting point of the alloy that contains it.  You are right about the Zinc vapors and fever. I do know from personal experience what fume fever is! I would imagine that slag on the surface of the melt which would keep the oxygen away. I wonder how brass is cast commercially.


Regards, Matthew