Author Topic: Bog's Paddleduck Engine  (Read 98834 times)

Offline kvom

  • Hero Member
  • *****
  • Posts: 520
Re: Bog's Paddleduck Engine
« Reply #50 on: May 11, 2009, 08:16:10 AM »
As Sunday was Mother's Day here, most of the day was spent on family doings.  Plus I was starting a minor repair to reweld the fenders on my car hauler trailer.  However, at the end of the day I decided to cut off the metal for the block using the big horizontal bandsaw from the 1940s that I recently restored.

The metal was a chunk of 1x2x7" bar of coppery alloy.  When cut the surface looks like a new shiny penny, but the patina is a dark brown chocolate color.  My goal was to cut a 3.25" piece.  This was the first time I tried to use the saw on anything other than a test on some 1/2" brass bar (which took 2 seconds to cut through).

The first and second attempts to start the cut saw the blade pop off of the drive wheels.  I finally got the tension tight enough and was able to start the cut, but had the feed adjusted too slow.  I left it to run while sweeping up a weeks' worth of swarf, but after 20 minutes it was only halfway through.  I let off on the hydraulic cylinder a touch and it sawed through the next inch or so in a couple of seconds, then slowed.  Another touch off and it cut through.  In conclusion, these old saws need a lot of manual adjusting to cut, but once it's right they can really rip through the material.  The resulting cut was quite straight as well.

I need to do some measuring, but I am hoping to get the steam chests and bearing blocks from whats left over.

Offline kvom

  • Hero Member
  • *****
  • Posts: 520
Re: Bog's Paddleduck Engine
« Reply #51 on: May 11, 2009, 03:22:45 PM »
I spent a few hours today starting on the engine block.  It took some time to square it all up as the material doesn't like big cuts or fast feeds.  Too fast and it throws off dark chips and smoke.  In addition it creates a lot of tough burrs, so lots of filing to debur the edges after milling each side was necessary.

The dimensions ended up right on for thickness, and about .100" large on height and width.  Based on the material I have, the steam chests may be somewhat thinner than spec, so I am planning not to adjust the block width until I can measure them.

In any case, the cylinder bores are positioned relative to the center lines, so I proceeded to drill these.  I am going to leave the bore at .500, which although somewhat less than scaled, is the size of my largest reamer.  Were I to bore it to .590, the displacement would be 3.375 times greater than the original.  As it is, the displacement will be 1.907 times.


I was concerned that scaling up the steam holes from 1.6 mm might not work, as I would presumably want the area of the opening to be approx. twice as large.  Since a hole with twice the area is .089" in diameter and a hole 1.5 times 1.6mm is .094", it seems irrelevant.

Offline kvom

  • Hero Member
  • *****
  • Posts: 520
Re: Bog's Paddleduck Engine
« Reply #52 on: May 12, 2009, 08:50:36 PM »
After milling the main block, I was determined to make the rest of that bar serve for the steam chests and bearing blocks, as I have no other thick brass. 

The piece destined for the steam chests was just wide enough for two, but I was afraid that if cut on the bandsaw one piece would be too small.  So I used the slitting saw to slide it in two on the mill.  I can say that the level of "chatter" was more like a scream, but feeding at less than 1 ft/min at 300 rpm finally got the job done.  After squaring the two resulting bars, I found that the height would be less than scale, but still enough for the computed valve bore with a decent amount to spare.  I then milled one side to the proper width, but left the depths unchanged.  Given that the datum lines are center lines, I can drill all the holes and clean up the depths at the end (I might possibly need to reduce the depth of the block slightly as well).

The remainder of the material was 1x1", meaning that the depth of the bearing blocks will be slightly smaller than scale.  Before I mill the width I need to calculate an allowance for the smaller than scale crankwebs.

So not a lot to show in finished parts, but a lot of time spent on the mill.

The scale for the valve bore is between 5/16 and 3/8, so I will need to order some drill rod.  Luckily Enco is running a free shipping + 10% discount the next two days.   :beer:

Offline kvom

  • Hero Member
  • *****
  • Posts: 520
Re: Bog's Paddleduck Engine
« Reply #53 on: May 14, 2009, 05:08:55 PM »
Not having any bar stock large enough for milling the crossheads, I did some calculations and found that I could get a block cut from some 2" round stock.  I still has a chunk of mystery brass alloy that Cedge gave me, so I cut off a 1" slice on the bandsaw and milled it into an ablong block.  This was yesterday; today I decided to continue.  I didn't get far.   :bang:  As I was drilling one of the holes for the guides, I noticed a hot spot on the side of the block.  Seems this metal gets hot when drilled, and actually melted at the bottom of the hole:


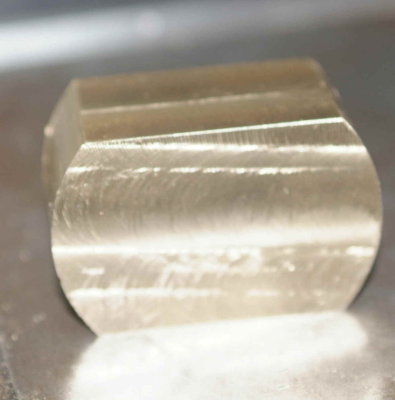
Since I also had a piece of 360 brass 2" rod, I went to Plan B and repeated the milling operation.  Once I had the first block, I calculated that it was 62% of the original disc:


Here's the machining sequence for anyone that's interested.  First, since the sides of the disc are reasonably straight, I chuck the disc in the vise with one side flat against the fixed jaw and mill one face flat to remove saw marks.  Next I reverse the disc with the flat face on parallels and mill the other face.  Now I can clamp the two flat faces on the vise jaws and mill one side (after calculating how much to cut).  This flat side is then clamped flat on parallels to mill the opposite face.  I now have something that looks like this:


I then use a square to clamp it vertically.


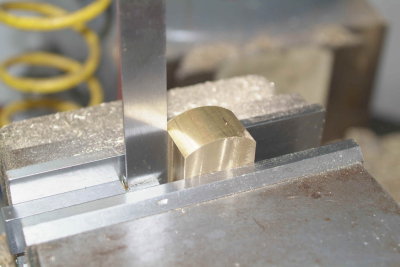
Once I had an oblong block it was a matter of carefully drilling and milling the crosshead out of it.  I didn't find the optimum milling sequence, but all was fine in the end.


Hopefully I'll finish the other one the next time in the shop.

Offline kvom

  • Hero Member
  • *****
  • Posts: 520
Re: Bog's Paddleduck Engine
« Reply #54 on: May 16, 2009, 06:08:52 PM »
Rather than finish the other crosshead, I decided to work on the bearing blocks that I had roughed out last week.  It was tedious work, but nothing fancy.  The vise stop saves a lot of time in repetitive operations on multiple parts.  I did drill the oil holes before reaming the bores so as to avoid burrs.

For turning the bosses on each side, I used the same fixture I used for the eccentrics:  a piece of aluminum round drilled and tapped 1/4-20.  The first one turned out poorly, with a lot of tearing.  I was using a medium speed and slow machine feed on the crossfeed.  This alloy needed just the opposite:  lots of RPMs and fast feed.  Here's the results:


I did discover a potential problem.  I drilled the holes for mounting the blocks on the base plate according to the plan.  However, the material I had for the blocks was smaller than spec, so the blocks ended up .18" shorter in the longest dimension.  Fortunately the blocks cover the holes, but using the planned 8-32 screws to attach them will mean that the tapped holes in the base of the block will be extremely close to the edges.  I think I will just use 5-40 screws, leaving more "meat" around the holes.  However, I'm going to sleep on it before making any decision.  I could conceivably drill a second set of holes in the plate inside the ones I already drilled.  In any case, I have not drilled mounting holes in the base of the blocks.

Any other ideas are welcome.

bogstandard

  • Guest
Re: Bog's Paddleduck Engine
« Reply #55 on: May 16, 2009, 07:31:07 PM »
You don't need to use large mountings, anything just to hold the blocks in position so they can do their job of supporting the crankshaft. Even tiny screws would have enough strength to hold them in position.

It will be the same for any fixings that hold pieces together, they don't have to be large just for the sake of being at the same scale. Use what you have.

Bogs

Offline kvom

  • Hero Member
  • *****
  • Posts: 520
Re: Bog's Paddleduck Engine
« Reply #56 on: May 16, 2009, 08:35:13 PM »
Thanks, John.

Offline Brass_Machine

  • Administrator
  • Hero Member
  • *****
  • Posts: 5504
  • Country: us
Re: Bog's Paddleduck Engine
« Reply #57 on: May 16, 2009, 11:27:30 PM »
It's getting there. This is a nice build to watch!

Eric
Science is fun.

We're all mad here. I'm mad. You're mad.

Offline kvom

  • Hero Member
  • *****
  • Posts: 520
Re: Bog's Paddleduck Engine
« Reply #58 on: May 17, 2009, 08:37:33 PM »
My first goal of the afternoon was to finish milling the second crosshead.  I did it in a different sequence, and although it required an extra reclamp in the vise, I was able to clamp solidly against the jaws more often.  The first operation was to expose the conrod bracket (three cuts in one vise position):


Then two cuts on the "cheeks":


Afterwards it was just the cross cut on the Y-axis and milling the slot.


After patting myself on the back and enjoying a soft drink, I drilled and tapped the bearing blocks.


There was just enough room for the 5-40 screws.  Right now the bores are a tight fit on some 1/4" drill rod that I lapped with some fine sandpaper.  I need to do the same thing with a longer piece to lap out the bores and align the blocks precisely on the plate, as shown in John's writeup.   I'd like to get the base cutouts done next so that I can trial fit the eccentrics and cranks.

bogstandard

  • Guest
Re: Bog's Paddleduck Engine
« Reply #59 on: May 17, 2009, 08:43:26 PM »
Kvom,

The crossheads are the most difficult part to machine because of all the operation and position changes that needed to be done.

Now you have got those out of the way, most other jobs should be plain sailing for you.

Very nicely done.

John

Offline kvom

  • Hero Member
  • *****
  • Posts: 520
Re: Bog's Paddleduck Engine
« Reply #60 on: May 17, 2009, 08:49:15 PM »
John,

The machining was not really a big concern in starting out on this build,  (knock on wood) especially with the details you provided.  My big concern is the silver soldering, which will be completely new to me when I get there. 

Kirk

Offline Bernd

  • Madmodder Committee
  • Hero Member
  • *****
  • Posts: 3688
  • Country: us
  • 1915 C Cab
    • Kingstone Model Works
Re: Bog's Paddleduck Engine
« Reply #61 on: May 17, 2009, 10:02:28 PM »
Kirk,

Nice work on the cross heads. You made it sound very simple.

I see Bogs is keeping an eye on you while you build. One of these days I'd like to build one of these engines too.

Bernd
Route of the Black Diamonds

bogstandard

  • Guest
Re: Bog's Paddleduck Engine
« Reply #62 on: May 17, 2009, 11:50:59 PM »
Kirk,

I go fairly deeply into silver soldering the parts on the build sheets, purely for the reason you have said, it can be a very daunting task when you have never done it before.

If you can get it mastered, it will open up a totally new area of model engineering to you, by allowing you to make joints that are stronger than the parent metals.

It is a shame I cannot send you the items I use, but I don't know how customs would react to little packets of a very fine white dust. But I will see what I can do for you.

The flux and the fine silver solder wire are the two things that would make it so easy for you.

Let me have a root in my box of tricks, and I will PM you.

John
« Last Edit: May 17, 2009, 11:55:00 PM by bogstandard »

Offline sbwhart

  • Global Moderator
  • Hero Member
  • *****
  • Posts: 3530
  • Country: gb
  • Smile, Be Happy, Have Fun and Rock Until you Drop
Re: Bog's Paddleduck Engine
« Reply #63 on: May 18, 2009, 01:07:12 AM »
Kirk

You'll be ok with the silver soldering Johns instruction will put you right, newbies struggle getting the temperature right try it on a bit of scrap first, when you hit the correct temperature the solder just flows like water. Keep the bits clean and use plenty of flux.

I used a small plumbers gas blow lamp for a long time, and got good results, see my loco build post for the last month, for pics of heat source.

Good luck

Stew
« Last Edit: May 18, 2009, 08:54:45 AM by sbwhart »
A little bit of clearance never got in the road
 :wave:

Location:- Crewe Cheshire

Offline kvom

  • Hero Member
  • *****
  • Posts: 520
Re: Bog's Paddleduck Engine
« Reply #64 on: May 18, 2009, 07:33:10 AM »
I have read the soldering techniques in John's writeup, and will certainly try it out on scrap first. 

I asked about firebrick at Lowes and was told they don't carry it.  I need to visit a shop that builds fireplaces to get a few. I have a "mapp gas" torch that I think will generate enough heat, as that is what we used to silver solder the joints on the linesets for my AC lines.  I'll look for citric acid one of these days.  There are some eBay vendors selling silver solder wire that looks appropriate: 56% silver.

In any case I still have weeks of machining to go. 

Offline Darren

  • Madmodder Committee
  • Hero Member
  • *****
  • Posts: 3795
  • N/Wales
Re: Bog's Paddleduck Engine
« Reply #65 on: May 18, 2009, 07:48:39 AM »
Bogs gave me a demo on silver soldering when I was over there.

He made it look so easy...but I imagine not having seen him do it then I would mess up myself at first.

What surprised me was just how much heat was put into the part to make the solder melt. You need to get it really hot.


Been following your build with keen interest, nicely shown and looking good  :thumbup:
You will find it a distinct help… if you know and look as if you know what you are doing. (IRS training manual)

Offline sbwhart

  • Global Moderator
  • Hero Member
  • *****
  • Posts: 3530
  • Country: gb
  • Smile, Be Happy, Have Fun and Rock Until you Drop
Re: Bog's Paddleduck Engine
« Reply #66 on: May 18, 2009, 08:22:07 AM »

I'll look for citric acid one of these days. 
 

Coke Cola/Pepsi or lemon juice will do the trick you just have to leave it in a bit longer.

Stew
A little bit of clearance never got in the road
 :wave:

Location:- Crewe Cheshire

Offline Bernd

  • Madmodder Committee
  • Hero Member
  • *****
  • Posts: 3688
  • Country: us
  • 1915 C Cab
    • Kingstone Model Works
Re: Bog's Paddleduck Engine
« Reply #67 on: May 18, 2009, 08:47:53 AM »
Kirk,

Check out a place that carries welding supplies. They should also carry silver solder and flux. I use Harris Saftey-silv 45. It melts at 1370 degrees F. The flux is Harris Stay-silv white braxing flux.

Make sure both parts are clean of dirt and oil. Put flux on both parts. Put the two parts together. Put a small piece of silver solder on the joint and heat till a dull red. At that point you should see the solder start to turn to a fluid. Let cool before moving. When still hot to the touch put in acid bath.

I use sulfirc acid. I get that at the hardware store. They sell it as drain cleaner. This is concentrated stuff. I dilute with water. Always pour the acid into the water, never the other way around.

Bogs explained all that in his section on building the engine as you have already said.

Good luck with the soldering. I see it as nothing more than soft soldering but using more heat.

Regards,
Bernd
Route of the Black Diamonds

Offline kvom

  • Hero Member
  • *****
  • Posts: 520
Re: Bog's Paddleduck Engine
« Reply #68 on: May 18, 2009, 03:36:35 PM »
Thanks for all the advice.  I'm actually looking foward to trying it.  I'll use the citric acid as it sounds simpler and safer.

Today I had a couple of hours in the shop before going off to school.  Ny task today was the cutouts on the base plate.   I started by measuring the faces of each of the bearing blocks with an edge finder.  I then used my height gauge scribe to make very faint marks on the plate.  These were just as checks on where the cutout corners are supposed to go.  Since I was going to use a 1/4" endmill, I spot drilled each corner 1/8" in from the computed dimensions, using the scribed lines as a check.  I then drilled 1/4" holes (end mill is the type with the small hole in the center, hence not useable as a dril).
Here's the result:


Next I made all the horizontal cuts using the table feed:


The Y-axis slots I had to do by hand.


After deburring the edges I remounted the bearings to check my work.  I looks as if I will need to slightly enlarge under  one of the bearings a bit.


I had a little time left, so I drilled and tapped the lock screws for the crank webs (did I ever mention I hate tapping?)

Offline CrewCab

  • Madmodder Committee
  • Hero Member
  • *****
  • Posts: 851
Re: Bog's Paddleduck Engine
« Reply #69 on: May 18, 2009, 05:03:31 PM »
Looking good kvom  :thumbup:

CC

bogstandard

  • Guest
Re: Bog's Paddleduck Engine
« Reply #70 on: May 18, 2009, 05:13:07 PM »
Kirk,

PM sent to you.

John

Offline shred

  • Jr. Member
  • **
  • Posts: 54
Re: Bog's Paddleduck Engine
« Reply #71 on: May 18, 2009, 06:19:53 PM »
The welding supply place I went to did have silver solder, but what they had available was pretty thick stuff that didn't do so well for little parts.  The flux they had was ok.  If you've got a few days, I'd surf on over to http://store.sra-solder.com/section.php/89/1  and get some 0.031" dia BAg-1 wire or the like (they have Cd-free if you prefer).  $20 will get you plenty for more than 10 of these engines and the thin diameter works well for pre-formed rings (silver soldering with pre-formed rings like John says below is highly recommended)


« Last Edit: May 18, 2009, 11:37:22 PM by shred »

bogstandard

  • Guest
Re: Bog's Paddleduck Engine
« Reply #72 on: May 18, 2009, 10:37:36 PM »
If you go down about half way on this post, it shows what you should be aiming for, and how I achieved it.

http://www.homemodelenginemachinist.com/index.php?topic=1500.msg13808#msg13808

I hate wastage and extra work. Use only enough materials to complete the job. Any excess and you will be trying to clean it off to a satisfactory condition for hours. You should be able to pickle the part, a quick rub over with wire wool or scothbrite, and the soldered assembly should look presentable and ready to use. Not like most silver soldering you see, like a bird has crapped all over it, with flux and excess solder dripping all over the place. I only hand feed flux and rod in dire circumstances, all other times I do it as shown.

OK, it is a bit like a black art, but once you have mastered it, a little bell rings in your head, and from then on, you should be making perfect silver soldered joints whenever you want them.

A special little trick to use. If you can't get the bits to hold together while you solder it up, deform the end of the tubing slightly so that when pushed into the hole, it stays where it is put. With soft copper tube, that is maybe pinching between your fingers to get the effect you want. For larger bits that fit together, use centre pops on the joint areas to expand the metal so they become a slight interferance rather than a slip fit. Once it is all done, you will never see you little 'bodges' ever again.

John


Offline Bernd

  • Madmodder Committee
  • Hero Member
  • *****
  • Posts: 3688
  • Country: us
  • 1915 C Cab
    • Kingstone Model Works
Re: Bog's Paddleduck Engine
« Reply #73 on: May 19, 2009, 09:24:00 AM »
kvom,

Here's a link to a guy that has silver soldering down pat. Scroll to the bottom of the page and you'll see one or two of his drawings showing his method of silver soldering.

http://www.craftsmanshipmuseum.com/Hiraoka.htm

Bernd
Route of the Black Diamonds

Offline kvom

  • Hero Member
  • *****
  • Posts: 520
Re: Bog's Paddleduck Engine
« Reply #74 on: May 19, 2009, 06:49:45 PM »
I had a few hours today interupted by several honey-dos.  Got the steam chest holes drilled.  I am going to hold off on reaming the valve bore until I'm ready to fit the valves.  I decided to go with a .375" bore and ordered some drill rod of that size today.  In any case I drilled the bore 1/32 smaller.  The steam ports are .177".  The flange mounting screws will be 5-40.  I didn't tap these yet (did I mention I dislike tapping?).  For mounting the steam chest to the block I will use 8-32 screws, hence the mounting holes are drilled accordingly.


I also made a flywheel from the Cedge mystery alloy (silver bronze).  It's hard to work with, but is very "pretty" when polished.  I used the badsaw to cut off a 5/8" slice from the 2" diameter rod, but since the saw didn't cut straight the wheel ended up .55" thick rather than the scale .59".  I wanted to machine a rim/hub recess, and normally would use a parting tool.  However because the cross slide on my lathe has a very short travel, the parting tool in the QCTP holder won't go close enough to the center.  So I needed to grind a HSS tool blank into an appropriate cutter.  That took quite a while, but gave me a chance to use the new 46-grit grinding wheel for the first time.  I plan to bling it up a bit, but here's the first version mounted up for a trial fit:

« Last Edit: May 19, 2009, 08:44:38 PM by kvom »