Author Topic: Modified Rocking Engine  (Read 46481 times)

Offline NickG

  • Madmodder Committee
  • Hero Member
  • *****
  • Posts: 1890
Re: Modified Rocking Engine
« Reply #50 on: September 15, 2009, 02:45:51 AM »
Sorry Arnold,

I don't know what I was talking about below, one sentence I was talking about your rocking engine, the next I was saying to build one! Will blame it on being tired!    :scratch: :doh: :wack:

That's a good idea, it would make a great present!  :thumbup:

Nick
Location: County Durham (North East England)

Offline NickG

  • Madmodder Committee
  • Hero Member
  • *****
  • Posts: 1890
Re: Modified Rocking Engine
« Reply #51 on: September 18, 2009, 04:50:40 AM »
Not much to report on this. Last night I did make the 2nd of 3 pedestals that support the frame. There wasn't any point taking pics as it was the same as the first one. everything went to plan except underestimated how long it would take again. Just under 2 hours in total, what a fiddley little thing it is! Oh well, only 1 more to do.

If I can get in the garage at 8 instead of 10 tonight (had to watch a film to keep the wife happy last night) I should be able to make the final pedestal and I am hoping the bit of brown stuff for the base.

Then tomorrow night I'll make a start on the Flywheel, that I am sure will need 2 nights - mainly because of the hand sawing!, but you never know, I might surprise myself! Even if I do finish that on sat night, I'll still need sun night to strip it down, clean / polish and reassemble with gaskets.

So that's the plan, hopefully it will be a finished article by the end of this weekend. I will then update any drawings as necessary and publish on here incase anybody wants to have go ...  :proj:

Nick
Location: County Durham (North East England)

bogstandard

  • Guest
Re: Modified Rocking Engine
« Reply #52 on: September 18, 2009, 06:27:26 AM »
You have almost doomed it to failure Nick.

Every time I try to guesstimate times like that, something goes pear shaped :lol:


John

Offline NickG

  • Madmodder Committee
  • Hero Member
  • *****
  • Posts: 1890
Re: Modified Rocking Engine
« Reply #53 on: September 18, 2009, 08:38:56 AM »
Bogs you're probably right ... could be 2 months on and still no chuffing sounds!  :doh:

On my hot air engine project I had a long stall in the middle of it when it started getting difficult, but this time I'm nearly finished so it will take a lot more to stop me! I just need a few  :poke: and  :whip: and I should cross the finish line soon!

You're right though, I shouldn't have tempted fate .. never learn!  :bang:

Nick
Location: County Durham (North East England)

Offline NickG

  • Madmodder Committee
  • Hero Member
  • *****
  • Posts: 1890
Re: Modified Rocking Engine
« Reply #54 on: September 18, 2009, 07:29:08 PM »
Hi all,

Tonight went  pretty well .. in the end!

I made a start on the base with some brown stuff.


It creates funny swarf … faster to saw than that 2” steel bar though!


Milling it square and to size


The sizes I designed it only just fit in the milling vice with the jaws removed … just!


Funny stuff this brown stuff


Drilling the holes … in the wrong place ... grrrrr! The brown stuff must have known I was taking the mick and got its own back … bloomin awful stuff!


Just before I chucked it at the wall I decided I could turn up a plug out of the small off cut of wood I kept .. knew it would come in handy! Turned it for a knock in fit.

Putting the chamfer on with the countersink … this worked pretty well.


Counterboring the underneath for the nuts to hold it down.


The finished base, pretty happy with it. You can see the plug but I even turned it the right way to get the grain going same way! Actually, it’s a really nice bit of wood, machines really well! Didn’t split or anything once.


I also managed to get the other pedestal done, and all pretty early too, by about 10:45!

Trial fit of engine on base:


Quite happy with it, looking quite good, or will do when it’s cleaned and polished!

Just the flywheel to do … I even made a start on that ..


Well, it’s a start!

Looks like Sunday is still on for a running engine (fingers and toes crossed!)

Nick
Location: County Durham (North East England)

Offline NickG

  • Madmodder Committee
  • Hero Member
  • *****
  • Posts: 1890
Re: Modified Rocking Engine
« Reply #55 on: September 18, 2009, 07:35:27 PM »
ps, forgot to put anything to judge scale on again, sorry!

Don't know what those funny patterns are on wood, it almost looks like filler on the photo, sure it can't be though. I thought it was when I sanded it as I used a bosch vibrating 'mouse' sander, but looking at the first photos, the pattern is there before I sanded it. It's strange, like some bits are really close grained. Looks a bit daft in the pictures now.

Nick
Location: County Durham (North East England)

Offline Darren

  • Madmodder Committee
  • Hero Member
  • *****
  • Posts: 3795
  • N/Wales
Re: Modified Rocking Engine
« Reply #56 on: September 18, 2009, 07:59:27 PM »
That's an Oak grain pattern Nick. I'm quite fond of oak as wood goes... :thumbup:
You will find it a distinct help… if you know and look as if you know what you are doing. (IRS training manual)

Offline sbwhart

  • Global Moderator
  • Hero Member
  • *****
  • Posts: 3530
  • Country: gb
  • Smile, Be Happy, Have Fun and Rock Until you Drop
Re: Modified Rocking Engine
« Reply #57 on: September 19, 2009, 01:47:09 AM »
Nice going Nick looking good

 :thumbup: :thumbup:


Are you making the fly wheel from plastic ?. if so be carful its not glass filled it'll do your machine no good, make sure you keep your ways covered and have a good clean up.

Have fun

Stew
A little bit of clearance never got in the road
 :wave:

Location:- Crewe Cheshire

Offline raynerd

  • Madmodder Committee
  • Hero Member
  • *****
  • Posts: 2893
  • Country: gb
    • Raynerds Projects - Raynerd.co.uk
Re: Modified Rocking Engine
« Reply #58 on: September 19, 2009, 02:35:00 AM »
Excellent NickG !! Like the base as well  :headbang: Whole engine looks great on it.

Offline NickG

  • Madmodder Committee
  • Hero Member
  • *****
  • Posts: 1890
Re: Modified Rocking Engine
« Reply #59 on: September 19, 2009, 04:51:11 AM »
Ah ... at least that's cleared up! When I was making it, I actually found myself wanting woodwork equipment like marking gauges and stuff ... weird! Actually I do have some sand paper and a wood saw, it was just my attempt at a joke using the hack saw and emery cloth on the wood  :lol: it worked though!

No it's not plastic Stew ... should have said, it's a bit of steel that I think has been phosphated in the past.

Cheers guys, can see the finish line now!

Nick
Location: County Durham (North East England)

Offline NickG

  • Madmodder Committee
  • Hero Member
  • *****
  • Posts: 1890
Re: Modified Rocking Engine
« Reply #60 on: September 19, 2009, 08:09:19 PM »
Right, had a mixed night tonight!

Started on the flywheel .. .still on track to complete tomorrow night, not worked out how I'm going to fix flywheel onto shaft yet as I've found some little alen key grub screws but I don't know what thread ... don't think they're ba and I don't have any other taps that small. On my other engines I've always had a screw sticking out but it looks a bit messy.

Anyway, started by sawing through the 2" steel with a hacksaw. That took 15 minutes, was pretty hard work but quite impressed as I got the cut fairly straight for once  :lol:


Facing it to true it up


Finished flywheel blank


Turning recess ... at first I had a smaller tool, then changed to this as it has 2 cutting edges so thought I could save time just swinging it around, however, it was too big, so had to go with individual left and right handed cutting tools.


Note, by this point I had already drilled the hole and done a trial fit on the crankshaft ... it was very tight and managed to get it stuck. I was turning it to get it off with my hands and slipped. The sharp edge of the wheel scratched my thumb ... or I thought it had, then 30 seconds later I looked down and saw it was covered in blood, sort of pulsating with splashes on the floor. One of those where you don't realise, then when you see it get quite a shock! Think it's going to be sore tomorrow. I tried to take a picture of it but it doesn't look much, the plaster has pulled it together quite well, think it's going to scar though. 

Anyway, soldiered on to get the recess done on 1 side but I was trying to de-burr it with a needle file and one of the chuck jaws caught the file, could have pushed it straight through my hand, I was lucky ... don't actually know what I was thinking really. At that point I just stopped and came in. All the machinery and I go and lacerate my thumb on a burr. It just shows how many hazards there are in a workshop.

I need a  :wack:, safety is drilled into us so much at work this sort of thing shouldn't happen to me.


Trial fit on the engine:


I actually quite like the look of it without the holes but still think I'll put them in. Also unsure whether to paint the inner bits red, that has become a bit of a trade mark of mine!!

Nearly there!

Nick
Location: County Durham (North East England)

Offline chuck foster

  • Sr. Member
  • ****
  • Posts: 334
  • Country: ca
Re: Modified Rocking Engine
« Reply #61 on: September 19, 2009, 10:30:21 PM »
looking goiod nick  :thumbup: :thumbup:

can't wait to see a video of it running  :D

chuck  :wave:

hitting and missing all the way :)

skype:  aermotor8

former hmem member

Offline Darren

  • Madmodder Committee
  • Hero Member
  • *****
  • Posts: 3795
  • N/Wales
Re: Modified Rocking Engine
« Reply #62 on: September 20, 2009, 01:50:05 AM »
Ouch Nick, finishing for the day sounded like a good idea....hope your thumbs ok, sounds 'orrible....

Engines looking great.... :clap:
You will find it a distinct help… if you know and look as if you know what you are doing. (IRS training manual)

Offline sbwhart

  • Global Moderator
  • Hero Member
  • *****
  • Posts: 3530
  • Country: gb
  • Smile, Be Happy, Have Fun and Rock Until you Drop
Re: Modified Rocking Engine
« Reply #63 on: September 20, 2009, 02:04:31 AM »
Hi Nick

Hope you filled in an accident report for the cut thumb  :thumbup: and don't forget the near miss report for the file incident  :D.

Just take care Nick you did the right thing and quitting for the night you may have bin on the tired side.

Engine coming along great, have you thought of supper glue or loctite for fixing the fly wheel thats what I've used.

Have fun :- Safely
 :beer:
Stew
A little bit of clearance never got in the road
 :wave:

Location:- Crewe Cheshire

Offline arnoldb

  • Hero Member
  • *****
  • Posts: 515
  • Country: na
  • Windhoek, Namibia
Re: Modified Rocking Engine
« Reply #64 on: September 20, 2009, 04:04:30 AM »
Looking very good Nick  :thumbup: - pretty much ready to run

Well, you've now got the blood and the sweat covered; I hope the tears will be of joy !

Cheers, Arnold

Offline Stilldrillin

  • Global Moderator
  • Hero Member
  • *****
  • Posts: 4972
  • Country: gb
  • Staveley, Derbyshire. England.
Re: Modified Rocking Engine
« Reply #65 on: September 20, 2009, 04:05:51 AM »
All looking good Nick!  :thumbup:


When I wor a lad, they used to say......  By the time a turner/ fitter retires, there`s been enough bits knocked off to make another of `em!  ::)

Let`s be carefull out there......


Re your flywheel recess tool. I used this one.

Didn`t have to disturb settings....... Forward rotation for rim area..... Reverse rotation for boss area......


David D
David.

Still drilling holes... Sometimes, in the right place!

Still modifying bits of metal... Occasionally, making an improvement!

bogstandard

  • Guest
Re: Modified Rocking Engine
« Reply #66 on: September 20, 2009, 12:42:17 PM »
Many moons ago I did an article on making recesses in a flywheel.
Unfortunately the accompanying vid went pear shaped ages ago, but there is enough on the post to give you a good idea of how to do it and what the tool looked like.

http://www.homemodelenginemachinist.com/index.php?topic=844.0

If you go to the middle of the post, there is another link that will take you to where it shows you how to make flywheels out of plate material.

http://www.homemodelenginemachinist.com/index.php?topic=228.0


Bogs

Offline NickG

  • Madmodder Committee
  • Hero Member
  • *****
  • Posts: 1890
Re: Modified Rocking Engine
« Reply #67 on: September 20, 2009, 01:47:06 PM »
Thanks for the replies guys, appreciate it   :mmr: hopefully I'll have something to show later on tonight!  :ddb:

The thumb has been aching a bit today, was deepish but at least it's only a cut! I took the plaster off this morning and it hasn't fused back together yet, started opening up so new one has been on all day, should be ok now. It's amazing how much harder things are without your right thumb though, so guess the only good things to take out of this are that I shouldn't do it again, and it's just a little reminder that you definintely can't afford to lose one.

David D, I like that tool, it would save quite a lot of time.

Bogs, looking at your tool, I'm not sure whether it would chatter on my lathe, probably not though, shouldn't do. Interesting about grinding tools, I often get colour into them and do hack a lot off, basically until it's too hot to hold so I'm doing it all wrong. I have started quenching in water but only when I can't hold it! Might try that tool profile on the other side tonight. My recess is only 1/16" deep though so I would probably just do it in about 4 cuts. Will be interesting.

I still haven't decided whether to drill the holes in the flywheel yet. I was liking the look of it plain, but it's a bit more fancy with the holes and I was trying to jazz this one up a bit with the columns and, radii and bolts so maybe I should stick to my original plan ... hmm! It will probably make the flywheel function better taking more mass away from the centre getting the moment of inertia up too.

Stew, I didn't think of loctiting it to the shaft, don't know why but I like to be able to take things to bits! That loctite that's been in the fridge at work is 648 which I think is the high strength stuff, had a look the other day and it's never been opened, will ask if I can have it! I was going to loctite the columns in and the bearing but I don't think the bearing needs it and I've just realised taking that out gives enough clearance to assemble the piston onto crank and into cylinder short of taking all the 8ba bolts out which is a PITA! Very fiddley to get back in when the piston rod is in the way!

Nick

ps if I can do a video, not sure how effective it'll be, I don't really have a good compressor, if it runs it'll probably run from the car tyre pump thing but that is dead noisy, will have to make some sort of adaptor too.


Location: County Durham (North East England)

Offline Gerhard Olivier

  • Sr. Member
  • ****
  • Posts: 314
Re: Modified Rocking Engine
« Reply #68 on: September 20, 2009, 02:38:03 PM »
That rocker of yours is coming on a treat - Very impressed with your engineering a block of wood idea.

Have fun, safely. Hope the thumb ok now.

Gerhard
Guernsey
Channel Islands

Offline Stilldrillin

  • Global Moderator
  • Hero Member
  • *****
  • Posts: 4972
  • Country: gb
  • Staveley, Derbyshire. England.
Re: Modified Rocking Engine
« Reply #69 on: September 21, 2009, 03:42:10 AM »
Many moons ago I did an article on making recesses in a flywheel.
Unfortunately the accompanying vid went pear shaped ages ago, but there is enough on the post to give you a good idea of how to do it and what the tool looked like.

http://www.homemodelenginemachinist.com/index.php?topic=844.0

If you go to the middle of the post, there is another link that will take you to where it shows you how to make flywheels out of plate material.

http://www.homemodelenginemachinist.com/index.php?topic=228.0


Bogs

John,

I remembered this one......

http://modelsteam.myfreeforum.org/ftopic8791-0-asc-0.php

My try, (then), with your recess tool, resulted in terrific chatter...... So, I went & did something else instead.......  ::)

It might be ok now, with the taper bearings installed. :thumbup:

David D.
David.

Still drilling holes... Sometimes, in the right place!

Still modifying bits of metal... Occasionally, making an improvement!

Offline NickG

  • Madmodder Committee
  • Hero Member
  • *****
  • Posts: 1890
Re: Modified Rocking Engine
« Reply #70 on: September 21, 2009, 05:31:38 AM »
Well,

It's finished ... about time really, a rocking engine that some people made in a few hours turned into a month long project for me - probably not worth it, I could probably have done a flame licker like I have always dreamed of in that time, done now though, I felt left out with everybody doing these rockers.

I know  :worthless: but you'll have to wait until this evening for a proper write up! It was far too late by the time I got in, it must have been a record of some sort how late I was in the workshop last night!

Not going to say any more now without the pictures .. but will there be a video? That's the question because

Nick
Location: County Durham (North East England)

Offline Stilldrillin

  • Global Moderator
  • Hero Member
  • *****
  • Posts: 4972
  • Country: gb
  • Staveley, Derbyshire. England.
Re: Modified Rocking Engine
« Reply #71 on: September 21, 2009, 05:39:59 AM »
Nice one Nick!  :thumbup:

David D
David.

Still drilling holes... Sometimes, in the right place!

Still modifying bits of metal... Occasionally, making an improvement!

Offline NickG

  • Madmodder Committee
  • Hero Member
  • *****
  • Posts: 1890
Re: Modified Rocking Engine
« Reply #72 on: September 21, 2009, 05:21:13 PM »
Hi all,

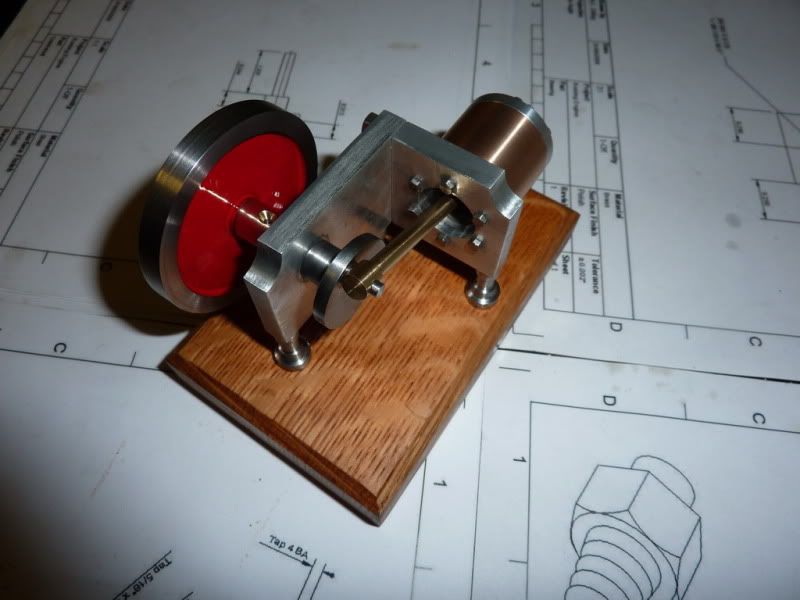
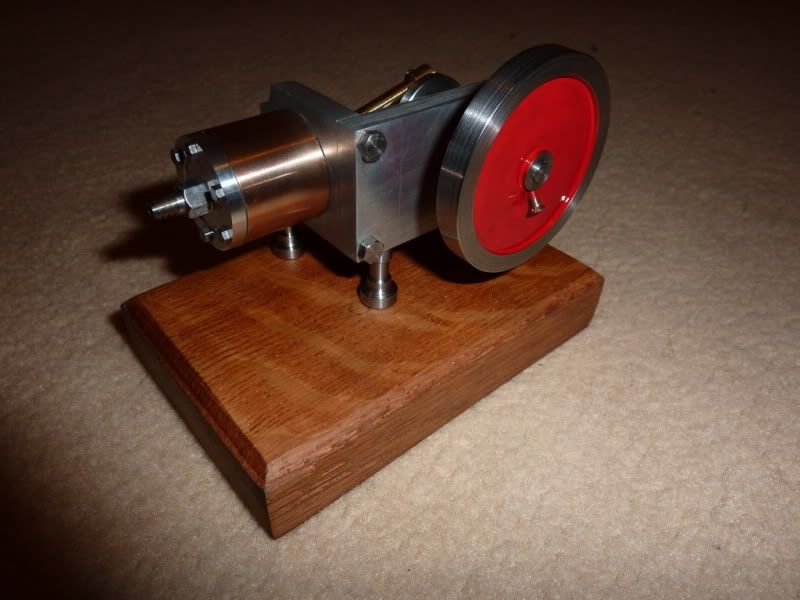
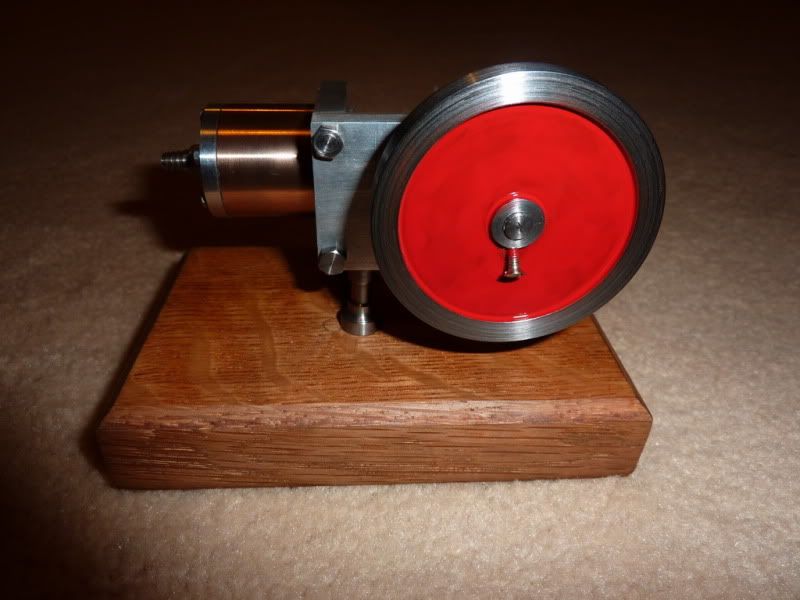
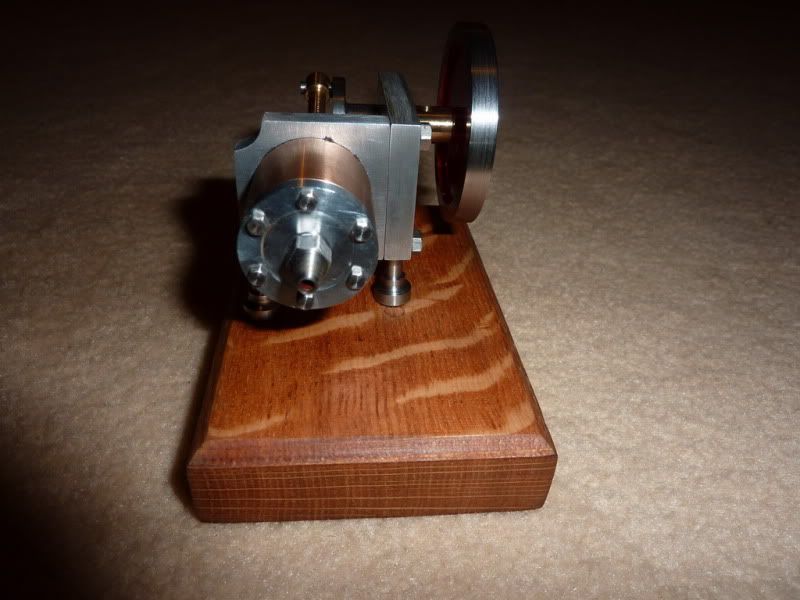
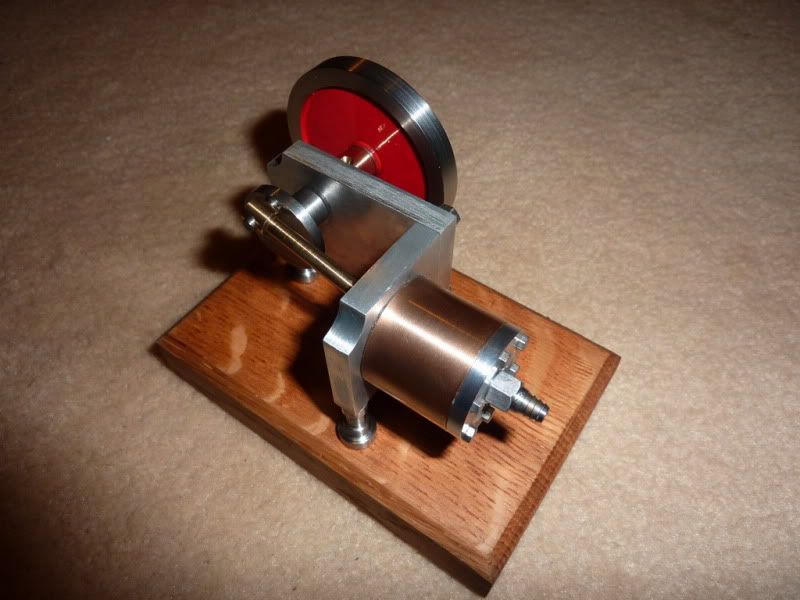
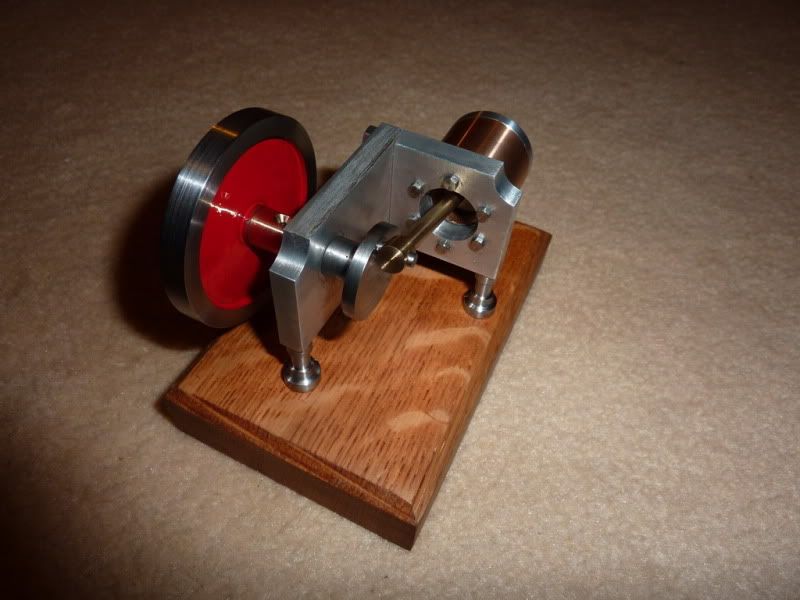
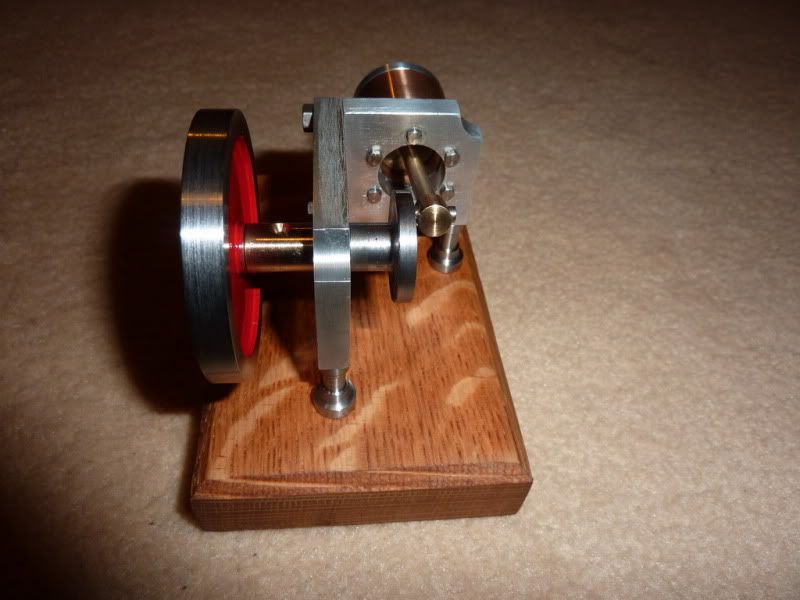
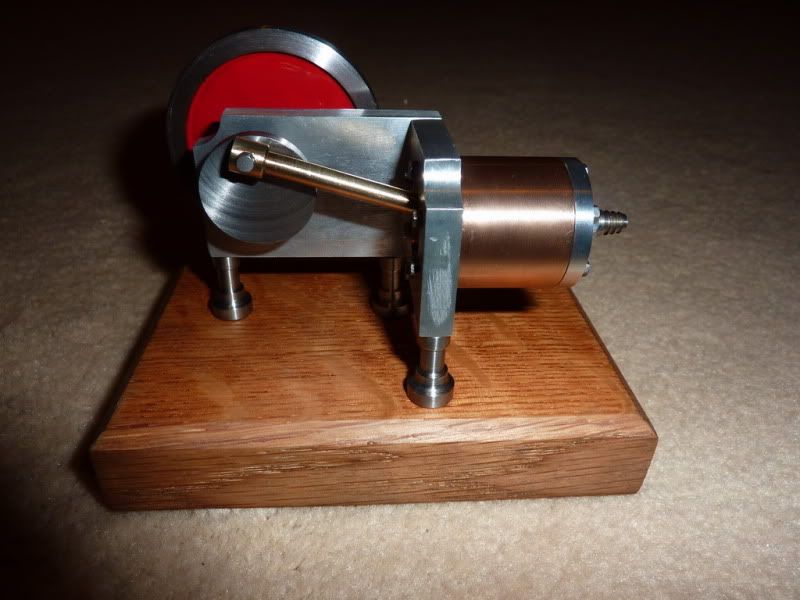
This is the final installation of my rocking engine, barring a better video once I get some sort of air supply sorted. I'm telling you up front, the video is rubbish so you don't get your hopes up! I still have a headache from being the human compressor!

I turned the recess on the other side of the flywheel, I was going to grind the proper tool up as in John's thread but I thought I'd leave that for another time since I already had the 2 tools and packing pieces that I needed to hand.

I then decided I would drill the lightening holes, in attempt to get it done quickly, I thought I'd try to plunge them with a slot drill  ... that was a mistake! I think the cutter was blunt and tried to run off, then the flywheel moved  :doh:, don't really know what I was thinking but I didn't fancy centre drilling then gradually opening 6 holes up to 3/8". I remember last time it was a bit of a pain, I just did it on the bench drill but with the centre web being quite thin it was snatching a lot.
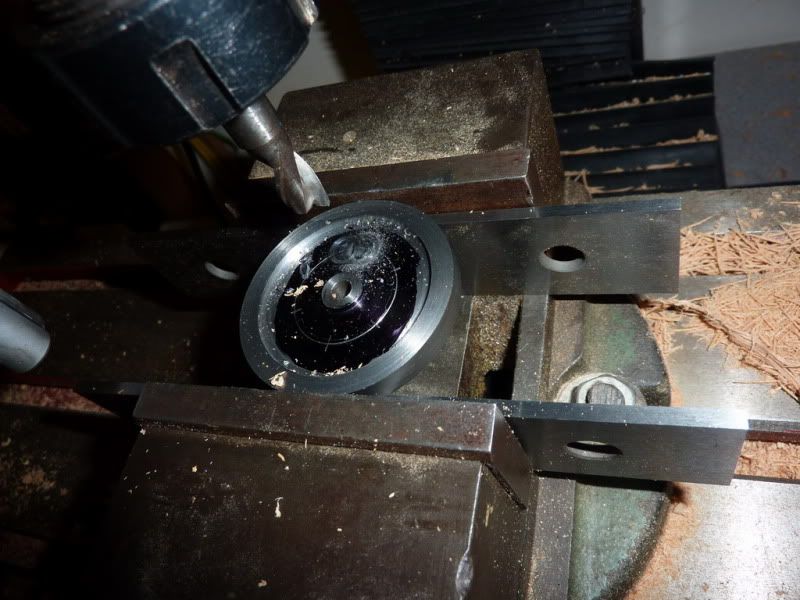

So abandoned that idea, just wish I hadn’t bothered wasting time marking it out etc. Luckily I was able to take a small skim to get rid of the nasty marks from the nasty slot drill!

Next I mounted it on a mandrel in the lathe to skim the OD … it was pretty concentric anyway but I coouldn’t seem to shift the phosphate coating or whatever it was just with emery cloth. As John said, don’t try machining the whole thing like this, it’s not rigid enough.  Just enough to take a very light skim really. I found a bit of 3/16” silver steel so just put a 2ba thread on one end as I knew I had a nut and washer. Gripped it tight in the lathe chuck and tightened the nut on so it squished the flywheel against the chuck jaws.
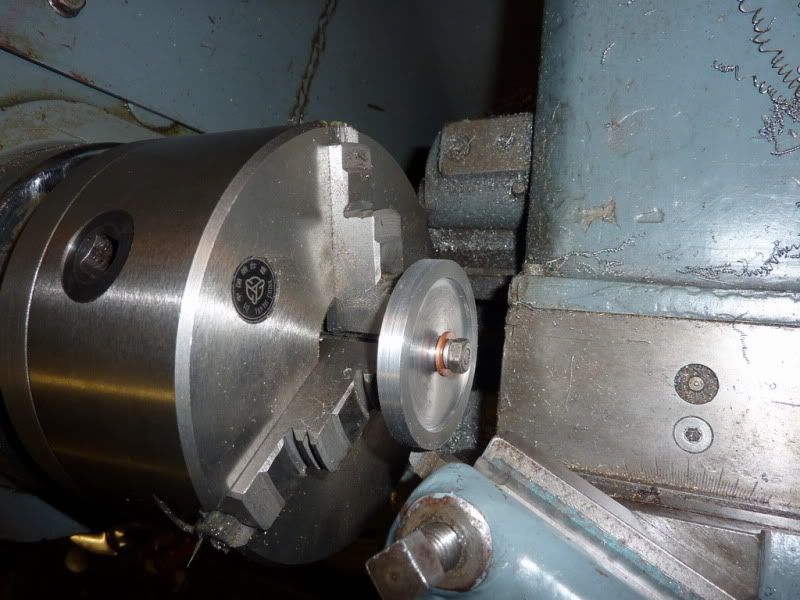

All that was left was to drill and tap an angled hole 8ba to fasten it onto the crankshaft. I still need a decent screw …for the flywheel that is!  :lol: I then painted the recess red!
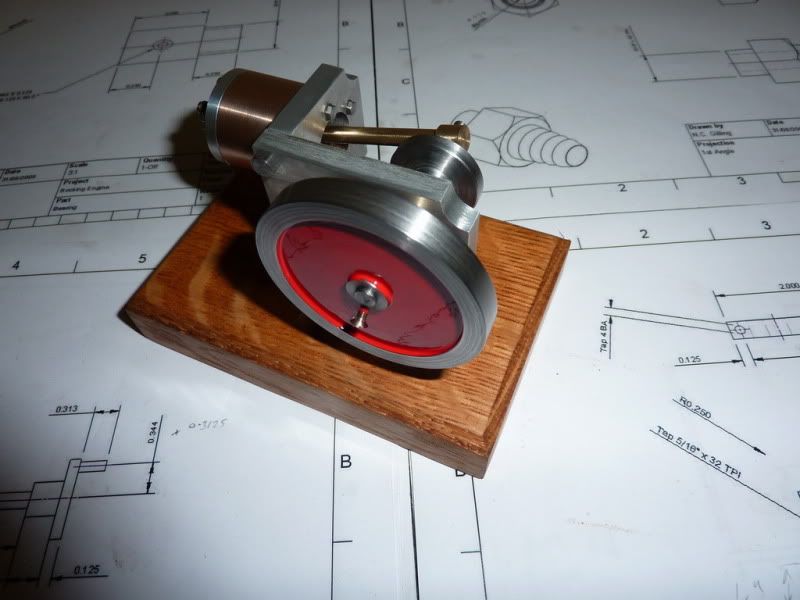
I tried to bling it all a bit but am not very good at that / don’t have the right stuff.  The aluminium from the shelf brackets I got over excited about … it’s pretty naff material, too soft. It won’t even polish very well, see the finish compared to the high strength stuff on the cylinder cover!

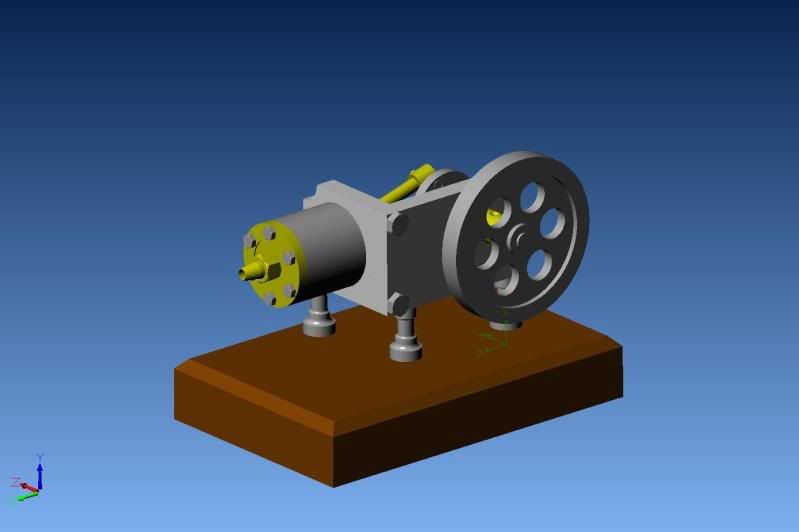
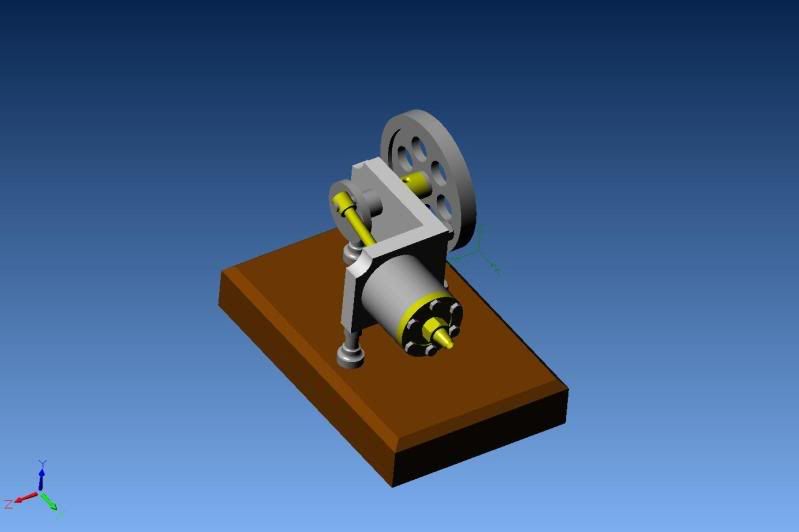
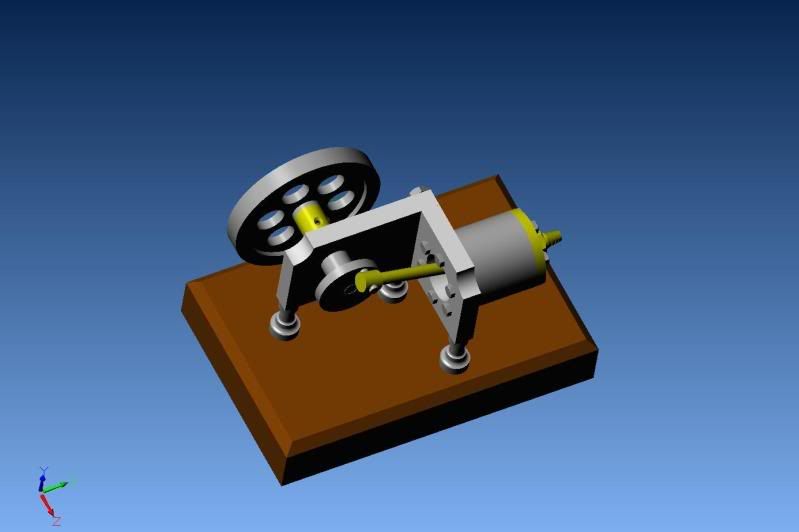
Just lots of pics to follow now, it’s a bit of overkill but it shows it compared with my CAD model.


Now for the video .. sorry about this, it’s the best I could do for now short of taking the car tyre compressor into the car and shooting a video in there, or busting a gut!

I’m quite happy with it, there are a few mistakes but it’s turned out pretty much how I expected, just glad it runs!
Now I will make sure all the drawings are correct incase anybody else wants to have a go ..probably not as it’s way over the top for a rocker but it’s one for the internet archive anyway!
My next project is going to be the restoration of my 3 ½” gauge ‘mabel’ locomotive (same design as Stew’s) so probably no machining for a while. Unless I decide I need a break and if that happens I’ll be making a QCTP with 4 holders … according to my project plan!  :lol: But as you have all seen how well I stick to plans, don’t take my word for it!  :proj:

Thanks for all the replies, support and advice  :mmr:

Nick
Location: County Durham (North East England)

Offline Darren

  • Madmodder Committee
  • Hero Member
  • *****
  • Posts: 3795
  • N/Wales
Re: Modified Rocking Engine
« Reply #73 on: September 21, 2009, 06:00:11 PM »
That's a very nice Looking engine Nick. Really like the design....and the wood..... :thumbup:

I suppose I'll have to have a go and make one........sometime.......when I have some spare...... :D
You will find it a distinct help… if you know and look as if you know what you are doing. (IRS training manual)

Offline raynerd

  • Madmodder Committee
  • Hero Member
  • *****
  • Posts: 2893
  • Country: gb
    • Raynerds Projects - Raynerd.co.uk
Re: Modified Rocking Engine
« Reply #74 on: September 21, 2009, 06:55:55 PM »
5 Stars: *****

Really enjoyed this entire thread, it has been great seeing your cad drawings and then piece by piece turning your ideas into parts. Really chuffed it works for you!  :) :thumbup: :thumbup: :thumbup: :thumbup: