Author Topic: 'Poppin' Flame Licker  (Read 77674 times)

Offline NickG

  • Madmodder Committee
  • Hero Member
  • *****
  • Posts: 1890
'Poppin' Flame Licker
« on: February 02, 2010, 06:41:25 AM »
Hi all,

I've had a bit of a break from the workshop after the trials and tribulations of getting my Jan Ridders Internal Valve Flame Licker running. I decided towards the end of that project to make a 'Poppin' flame licker which is a more conventional design> I decided on that incase I was utterly disappointed and couldn't get the other one working, but now I intend to go through with it, mainly as I am intrigued to see how different they are to make and how differently their running characteristics are. It will also introduce some new machining / modelling techniques that I haven't used before. So I bought enough materials to do two when I had my pessemistic head on, basically so I could make anything twice to get it to work if need be!  :lol: Now, the plan is to learn from previous experience and carefully make two of everything so I end up with 2 engines! I was going to try to keep this shorter and sweeter than my other build logs as I tend to ramble a bit and it takes twice as long to finish a project! Not sure whether I can do that though - lets find out!

Last night I made a start with the cylinder - no pics at the moment but it's still in the lathe so I'll get a couple of snap shots tonight. If I get things right, it shouldn't take twice as long to make two engines as I should save a bit here and there on set up times. So I'm planning on completing these in a month - knowing me and my past predictions, that could easily stretch to two!

Nick
Location: County Durham (North East England)

Offline spuddevans

  • Global Moderator
  • Hero Member
  • *****
  • Posts: 1618
  • Country: 00
  • Portadown, Northern Ireland
    • My Photo website
Re: 'Poppin' Flame Licker
« Reply #1 on: February 02, 2010, 06:54:33 AM »
Sounds good Nick  :thumbup:

( waits on edge of seat for promised pics to appear  :coffee: )


Tim
Measure with a micrometer, mark with chalk, cut with an axe  -  MI0TME

Offline NickG

  • Madmodder Committee
  • Hero Member
  • *****
  • Posts: 1890
Re: 'Poppin' Flame Licker
« Reply #2 on: February 02, 2010, 08:57:12 AM »
I know -  :worthless:

I wish I could get pics as good as yours Tim but I don't think they ever will be!

Nick
Location: County Durham (North East England)

Offline jim

  • Sr. Member
  • ****
  • Posts: 441
  • Country: 00
Re: 'Poppin' Flame Licker
« Reply #3 on: February 02, 2010, 11:31:48 AM »
mine is still on the back burner :(

got some home work to get done and i'll get it done :lol:
if i'd thought it through, i'd have never tried it

Offline NickG

  • Madmodder Committee
  • Hero Member
  • *****
  • Posts: 1890
Re: 'Poppin' Flame Licker
« Reply #4 on: February 03, 2010, 05:17:50 AM »
Made a bit more progress last night.

This was how far I had got with the cylinder. Simple really - face end, centre drill, support with revolving centre, turn to diameter, turn grooves with parting tool (I didn't grind a special tool to width, just recalculated the number of grooves and widths I could do with my tool), drill and bore out 5 thou undersize to leave for reaming with adjustable reamer.


Next I needed to polish it a bit and part it off. Then I thought while I had the right diameter I would part off the two cylinder covers. I had already drilled 1/4" through to that part of the bar before hand so all I had to do was countersink each one first then part off:


I then got the 2nd cylinder to the same stage as the first so this is where I am up to:


I still need to face the cylinders, ream for a nice finish in the bore and drill and tap holes on each end and for oil cup. For the cylinder covers I need to drill clearance holes for screws that fasten them on and lap both sides, one to seal with the valve nicely and the other with the end of the cylinder.

So far so good but don't think I'll make any progress tonight, Leeds vs Tottenham game is on  (4th round FA cup replay)!

Nick

« Last Edit: February 03, 2010, 05:19:21 AM by NickG »
Location: County Durham (North East England)

Offline Stilldrillin

  • Global Moderator
  • Hero Member
  • *****
  • Posts: 4972
  • Country: gb
  • Staveley, Derbyshire. England.
Re: 'Poppin' Flame Licker
« Reply #5 on: February 03, 2010, 08:58:46 AM »
Yer`ve got off to a good start Nick!  :thumbup:

David D
David.

Still drilling holes... Sometimes, in the right place!

Still modifying bits of metal... Occasionally, making an improvement!

Offline spuddevans

  • Global Moderator
  • Hero Member
  • *****
  • Posts: 1618
  • Country: 00
  • Portadown, Northern Ireland
    • My Photo website
Re: 'Poppin' Flame Licker
« Reply #6 on: February 03, 2010, 10:44:54 AM »
Looking good there :thumbup:

Tim
Measure with a micrometer, mark with chalk, cut with an axe  -  MI0TME

Offline sbwhart

  • Global Moderator
  • Hero Member
  • *****
  • Posts: 3530
  • Country: gb
  • Smile, Be Happy, Have Fun and Rock Until you Drop
Re: 'Poppin' Flame Licker
« Reply #7 on: February 03, 2010, 11:53:22 AM »
Hi Nick

Looking good  :thumbup: what plans are you following ? or are you working to your own.

Have fun

Stew
A little bit of clearance never got in the road
 :wave:

Location:- Crewe Cheshire

Offline NickG

  • Madmodder Committee
  • Hero Member
  • *****
  • Posts: 1890
Re: 'Poppin' Flame Licker
« Reply #8 on: February 03, 2010, 01:16:02 PM »
Stew, I am following plans for 'poppin' which was serialised in Live Steam magazine in the 80's. It looks a pretty well thought out design.

Nick
Location: County Durham (North East England)

Offline Dean W

  • Hero Member
  • *****
  • Posts: 571
  • My kingdom for a lathe!
    • Projects web pages
Re: 'Poppin' Flame Licker
« Reply #9 on: February 05, 2010, 03:39:58 PM »
Nice to see you on another flamer build, Nick.  Good progress already!

Dean
Dean W.

Shop Projects:
http://www.deansphotographica.com/machining/projects/projects.html

Praise the Lord and pass the Carbide!

Offline NickG

  • Madmodder Committee
  • Hero Member
  • *****
  • Posts: 1890
Re: 'Poppin' Flame Licker
« Reply #10 on: February 07, 2010, 05:08:27 AM »
Thanks David, Tim, Stew and Dean,

I 've been struck down with Man Flu  :lol: I musn't have had a bad cold for about 2 years so forgot how bad it was! Anyway, still made a small amount of progress -

First I put the cylinders back in the 3 jaw with some protective thin aluminium around them and faced to length before using the adjusable reamer, I had adjusted it just about spot on, made it slightly larger than I had measured it and reamed right through at about 45rpm with cutting oil - this has produced a good smooth finish and very parallel and accurately sized bores - they have actually come out at 0.625" as intended, am quite astonished!

I then made a bit of a jig from nylon which had a 5/8" spigot and a smaller 1/4" one to hold the cylinder covers concentric. Gripped that in the milling vice and let the cylinder rest against the top of the vice jaws - probably not the best practice but I marked a cross on the cylinder covers with a centre square and a set square by eye. I then found the centre of my spigot in the milling machine and wound it out to the 0.422" or whatever radius it was then put a dab of loctite on the cyl covers to hold them on whilst spotting through with a centre drill, turning it around and drilling on each of the 4 scribed lines. This has produced a decent and repeatable result, I think the 2 covers will both fit on any of the 4 cylinder ends so I may have got lucky. If not, it wouldn't have mattered, they would have just been matched. I nearly messed up drilling the bolt holes on the other end of the cylinder - they have to be in the same place at both ends which only just occured to me before drilling. This is because there has to be a gap at the bottom for the valve to pass through! I opened the holes up to 8ba tapping size on the normal drill since

I didn't take any pictures of the jig yet but it's still in the milling machine as i still need to tap the holes so will get some pics tonight. I lapped both sides of each cylinder cover too.

I was a little bored of the cylinders by this time so on Fri night I decided to do something else – thought I’d try the oil cups. When I looked at the drawings the small numbers scared me but I thought they have to be done sometime so I’ll try and stick to it.

So chucked some brass hex in the 3 jaw and turned the outer body dia and smaller neck dia that’s threaded to go into the cylinder. This brass was rock hard – much harder to turn than stainless, I should maybe have used that.


 I then had to drill a 0.020” hole – no way I was trying that so I used my smallest number drill instead, no. 60 0.040” ! Twice the size but still the smallest hole I’ve drilled and small enough in my opinion! So the hole was drilled at the lathes max speed 720rpm, it coped surprisingly well, I had to drill about ¼” or so deep so just took it steady and didn’t break the drill to my surprise.


I then cut the 8ba thread using one of my xmas pressies:


Sawed it off, turned around in the chuck, drilled out with number 13 or something which broke into the tiny hole, then faced to length.


Quite happy with the result but I then had to repeat the whole process for the other one which is starting to bore me having to do everything twice but I’ve got to remember I’ll have 2 engines then!

Next job is to tap all the holes in the cylinders and do the pistons and yokes before I start on the frames.

Nick
 
Location: County Durham (North East England)

Offline NickG

  • Madmodder Committee
  • Hero Member
  • *****
  • Posts: 1890
Re: 'Poppin' Flame Licker
« Reply #11 on: February 07, 2010, 05:19:19 AM »
PS can't seem to get the camera to focus in on this small things which is quite annoying as it's supposed to be one of the best compact digital types. Maybe it's the light.
Location: County Durham (North East England)

Offline kellswaterri

  • Jr. Member
  • **
  • Posts: 68
  • Country: gb
Re: 'Poppin' Flame Licker
« Reply #12 on: February 07, 2010, 11:02:23 AM »
Hi Nick, I see the reamer worked for you all right, but if I have read your post correctly...''hand reamer, adjustable'' in lathe...decidely dodgy  :bugeye: but it did the job and you are coming on well with the build.
All the best for now,
                           John.

Offline Powder Keg

  • Global Moderator
  • Hero Member
  • *****
  • Posts: 932
  • Country: us
  • Machinist Extraordinaire
Re: 'Poppin' Flame Licker
« Reply #13 on: February 07, 2010, 11:10:43 AM »
Looking pretty nice there Nick!!!

On the camera... There should be a Icon somewhere on it saying tat it is focused. On mine there is a red square in the center that turns green when it is focused. Make sure you have plenty of light and turn off the flash on the camera. I have an extra light mounted over my mill, lathe, and work bench. This helps alot!!! Also, I've found that I try to get too close to my subject. I found that if I back up just a couple inches I have better results.

Thanks,
Wesley P
A Gismo ??? If it has a flywheel or spins and is made with small parts. I'll take one! If it makes noise, moves, or requires frequent oiling and dusting it's a better deal yet. It's especially right if its shiny and bright; but if it's dirty and dull it wont mater at all...

Offline sorveltaja

  • Hero Member
  • *****
  • Posts: 605
Re: 'Poppin' Flame Licker
« Reply #14 on: February 07, 2010, 01:55:50 PM »
PS can't seem to get the camera to focus in on this small things which is quite annoying as it's supposed to be one of the best compact digital types. Maybe it's the light.

Nick, does your camera have a macro-function? it usually helps when taking closer shots. More important is an even ambient lighting, that isn't much of a problem at the summer, but at the winter it would be a good practise to use white background.

Offline Dean W

  • Hero Member
  • *****
  • Posts: 571
  • My kingdom for a lathe!
    • Projects web pages
Re: 'Poppin' Flame Licker
« Reply #15 on: February 07, 2010, 07:01:53 PM »
Nice looking oil cup, Nick.  One more to go?  Double the fun!

Two things for your focus problem. 
1)  Push the button on the back of the camera that has an icon that looks like a tulip, or that says "macro".

2)  If it won't focus on a small item, put your finger or something like a small rule next to the item until it says it's focused.

3)  Don't use the flash unless you have too.  It blows out small bits, and makes them look out of focus, even when they're not.

4)  Check the shot after you take it to see if you got what you want.

Okay, that's four things.  Toldja, double the fun.

Dean
Dean W.

Shop Projects:
http://www.deansphotographica.com/machining/projects/projects.html

Praise the Lord and pass the Carbide!

Offline NickG

  • Madmodder Committee
  • Hero Member
  • *****
  • Posts: 1890
Re: 'Poppin' Flame Licker
« Reply #16 on: February 08, 2010, 07:58:23 AM »
John,

I think a lot of people use hand reamers in the lathe, why is it dodgy? Do you mean there is a safety issue? If so I won't be doing it again. I ran the lathe speed very low and held the reamer with a tap wrench fed in with a reolving centre to let it float. I've seen this method used a lot in magazine articles in model engineer and such like.

Wes / S / Dean, thanks for the advice. Mine does the same when focused with the green box. I did have macro engaged, it's got an intelligent auto function that basically sorts everything out for you, or is supposed to! It did engage macro but I also had the flash on, I have a light over the lathe.

I tried a few times but not without the flash so I probably need more light and no flash. Will try the something else to focus on trick too. I may need to go away from the fully automatic mode.

Here it is:

http://www.panasonic.co.uk/html/en_GB/Products/LUMIX+Digital+Cameras/Super+Zoom/DMC-TZ6/Overview/2032514/index.html

Nick

Location: County Durham (North East England)

Offline NickG

  • Madmodder Committee
  • Hero Member
  • *****
  • Posts: 1890
Re: 'Poppin' Flame Licker
« Reply #17 on: February 09, 2010, 07:06:41 PM »
Quick update, not a great deal of progress but worth mentioning.

I started by taking a couple of snaps of the simple jig I made to drill the holes as promised. It's not really the best jig, all it does is fix the radius and concenter the cover and cylinder. The rest had to be done by eye on markings on the cylinder cover just by gluing the cover on and rotating the cylinder. Seems to have been effective though and worked well.


I then wondered which part to make next and pontificated on a number of methods. I had some brass large enough and enough to do 2 flywheels, also had a bit of steel to do another 2. Then I found some brass 1/2" plate which I could have used. Or, some 2" steel which would make them 1/8" under size.

Anyway, whilst on the netti, I came to the decision to use the 2" steel as I would have little or no OD turning do do if I could drill centrally, just a bit of a polish up. I decided I wouldn't pussy foot about and would try to part off the blanks from the stock. So I went out full of enthusiasm, set the parting tool to the minimum overhang that would do the job, selected a suitable speed - very slow, back gear engaged, about 70 odd rpm, slowest cross feed to keep it nice and constant and even got ready with some suds in a syringe.

Then disaster almost struck - before I could react, this happened:
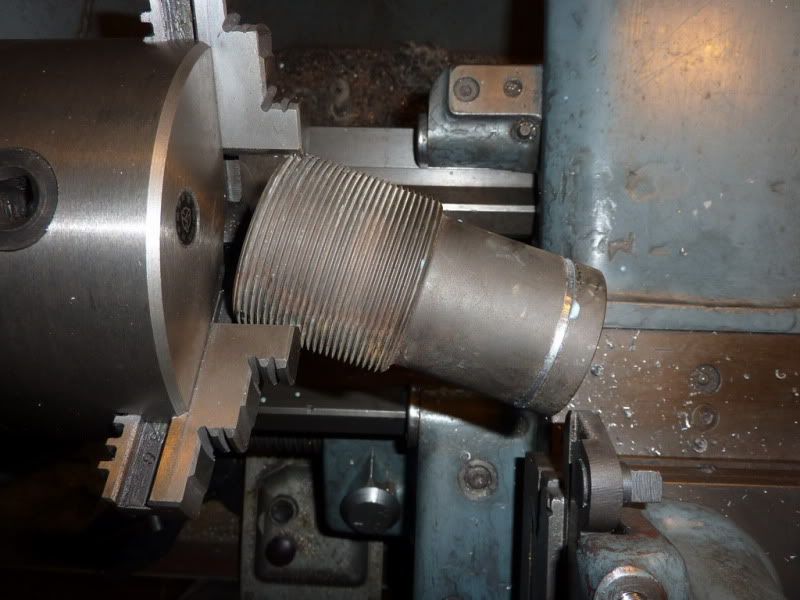
  :doh:  :(


I’ve moved the saddle a bit in that photo, the blade dug in shattered, and sounded like it hit all 4 walls, floor and ceiling but luckily missed me.
This was my thought process immediately after switching power off:

1.   Oh ****, ******* ********.
2.   I’m ok.
3.   That could have been worse.
4.   Actually I might have mangled the chuck and caused damage to the machine.
5.   I think I might give up this hobby.
6.   Take a step back and calm down a bit.

Seriously, it scared me. I’ve never parted off anything that’s steel as the feeling I get and noise have always put me off. This time I went for it as I thought I was being soft in the past, I thought I was doing it correctly but obviously not.

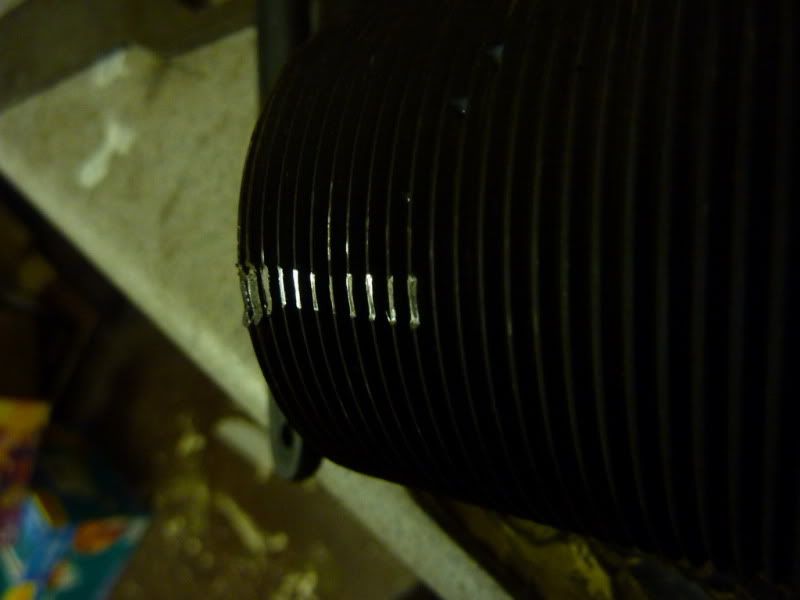
When I did calm down there seemed a tight spot on the chuck jaws, something has probably got bent. I took the jaws out, cleaned and reinstalled and it works, but there is a slight tight spot at some point so I must have done some sort of damage. It still grips and seems concentric though so hopefully I’ve got away with it.

Here is the damage to the metal:


There are a few major safety points that should go without saying:

1.   Always wear eye protection – make sure you have eye protection you can see out of and are comfortable wearing and make sure you always wear it. I could easily be lying in a hospital bed wondering if I’d ever see again rather than writing this.
2.   If in doubt, stop, I had a doubt in my mind I would be able to part this off but was trying to save time. I should have reached for the hacksaw at that point.
3.   If you have a chuck guard you should probably use it. That piece of steel very nearly came out of the chuck – at the speed it was rotating it wouldn’t have been flung and I’m not saying the guard would have stopped it but it could only have helped matters. I’ll be using mine more in future that’s for sure.

I didn’t think there’d be an issue with me gripping on the threads of that bar, but with hindsight it may have been part of the problem. They were probably the weak point, deforming and allowing the stock to move.  :hammer: I did consider turning a parallel section to grip on but then I thought, it’ll grip tight on the threads and they will probably let the chuck jaws dig in a bit and get better grip.

So, I’ve calmed down a bit and the following hour and a half was spend with the hacksaw for punishment – aching now! :lol::


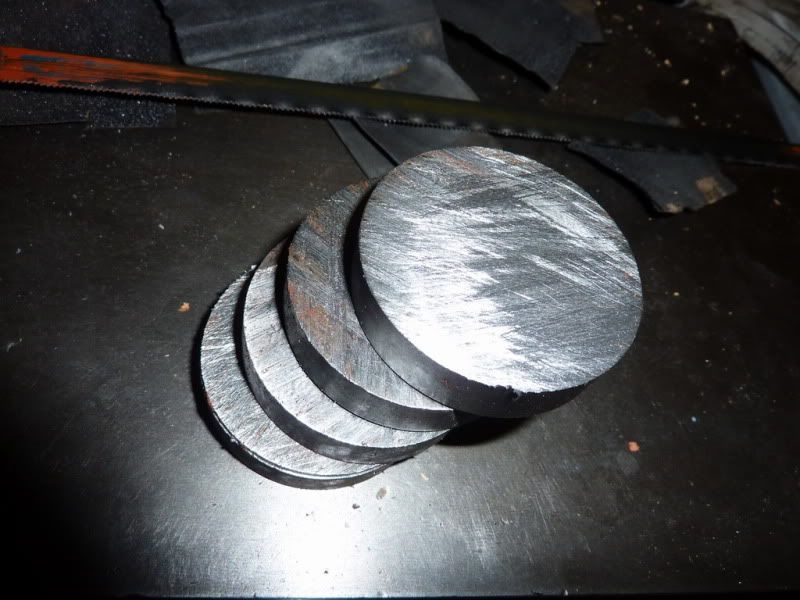
I did face the stock between each hack saw cut so at least  1 side of each blank is faced. Got a nice finish using the suds too, very good.

I could have not mentioned this mishap but I think it’s worth sharing these near misses just to give people a prod and make them think about things twice.

Nick

Location: County Durham (North East England)

Offline Dean W

  • Hero Member
  • *****
  • Posts: 571
  • My kingdom for a lathe!
    • Projects web pages
Re: 'Poppin' Flame Licker
« Reply #18 on: February 09, 2010, 11:06:18 PM »
A nasty bit of trouble there, Nick.  Sorry to see it happen to anyone, and especially such a nice guy.

I hope you will take my comments as just a few remarks from a fellow machinist impersonator, with a fair number of this type of job behind him.  (Even when I got paid for doing it, I felt like an impersonator!);

The piece was sticking out of the chuck quite a long way.  Parting off puts more side pressure on the spindle/work/work holding device than almost anything else, other than knurling, and maybe running a profile tool into the work.
 
Not knowing the size of your lathe, but getting a sense of scale seeing that you are cutting 2" dia steel, this may have been too much for the lathe in the first place, but there are some things that would have helped prevent such a violent outcome.

First, since the pieces would have a bore in them anyway, it would have been a good idea to put a center in the unsupported end.  You shouldn't part off completely with a center in the tail of the piece, but you can do about 80 percent of the job that way, and finish with a saw.  The reason not to do it all the way through is the piece will pinch at the end of the cut, causing a similar problem to what you have here.

Second, having the parting blade stick far enough out of the tool holder to make the complete cut is trouble.  They wobble like a noodle, and if you had an inch and a half sticking out, it didn't have much of a chance.

Finally, just too much sticking out of the chuck.  That far out, and the effective runout of the spindle is magnified.  The work deflects a few thou, and again, the tool gets pinched, and pop!

This is one place for sure that you need plenty of lube, too. 

Parting off is kind of a tough operation, especially when you're just getting to know the procedure.  Don't let it scare you off, though.  It's a normal shop op.  Find some smaller diameter pieces to practice on.  Put them in the chuck with only enough sticking out to get the tool to the cut off point.  I would think some size that will pass through your spindle would be a good practice size, and try some leaded steel if you have it.   Lots of lube and a very steady feed will do it.

Very glad there was no bloodshed associated with this, and I hope it doesn't put you off this type of operation. 
It's meant to be done, but it does have to be sized to the size, weight and power of your lathe.
Glad you got the job done, and thanks for showing us some more progress.  I'll bet your poor arm is just drooping!


Your camera;
"it's got an intelligent auto function..." 
It will most likely do what ever it wants at that setting.  Put that thing into submission.  The folks who program these functions think they know what you want.  They are often wrong.

Dean
Dean W.

Shop Projects:
http://www.deansphotographica.com/machining/projects/projects.html

Praise the Lord and pass the Carbide!

Offline Darren

  • Madmodder Committee
  • Hero Member
  • *****
  • Posts: 3795
  • N/Wales
Re: 'Poppin' Flame Licker
« Reply #19 on: February 10, 2010, 01:30:31 AM »
Nick, if I remember rightly you have a Harison 6" (12" swing) lathe?

This should have coped with parting this piece, except you would have needed to use a tailstock center as that part looks to be 6" long? The treaded end in the chuck prob made it unstable.

This is 2" diameter and very tough steel

You will find it a distinct help… if you know and look as if you know what you are doing. (IRS training manual)

Offline sbwhart

  • Global Moderator
  • Hero Member
  • *****
  • Posts: 3530
  • Country: gb
  • Smile, Be Happy, Have Fun and Rock Until you Drop
Re: 'Poppin' Flame Licker
« Reply #20 on: February 10, 2010, 03:21:34 AM »
Hi Nick

Bin there done that got the grey hairs, look on it as a learning exercise, no blood spilt which is a good thing.

Deans advice was spot on  :thumbup:

Have fun

Stew
A little bit of clearance never got in the road
 :wave:

Location:- Crewe Cheshire

Offline Stilldrillin

  • Global Moderator
  • Hero Member
  • *****
  • Posts: 4972
  • Country: gb
  • Staveley, Derbyshire. England.
Re: 'Poppin' Flame Licker
« Reply #21 on: February 10, 2010, 03:59:54 AM »
Ooohhhh....... Nick!  :bugeye:

All part of the "fun" that is home machining!   :wave:

No one damaged..... That`s the main thing! :thumbup:


Like wot Stew said, Dean`s spot on.....

I would have machined away the threads under the jaws, for a better grip . (Or held the bar t`other way round).

Very small centre drill hole, with centre in place to support, but no real pressure applied.

1" bar...... 250rpm
2" bar...... 120rpm
3" bar........ 70rpm

Part in to a depth of 1/2" or so, only. Then saw through the reduced diameter.

David D
David.

Still drilling holes... Sometimes, in the right place!

Still modifying bits of metal... Occasionally, making an improvement!

Offline NickG

  • Madmodder Committee
  • Hero Member
  • *****
  • Posts: 1890
Re: 'Poppin' Flame Licker
« Reply #22 on: February 10, 2010, 06:49:20 AM »
Thanks for the advice Dean and all.

Just for info, the lathe is a Harrison L5 - 4.5" x 24" or something. Very robustly built, although not as robust as Darren's, with 2 hp ph1 motor.

I've parted cast iron, gun metal and aluminium with no problems but this was steel to spec in attachment. It seems to machine nicely but fairly tough. There is about 3 1/2" protruding from the outer edge of the jaws.

I was going to hold it with the centre - I don't know why I didn't, just thought it would all be rigid enough. I'd say the parting blade was stuck out just over an inch. So in future I should make the initial cut with just a small bit sticking out then extend it, then it will be supported by the cut walls of the stock I guess the further you get in?

I will have to try some different smaller diameters of steel. I was going to make the thin cam disc from cast iron as I know I can part that but my try it from steel as an exercise. Not sure how much parting blade is left in there now!

I feel like I've had a good work out cutting the blanks by hand.

Should have mentioned before, I did do the 2nd oil cup - there are just 1 per engine, perched on top of cylinder.

Thanks for the advice, am coming back around to the idea of parting!

Nick


Location: County Durham (North East England)

Offline andyf

  • In Memoriam
  • Hero Member
  • *****
  • Posts: 1795
  • Country: gb
    • The Warco WM180 Lathe - Modifications
Re: 'Poppin' Flame Licker
« Reply #23 on: February 10, 2010, 07:38:44 AM »
I too have had problems with a "blade in a holder" parting tool. I reckon some of my difficulty might come from not getting the cutting edge dead square with the sides of the blade when I sharpen it, so the blade, being thin and thus having a bit of flex, gets steered increasingly off course, trying to flex more and more as it goes further in. The larger the diameter of the stock, the more the overhang of the blade, giving it more opportunity to flex. Then again, my problems may just stem from ham-fistedness and lack of experience.

I need to experiment to see if setting the blade short for minimum flex, going in say 1/4", and then pulling some more blade out of the holder will enable the sides of the 1/4" deep groove to keep the blade on course. At present, I'm using a parting tool ground on the end of a square HSS blank for greater rigidity, but I can only get just over 1/4" in with it before the saw has to come into play. But even that shallow groove gets me well on the way - in terms of cross-sectional area, a 2" dia, 1" radius bar is 3.14 sq inches. With a 1/4" groove round it, there's 3/4" of radius = 1.76 sq inches left to saw through, so 44% of the job has been done by the parting tool.

Andy
Sale, Cheshire
I've cut the end off it twice, but it's still too short

Offline Darren

  • Madmodder Committee
  • Hero Member
  • *****
  • Posts: 3795
  • N/Wales
Re: 'Poppin' Flame Licker
« Reply #24 on: February 10, 2010, 08:00:17 AM »
I too had problems with HSS parting blades cutting steel. OK for brass and such though.

Then I bought an insert parting tool, different world. Now I part off under power and it can be quite a rapid speed too.
This one had left and right cutting edges so quite versatile as well.


You will find it a distinct help… if you know and look as if you know what you are doing. (IRS training manual)