Author Topic: 'Poppin' Flame Licker  (Read 77669 times)

Offline slowcoach

  • Full Member
  • ***
  • Posts: 230
  • Country: england
Re: 'Poppin' Flame Licker
« Reply #25 on: February 10, 2010, 08:26:12 AM »

1.   Oh ****, ******* ********.
2.   I'm ok.
3.   That could have been worse.
4.   Actually I might have mangled the chuck and caused damage to the machine.
5.   I think I might give up this hobby.
6.   Take a step back and calm down a bit


I've been there Nick. Completely sh*t*ng myself and then giving myself a good b*ll*cking  :)

Rob  :thumbup:

Offline NickG

  • Madmodder Committee
  • Hero Member
  • *****
  • Posts: 1890
Re: 'Poppin' Flame Licker
« Reply #26 on: February 10, 2010, 09:32:40 AM »
Andy, good points made there.

That looks a handy tool Darren.

Rob, yes, that's what happened!  :)

Starting to feel slightly better that I can have another go and attack it in a different way this time  :smart:

Nick
Location: County Durham (North East England)

Offline madjackghengis

  • Hero Member
  • *****
  • Posts: 717
  • big engine
Re: 'Poppin' Flame Licker
« Reply #27 on: February 12, 2010, 08:46:45 AM »
PS can't seem to get the camera to focus in on this small things which is quite annoying as it's supposed to be one of the best compact digital types. Maybe it's the light.
Hi Nick,  looks like you got a good start on those TWO engines, and you'll probably end up with two working models when you're done.  I had a problem with taking any kind of machine pictures with my digital camera, and someone suggested finding the manual focus control.  Once I did that, my pictures started coming out good, I usually take two or three from different angles, as the glare of light seems to pop up with no sense of responsibility at all.  I'm starting to work on a "poppin' engine" using my first discarded cylinder from my radial, it'll have a one inch bore, since I was already drilled out to that when I screwed up the base flange, but you and a couple others have been kind enough to send the plans, and I do need to do something small while this other takes huge amounts of time.  Your using the adjustable reamer is good news, as I need to ream out about a thousanths of taper from my cylinders before then can be honed, and I wasn't sure an ajustable reamer would leave a clean enough cut.  Great job so far  mad jack :headbang:

Offline NickG

  • Madmodder Committee
  • Hero Member
  • *****
  • Posts: 1890
Re: 'Poppin' Flame Licker
« Reply #28 on: February 12, 2010, 12:44:48 PM »
I'll have to try that madjack.  Would be interesting to see your version of poppin, you're right, sometimes you need a break and a quick win whilst in the middle of a large project. Adjustable reamer seemed to work spot on for the cast iron.

Nick
Location: County Durham (North East England)

Offline jim

  • Sr. Member
  • ****
  • Posts: 441
  • Country: 00
Re: 'Poppin' Flame Licker
« Reply #29 on: February 12, 2010, 01:29:21 PM »
Nick, what a week you've had!

sorry to read about your parting mishap.

keep up the good work :thumbup:
if i'd thought it through, i'd have never tried it

Offline madjackghengis

  • Hero Member
  • *****
  • Posts: 717
  • big engine
Re: 'Poppin' Flame Licker
« Reply #30 on: February 15, 2010, 11:26:47 AM »
Hi Nick,  I've often chucked on threads with the exact notion you mentioned, but have used the opportunity to use greater clamping force on account of having less clamping area for the force to spread over.  This actually insets the chuck jaws into self-made pockets, and if you don't get them drawn out, they are more secure and will carry more torque.  With such overhang though, it is best to use a tailstock center while using the cutoff tool, and if possible, drill the center hole first, so the blade will run into air, and not an increasingly straight cut.  When I get close to the end of the cut, I back out the tailstock center just a hair, enough so it still turns with the work, but will slip a bit when pressure of the tool is backed off.  It can also make a big difference with steel if you use a bench grinder and grind a slight hollow in the top of the cutoff blade, so there are a couple of degrees of positive back rake in the tool.  I always sharpen my high speed tools with a grinder and finish the job with a diamond lap, lapping each surface that gets contact.  It can make all the difference in the world.
     I'm glad to see you making good progress, and watching close so my build will be easier.  For this I thank you.  Mad Jack :beer:

Offline NickG

  • Madmodder Committee
  • Hero Member
  • *****
  • Posts: 1890
Re: 'Poppin' Flame Licker
« Reply #31 on: February 17, 2010, 06:27:49 AM »
Madjack,

Thanks for the advice. I had already done as you had mentioned on the parting blade but the rest I will have to put down to experience!

Unfortunately I've picked up some vomiting bug on monday and today is the first day I've started feeling ok. Only kept down 2 slices of toast and 1/2 bag of crisps in the last 48 hours, touch wood it's going to stay down and I'll be able to get back in the garage tomorrow (thurs) night.

Nick
Location: County Durham (North East England)

Offline jim

  • Sr. Member
  • ****
  • Posts: 441
  • Country: 00
Re: 'Poppin' Flame Licker
« Reply #32 on: February 17, 2010, 01:38:42 PM »
Madjack,

Thanks for the advice. I had already done as you had mentioned on the parting blade but the rest I will have to put down to experience!

Unfortunately I've picked up some vomiting bug on monday and today is the first day I've started feeling ok. Only kept down 2 slices of toast and 1/2 bag of crisps in the last 48 hours, touch wood it's going to stay down and I'll be able to get back in the garage tomorrow (thurs) night.

Nick
hope you are felling better :thumbup:
if i'd thought it through, i'd have never tried it

Offline NickG

  • Madmodder Committee
  • Hero Member
  • *****
  • Posts: 1890
Re: 'Poppin' Flame Licker
« Reply #33 on: February 19, 2010, 05:58:51 PM »
Thanks, Jim

I'd say I'm back to 95% now, not sure what the 95% is of but nevertheless, feeling a lot better.

I’ve finally got my self back into the garage for a couple of hours and made a little progress. Things seem to keep getting in the way of this project.

I started by facing all the flywheel blanks to about 10 thou over thickness to leave a little to skim at the end.
Seeing as though I have a few of each part to do I am trying to do a sort of mini production line on this job, completing operations rather than the part. So I left the lathe saddle where it was and faced across each blank. They came out within a few thou of each other so I scribbled the sizes on so I knew how much to take off on the next operations.


I then centre drilled one of the blanks and drilled out to 5/16” hole ready to turn the recess. I thought I’d be able to do this with my standard carbide tool that I now seem to be able to use for most jobs! After struggling on for about 10 mins I got a 20 thou deep recess that my 1 year old son could have chewed out better with his few teeth! The tool just didn’t have the right clearances, I don’t know why I thought I’d get away with it, it was just rubbing far too much everywhere.

So I decided to take a step back and think about it for a few seconds, then grind an HSS tool just for the job. This sketch shows the angles I ground it to:


This now worked an absolute tread, was very pleased with myself! Don’t know why but it was satisfying to watch it cut, I could cut 30 thou at a time with no chatter or anything. So I quickly turned the recesses on a couple of the flywheels, then got a bit tired and bored and came in. It took little time to do though so not worried about that now.
Here is a pic showing 2 flywheels, 1 has a larger recess in 1 side to clear the cam and roller.


It is only now that I realise how light these flywheels are and probably one of the reasons poppin runs so fast. There are 4 9/16” lightening holes called for on the drawings but I’m going to go for 6 smaller holes as I can use the 3 jaws of the chuck to divide those. I will probably turn up a mandrel to mount on in the milling machine and drill in the same way I did the cylinder holes. Should be really quick to spot them all with centre drill then open up that way.

I won’t be getting much more done on this in the coming days – family do tomorrow,  might get a bit done sun night but then away with work until thurs night when I should hopefully pick it back up.
Might go for the crankshafts for a change after these flywheels are sorted.

Nick
« Last Edit: February 19, 2010, 06:01:24 PM by NickG »
Location: County Durham (North East England)

Offline Dean W

  • Hero Member
  • *****
  • Posts: 571
  • My kingdom for a lathe!
    • Projects web pages
Re: 'Poppin' Flame Licker
« Reply #34 on: February 19, 2010, 06:58:39 PM »
Glad to see you back in the shop!
Sometimes tool clearances just give me fits.  I do most of my own tool grinding, and now and then, I just have get a piece of paper,
draw a circle and a center spot on it, and put my tool blank up against it to check it out.

Looks like you had a similar idea and got the job done it good fashion.  That's a fair amount of metal removal for
one sitting, unless you have a large machine. 
Good job, Nick.

Dean
Dean W.

Shop Projects:
http://www.deansphotographica.com/machining/projects/projects.html

Praise the Lord and pass the Carbide!

Offline sbwhart

  • Global Moderator
  • Hero Member
  • *****
  • Posts: 3530
  • Country: gb
  • Smile, Be Happy, Have Fun and Rock Until you Drop
Re: 'Poppin' Flame Licker
« Reply #35 on: February 20, 2010, 11:13:11 AM »
Hi Nick sorry to hear you've bin a bit croak. I was wondering why you hadn't posted.

Good work with the fly wheels.  :thumbup:

Have fun

Stew
A little bit of clearance never got in the road
 :wave:

Location:- Crewe Cheshire

Offline NickG

  • Madmodder Committee
  • Hero Member
  • *****
  • Posts: 1890
Re: 'Poppin' Flame Licker
« Reply #36 on: March 03, 2010, 07:10:17 PM »
Hi guys,

The lathe is a fair size and more rigid than most Dean, it's a Harrison L5 9 x 24" but the capacity doesn't tell the full story, it's bigger than it sounds! It's been a good purchase, I wish my milling machine was of the same ilk but you win some you lose some!

Well I've had a couple of short sessions in the workshop since my last post. For some reason I just can't get motivated / finding it hard to find the time, then when I do I'm in by 22:00 where as before sometimes I was in the shop until 2am - that's probably not good I know, but still got more done that way!

Anyway, onto the build:

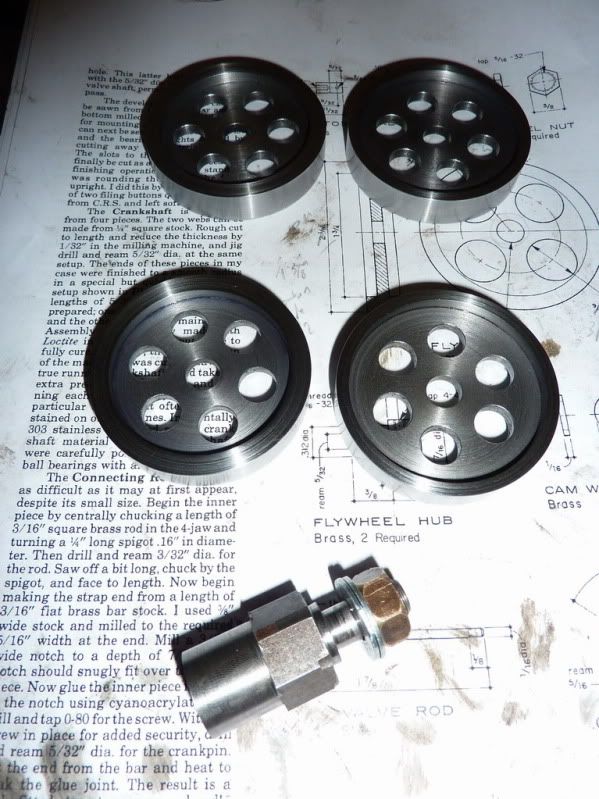
The first job was to get all of the flywheels to the same stage with the recesses turned out, remembering to do 2 flywheels with the larger dia. recess on one side to clear the cam disc.

I then blued the flywheels and marked them up for the lightening holes by using the jaws of the 3 jaw chuck to index the 6 holes.

The idea then was to set about making an arbor to hold the flywheel on – this way I could set the milling machine to the right place then simply fasten each flywheel to the arbor in turn and index around lining up by eye with the markings, tighten nut, then drill. There would still be a bit of manual adjustment but only 1 adjustment for each hole.

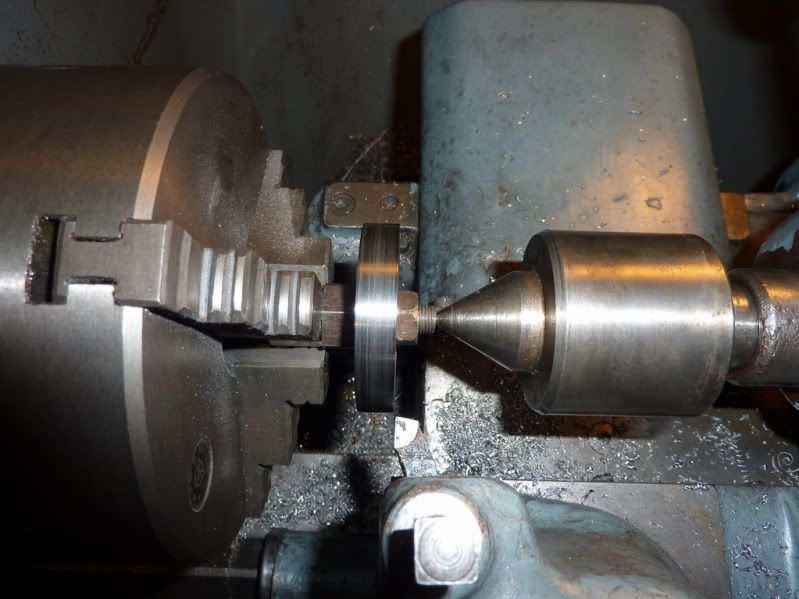
Threading arbour in lathe with tailstock die holder:
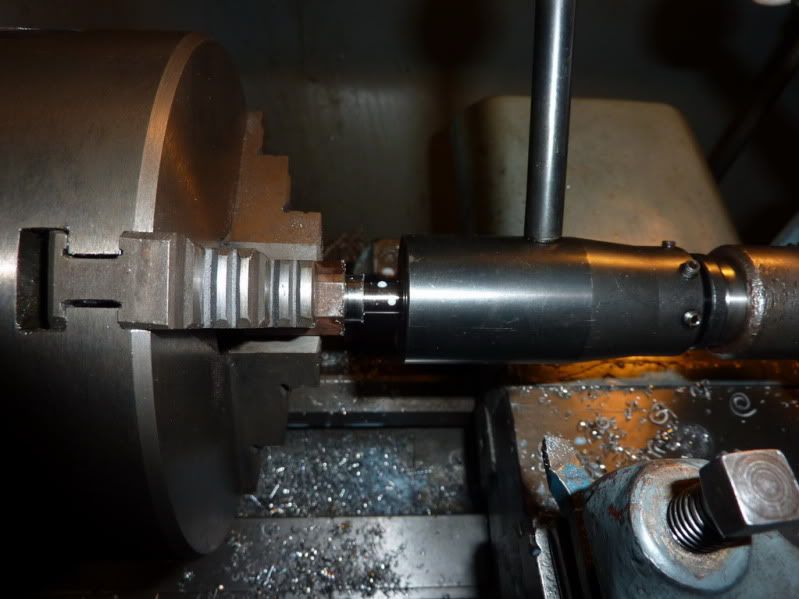
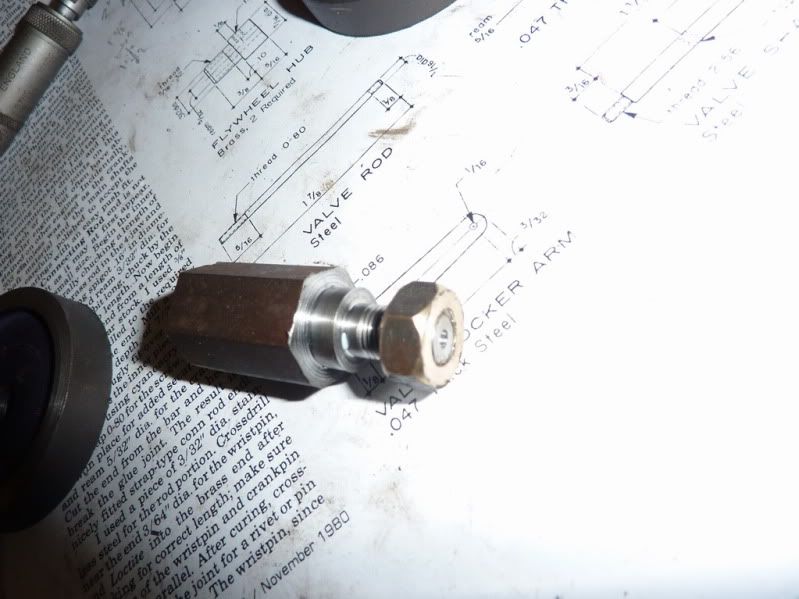

Here is the arbour:


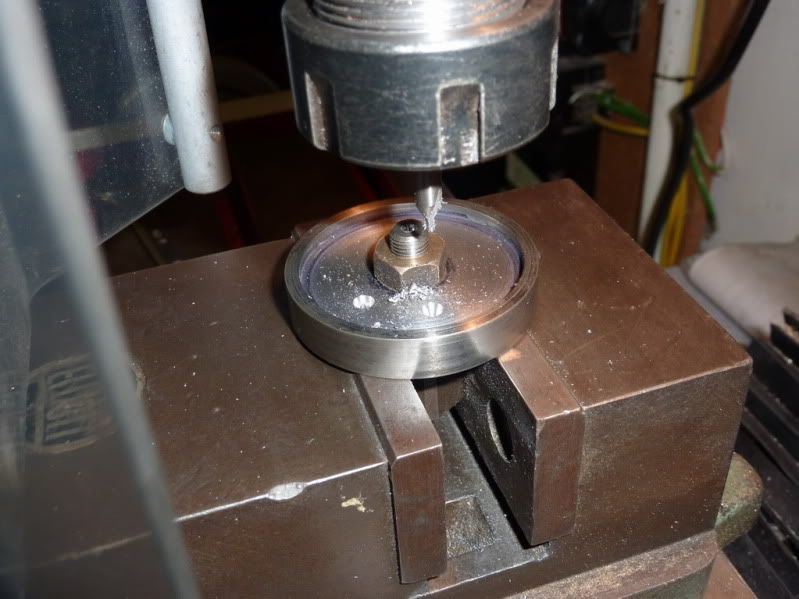
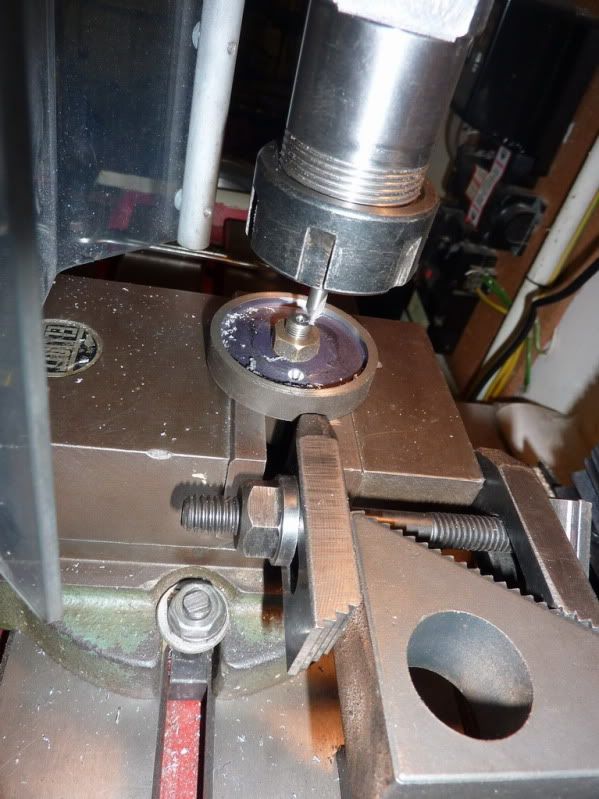
So I plonked it in the milling vice, centred the quill and wound it out to the rad that the lightening holes lie on and started drilling:


I soon realized that this method was still taking a while – I had to drill 24 holes, 6 on each of 4 flywheels but opened up gradually too. As soon as I started opening the holes up it became less easy to find the centre of the hole by eye.

Luckily, I had a brainwave – I say luckily because by chance I had made the arbor from hexaganol bar – my indexing method was sat there looking me right in the face and I couldn’t see it!

So with a vice depth stop in place (thanks Tim!), all I had to do was clamp the flywheel onto the arbor, slacken the vice and index around onto the 6 flats of the hex bar! This made if very quick to do.


Here are the flywheel s at similar stages:


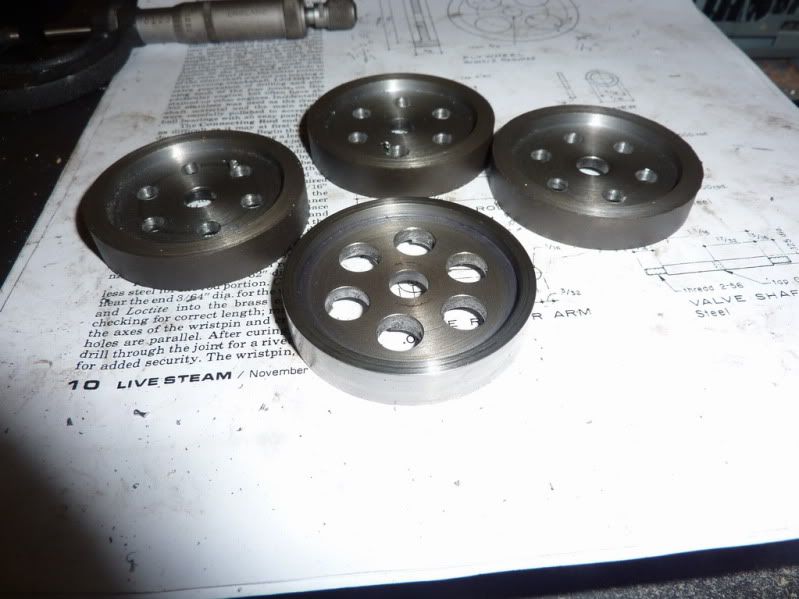
Once I got to the larger size I was having massive problems with getting the drill to cut – It did a little then just refused, with or without cutting oil, tried regrinding etc but it was making a right mess chewing through the steel on the first flywheel  I did. So I used a slot drill instead, this worked much better, quicker and cleaner.

Once all the holes were drilled I put the arbor back in the lathe and turned a parallel register on the other end. Turned it around and turned a new location diameter for the flywheels  (see last pic) I then left the arbor in the chuck and clamped each flywheel on in turn to true up the OD. This should make them run true.


Here are the two pairs of flywheels, I’ve left the centres as they came from the lathe so I can paint.


Location: County Durham (North East England)

Offline Dean W

  • Hero Member
  • *****
  • Posts: 571
  • My kingdom for a lathe!
    • Projects web pages
Re: 'Poppin' Flame Licker
« Reply #37 on: March 04, 2010, 01:33:47 AM »
It's going well, Nick.
I can't remember which forum I'm watching you on, from one day to the next.  Some here, some the other place.
Anyway, still watching your build!

: )

Dean
Dean W.

Shop Projects:
http://www.deansphotographica.com/machining/projects/projects.html

Praise the Lord and pass the Carbide!

Offline Stilldrillin

  • Global Moderator
  • Hero Member
  • *****
  • Posts: 4972
  • Country: gb
  • Staveley, Derbyshire. England.
Re: 'Poppin' Flame Licker
« Reply #38 on: March 04, 2010, 03:26:46 AM »
It's going well, Nick.
I can't remember which forum I'm watching you on, from one day to the next.  Some here, some the other place.
Anyway, still watching your build!

: )

Dean

Yeah.... I`m watching in stereo too! ::)

It`s all looking good Nick.

Love the hexagon indexer....... Well done...  :thumbup:

David D
« Last Edit: March 04, 2010, 03:32:27 AM by Stilldrillin »
David.

Still drilling holes... Sometimes, in the right place!

Still modifying bits of metal... Occasionally, making an improvement!

Offline NickG

  • Madmodder Committee
  • Hero Member
  • *****
  • Posts: 1890
Re: 'Poppin' Flame Licker
« Reply #39 on: March 04, 2010, 03:31:40 AM »
Hi Dean & David,

Thanks, I'll be starting something new tonight, glad those flywheels are out of the way!

I've lost track myself - I think I might have replied to peoples posts from here on the other forum!

I think in future I won't be able to go into this detail on my projects, It'll just be a quick description of what I'm doing then a brief write up of how it went, any issues I had and some photo's  / video of the finished thing.

I'm finding that trying to take photos whilst machining takes time and is quite disruptive, sometimes throws you off course. Then you've got to resize them, up load them and write up an article - this takes a lot of time and there are other distractions when you get onto the computer as well. So I think I'll be using some of that time to actually make stuff in future!

Nick
Location: County Durham (North East England)

Offline sbwhart

  • Global Moderator
  • Hero Member
  • *****
  • Posts: 3530
  • Country: gb
  • Smile, Be Happy, Have Fun and Rock Until you Drop
Re: 'Poppin' Flame Licker
« Reply #40 on: March 04, 2010, 03:32:29 AM »
It's going well, Nick.
I can't remember which forum I'm watching you on, from one day to the next.  Some here, some the other place.
Anyway, still watching your build!

: )

Dean

Yeah.... I`m watching in stereo too! ::)

It`s all looking good Nick. Well done...  :thumbup:

David D

Me to

Nice work Nick  :clap: :clap: :clap:

Stew
A little bit of clearance never got in the road
 :wave:

Location:- Crewe Cheshire

Offline Stilldrillin

  • Global Moderator
  • Hero Member
  • *****
  • Posts: 4972
  • Country: gb
  • Staveley, Derbyshire. England.
Re: 'Poppin' Flame Licker
« Reply #41 on: March 04, 2010, 03:43:21 AM »
I'm finding that trying to take photos whilst machining takes time and is quite disruptive, sometimes throws you off course. Then you've got to resize them, up load them and write up an article - this takes a lot of time and there are other distractions when you get onto the computer as well. So I think I'll be using some of that time to actually make stuff in future!

Nick

This, to me is all part & parcel of the hobby...... Retired so, I guess I`ve got more time than you Nick!


When I manage to shake myself free from the winter doldrums...... 

David D
David.

Still drilling holes... Sometimes, in the right place!

Still modifying bits of metal... Occasionally, making an improvement!

Offline spuddevans

  • Global Moderator
  • Hero Member
  • *****
  • Posts: 1618
  • Country: 00
  • Portadown, Northern Ireland
    • My Photo website
Re: 'Poppin' Flame Licker
« Reply #42 on: March 04, 2010, 06:15:57 AM »
Looking good there Nick  :thumbup: :thumbup: Good thinking on using the hex as an indexing aid, and I see that you have got the Mk2 version of my depth stop, the horizontal one :lol:

It's true that it does interrupt the machining process to take pics, I sometimes get a little carried away and forget to document the different stages of a build. But what I do find good about stopping to take pics, it does help you to just take a regular step back which can help to get a clear perspective of where you are going ( or in my case, where I am going wrong :lol: )

But on the other hand, if you are working on something that has a lot of intricate steps that takes full concentration, maybe it is better to be uninterrupted.

Anyway, back on topic, glad to see your good progress on this.


Tim
Measure with a micrometer, mark with chalk, cut with an axe  -  MI0TME

Offline Darren

  • Madmodder Committee
  • Hero Member
  • *****
  • Posts: 3795
  • N/Wales
Re: 'Poppin' Flame Licker
« Reply #43 on: March 04, 2010, 06:20:10 AM »
 Nice indexing Nick ... faster than an indexing table no doubt.   :ddb:

You will find it a distinct help… if you know and look as if you know what you are doing. (IRS training manual)

Offline Darren

  • Madmodder Committee
  • Hero Member
  • *****
  • Posts: 3795
  • N/Wales
Re: 'Poppin' Flame Licker
« Reply #44 on: March 04, 2010, 06:21:29 AM »


When I manage to shake myself free from the winter doldrums...... 

David D

You're not alone there David, I feel the season is just before us .....  :)
You will find it a distinct help… if you know and look as if you know what you are doing. (IRS training manual)

Offline NickG

  • Madmodder Committee
  • Hero Member
  • *****
  • Posts: 1890
Re: 'Poppin' Flame Licker
« Reply #45 on: March 04, 2010, 07:19:48 AM »
Thanks guys, glad it's not just me!  :lol:

I really need to make a depth stop, I had no idea how useful they'd be, but the Tim Mk 2 works just fine for now so I think it may get deployed more in the future!

You might be right about the taking the step back being good Tim. This project is taking me ages, but (touch wood) I haven't made a costly mistake yet (shouldn't have said that  :lol:  :doh:), it's just frustrating that the box of bits looks nothing like an engine yet, let alone two!

Nick
Location: County Durham (North East England)

Offline AdeV

  • Madmodder Committee
  • Hero Member
  • *****
  • Posts: 2434
  • Country: gb
Re: 'Poppin' Flame Licker
« Reply #46 on: March 04, 2010, 07:55:37 AM »
Lots of good work on this one Nick, I'm looking forward to seeing how it turns out.... I certainly don't feel ready to tackle an engine yet (at least, not a whole one!  :lol:)

Just going back over a few posts to your parting off troubles - I did something very similar with a piece of tube (3" dia, maybe 1/16" wall thickness), get a few thou into the cut then "KLUNK". I'm fairly sure I've mortally wounded my 3-jaw chuck, it's quite stiff in several places now.... but the 4-jaw is easier to fix the run-out, I'm finding, so I'll just stick with that one I think.

I find I take most of my photos between operations, rather than during (the occasional under-power shot being the exception). I never really thought about how much time it was taking, or whether it was distracting; I know most readers here are voracious photo consumers (myself included), so partially I aim to please on that score; but also I find them useful for me too, so I can go back & review what I've already done.

The writeup is another kettle of fish. Each of the longer BMW Sump write-ups takes me about an hour to do, all told. I may need to reduce that a bit, but TBH I find the writing about it almost as much fun as the actual doing (more so, if I'm not comfortable with the doing).

Anyway, enough thread hi-jacking. Just to say I'm loving your work, and hope you find the time to keep the excellent and thorough documentary going. They're really useful to newbies like me - even, no, especially the "warts and all" photos. :thumbup:
Cheers!
Ade.
--
Location: Wallasey, Merseyside. A long way from anywhere.
Occasionally: Zhengzhou, China. An even longer way from anywhere...

Offline spuddevans

  • Global Moderator
  • Hero Member
  • *****
  • Posts: 1618
  • Country: 00
  • Portadown, Northern Ireland
    • My Photo website
Re: 'Poppin' Flame Licker
« Reply #47 on: March 04, 2010, 09:04:24 AM »
This project is taking me ages,

Dont lose heart, this is more about the journey than the destination. If all we were interested in was just the end result we'd just go out and buy the completed model. But by taking however long as the project needs, and our own personal circumstances allow, we get the satisfaction from beating poor defensless bits of metal crafting and sculpting raw stock into working parts of a project.

So what's the rush, you know you are just going to start on another project as soon as you finish this one, so just enjoy the journey with the rest of us :thumbup:


Tim
Measure with a micrometer, mark with chalk, cut with an axe  -  MI0TME

Offline madjackghengis

  • Hero Member
  • *****
  • Posts: 717
  • big engine
Re: 'Poppin' Flame Licker
« Reply #48 on: March 04, 2010, 09:37:43 AM »
Hi Nick,  it's good to see you posting, I take it to mean you've got past the bug you were under the weather with.  For myself, reading other's posts is good when I'm doing something on my own project which involves lots of repetition, such as making cylinder blanks for a radial engine.  I haven't stopped working on it, but serial pictures of the ten or eleven cylinders being machined as I get opportunity between jobs would be boring to look at, so I took a couple of pictures in the beginning, and will take a picture of all of the little soldiers standing in a row, when they're lapped out and ready for fitting pistons.  In the mean time, I have got off land line internet, got on satallite internet, and actually viewed someone's engine running, seeing a u-tube video for my first time ever.
     I am almost done with the many cylinders, and in the mean time, I'm enjoying watching this thread, as I intend for the "poppin" to be my next project, and want it to go perfect, smooth, and without a bump first time out.  I don't suppose that's asking too much in one sitting is it?  mad jack :headbang:

Rob.Wilson

  • Guest
Re: 'Poppin' Flame Licker
« Reply #49 on: March 04, 2010, 04:24:21 PM »
Lookin good Nick  :clap:
Great read and photo build , keep it coming.

Cheers Rob  :beer: