Author Topic: Jan Ridders Otto 4 stroke build  (Read 64064 times)

Offline madjackghengis

  • Hero Member
  • *****
  • Posts: 717
  • big engine
Re: Jan Ridders Otto 4 stroke build
« Reply #50 on: February 28, 2011, 09:10:39 AM »
I'm running out of things to do without belts and ignition parts.  Belt and cogs will be here tomorrow...  I hope I got the right size...

I redesigned the muffler.  It looked like it might be a bit fragile and exposed and easily damaged or knocked off.  Not that I am going to be tossing the motor around, but things happen, so I made it with a mount that bolts to the tappet cross member.


It is high temp loctited together.


The intake was the same idea.  I will connect the nipple to the vapor tank with some silicone hose or some aluminum tubing.


And a view of it on the motor.  Starting to look pretty complete now.


More to come...  not much more, but more just the same...
Doug, it takes a lot of gall to say you're not going to toss it around or anything, when you just posted a video of you tossing it around and everything :poke: :lol: I guess my thoughts on using four bolts for the bottom of the cylinder would be another problem too.  That is a very nice connecting rod, and you are definitely making it "your own", by the unique modifications from the design, I'm really looking forward to seeing and hearing it run.  :beer: cheers, Jack

Offline DavidA

  • Hero Member
  • *****
  • Posts: 1219
  • Country: gb
Re: Jan Ridders Otto 4 stroke build
« Reply #51 on: February 28, 2011, 09:40:17 AM »
Doug,

You should have an email with a copy of my pdf.  If not let me know and I'll do a screen dump of the relevant section.
I note that my version is dated October 2007. You may have an updated set.


I echo the 'nice build' comments of the others.  I made a cylinder barrel and roughed out the head months ago before I retired from work,  whilst I still had access to big machines. Haven't done anything else on it yet.

The only thing that does raise an eyebrow is that you have a brass piston pin running in a brass small end bush. Don't know if that will last very long.  One way to get around the problem of the steel pin scoring the bore is to shorten the pin a bit and fit some small brass 'end  pieces' that will prevent the pin touching the bore.

Just an idea.

Dave.

Offline dbvandy

  • Full Member
  • ***
  • Posts: 170
Re: Jan Ridders Otto 4 stroke build
« Reply #52 on: February 28, 2011, 10:47:56 AM »
Doug,

You should have an email with a copy of my pdf.  If not let me know and I'll do a screen dump of the relevant section.
I note that my version is dated October 2007. You may have an updated set.


I echo the 'nice build' comments of the others.  I made a cylinder barrel and roughed out the head months ago before I retired from work,  whilst I still had access to big machines. Haven't done anything else on it yet.

The only thing that does raise an eyebrow is that you have a brass piston pin running in a brass small end bush. Don't know if that will last very long.  One way to get around the problem of the steel pin scoring the bore is to shorten the pin a bit and fit some small brass 'end  pieces' that will prevent the pin touching the bore.

Just an idea.

Dave.

Wow! these plans are great!  There is just something about hand drawn plans that feel right.  He also includes the info about the piezo igniter, I am still on the fence on where to go there.  The CDI is looking better and better, but the piezo is really clean looking.

On the brass wrist pin:  I had a stainless wrist pin in the webster and it was starting to mar the cylinder, so I did some research and the jury is about 50/50 on the use of brass on brass.  Being as this is not a high HP or RPM engine, it will probably be fine.  The new one in the webster (brass on brass)  has about 20 hours on it and it looks about brand new. 

I have some old school IC engine books that talk about that same thing:  using steel rod with brass buttons on the end.  Being as it looks like I have some time before it runs (not that I am on any deadline anyway...)  I think I might go ahead and make one up and use it.

You should pull that cylinder off the shelf and see if it speaks to you....

Doug
"if you can pay someone to do it, then you can do it... just might cost more and take longer."  ~Grandpa Vanderbilt

Offline sorveltaja

  • Hero Member
  • *****
  • Posts: 605
Re: Jan Ridders Otto 4 stroke build
« Reply #53 on: February 28, 2011, 12:19:27 PM »
Brass is good, and some small commercial 2-stroke glow engines, like Thunder Tiger, used to have ptfe wrist pins. Maybe they still do.

That piezo ignition is a very interesting, and compact alternative. But as Jan has stated, it works reliably only on his 4-stroke engines, but not on 2-strokes.

I guess, that the speed limitation isn't in the piezo itself, but in the mechanism, that drives that piezo.

All of the local market/grocery store barbique grill/gas stove igniters, that I've had, have exactly same size piezo unit in them. Could make them easy to replace.

Offline DavidA

  • Hero Member
  • *****
  • Posts: 1219
  • Country: gb
Re: Jan Ridders Otto 4 stroke build
« Reply #54 on: February 28, 2011, 04:52:51 PM »
Doug,

...You should pull that cylinder off the shelf and see if it speaks to you....

I did;  it said 'sod off,  can't you see I'm asleep?'

Dave.

Offline saw

  • Hero Member
  • *****
  • Posts: 1003
  • Country: se
  • lucky amateur
    • Svenssons AckordsWerkstad
Re: Jan Ridders Otto 4 stroke build
« Reply #55 on: February 28, 2011, 04:58:49 PM »
A good one  :lol: :lol: :lol:
_________________________
Greetings / Benni
http://myprojecty.wordpress.com/category/steam-engine/

Offline dbvandy

  • Full Member
  • ***
  • Posts: 170
Re: Jan Ridders Otto 4 stroke build
« Reply #56 on: February 28, 2011, 08:39:24 PM »
Doug,

...You should pull that cylinder off the shelf and see if it speaks to you....

I did;  it said 'sod off,  can't you see I'm asleep?'

Dave.

Googling " 'sod off "....... :zap:
"if you can pay someone to do it, then you can do it... just might cost more and take longer."  ~Grandpa Vanderbilt

Offline dbvandy

  • Full Member
  • ***
  • Posts: 170
Re: Jan Ridders Otto 4 stroke build
« Reply #57 on: February 28, 2011, 09:59:46 PM »
cogs and belt arrived today... yea...  the belt calculator online was dead on!  I bought one smaller and one bigger just in case.  Tomorrow I strip the engine and cut some slots...


Here is a link to the calculator:  http://www.sdp-si.com/Cd/default.htm


Vapor tank will be a glass tube with socket heads to adjust the mixture and throttle...  we will see how well it works...


More to come...

Doug
« Last Edit: March 01, 2011, 11:58:58 PM by dbvandy »
"if you can pay someone to do it, then you can do it... just might cost more and take longer."  ~Grandpa Vanderbilt

Offline NickG

  • Madmodder Committee
  • Hero Member
  • *****
  • Posts: 1890
Re: Jan Ridders Otto 4 stroke build
« Reply #58 on: March 01, 2011, 01:33:15 PM »
Really interesting to watch Doug with your own take on things. Thanks for the videos - that will be of great benefit to prospective builders. I think some people make their fits way too tight, but a video is worth 1000000 words and that shows the sort of friction people should be aiming for. It does many many revolutions when spun over. :thumbup:

On the wrist pin, I usually make it a tight fit in the rod so the pin always stays central with enough clearance so that it never touches the bore - not sure whether it's good practice or not but seems to work.

Nick


Location: County Durham (North East England)

Offline dbvandy

  • Full Member
  • ***
  • Posts: 170
Re: Jan Ridders Otto 4 stroke build
« Reply #59 on: March 01, 2011, 11:33:13 PM »
I cut the slot today and mounted the 192 tooth belt, though I think a 191 would have been PREFECT, it was not offered.  I had to bore the holes larger in the cogs to 8mm drill, still do not have an 8mm drill.  I drove all over today looking for one.  I used a 5/16th and then made a reamer with my chop saw and some 8mm rod.  It worked ok.  Might make one perfect then harden it for future use.

To cut the slot, I had to mount the plate square to a piece of 3/8 x 2 inch aluminum bar so I had something the clamp to with the vise.


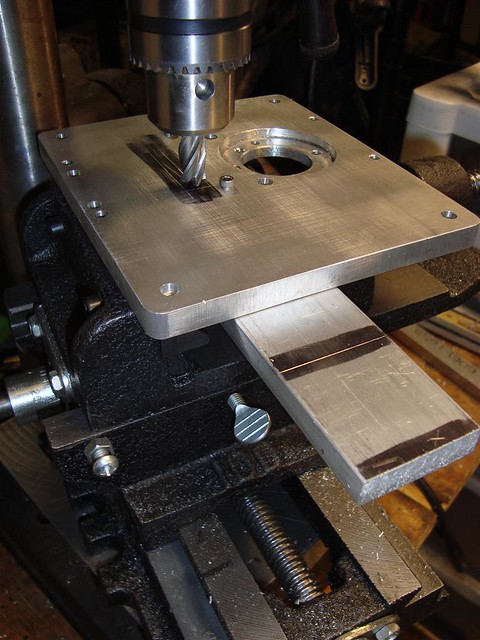
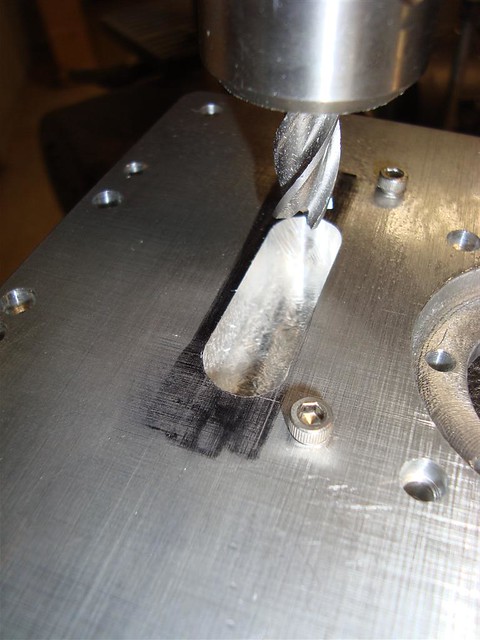
I plunged the holes to start with, then ran the XY compound vise along the sides to clean them up.  Not a perfect setup, but it is what I have and works good for cuts that do not have to be super precise.


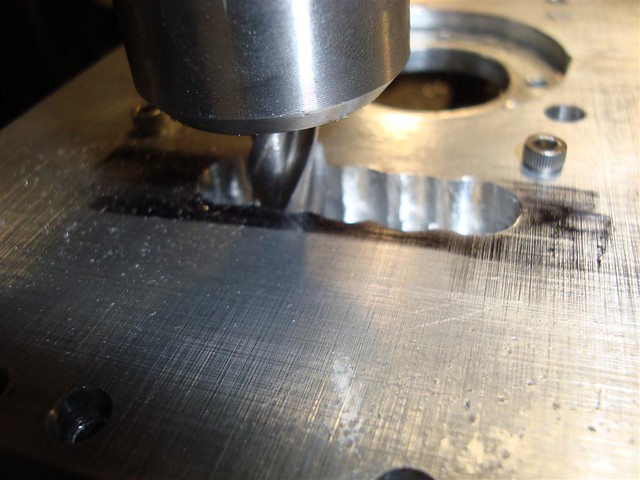
The finished slot.  A bit wider than I wanted to clean it up good, the table moved just a bit between the first and second plunge, but unless you have the plans in front of you and a caliper, you would never know.


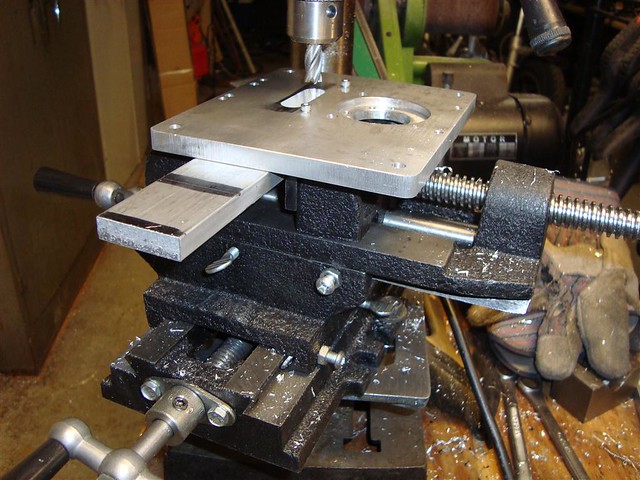
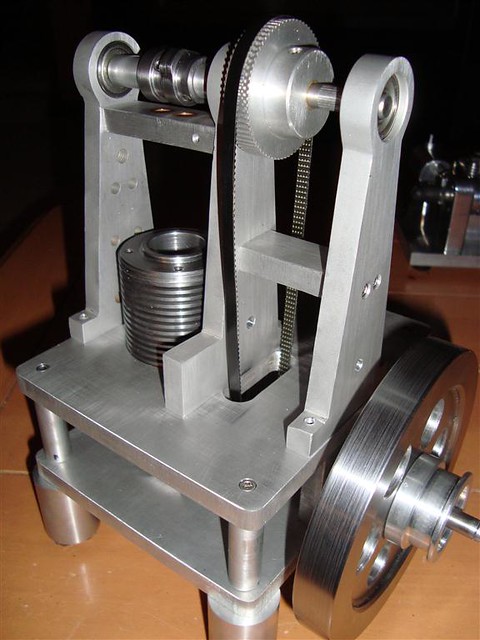
This is a wide shot of my "mill" setup.  I purchased the $89 XY compound vise from Harbor Freight for $13 (had a good coupon) and I have had the 8 in drill press for 15 years.  Bounces around a bit, but plunges well, and then side cuts to clean up the edges.  I made a locking bolt for the spindle so that I could set depth and lock it in place.


The small cog with the spacers to keep the bearings apart.


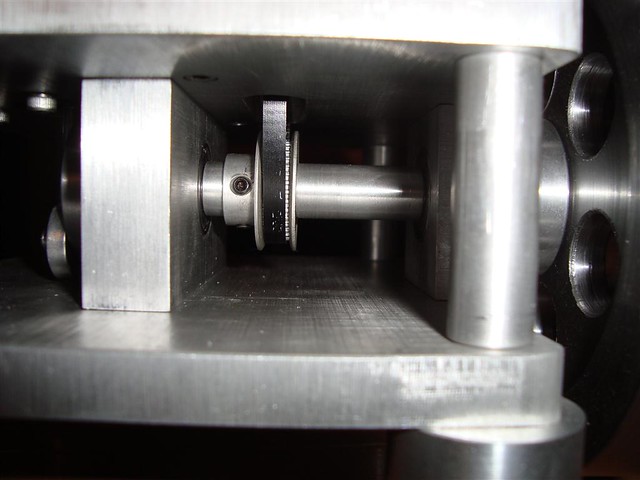
The top cog and belt.  I will make the tension idler pulley, top spacers, and cut a slot in the middle support tomorrow.


Ordered some lighters last night...  we will see...

A little video of the progress...  still have to set timing, I think I will have the motor run toward me, front of cam going down... I think it looks better.


More to come...

Doug
« Last Edit: March 02, 2011, 08:03:35 AM by dbvandy »
"if you can pay someone to do it, then you can do it... just might cost more and take longer."  ~Grandpa Vanderbilt

Offline dbvandy

  • Full Member
  • ***
  • Posts: 170
Re: Jan Ridders Otto 4 stroke build
« Reply #60 on: March 02, 2011, 12:05:19 AM »

On the wrist pin, I usually make it a tight fit in the rod so the pin always stays central with enough clearance so that it never touches the bore - not sure whether it's good practice or not but seems to work.

Nick


I think that approach is probably fine.  The webster plans even call for some 4-40 set screws to lock the pin in place.  4-40 and smaller are too hard to tap IMHO...  all that work to pop off a tap in the piece right before installing...  ouch...  I will let my brass pin float.


Doug
"if you can pay someone to do it, then you can do it... just might cost more and take longer."  ~Grandpa Vanderbilt

Offline DavidA

  • Hero Member
  • *****
  • Posts: 1219
  • Country: gb
Re: Jan Ridders Otto 4 stroke build
« Reply #61 on: March 02, 2011, 07:16:29 AM »
Just thinking about that piston pin (Gudgeon pin as we used to call them),  I suppose that if one was very careful then one could machine a groove at each end in the pin hole (like the circlip groove in the full size pistons) and fit a tiny spring clip,  say, a turn off a coil spring.  That would solve the problem.

Could be fun holding the piston whilst you do it though.

Dave.

Offline dbvandy

  • Full Member
  • ***
  • Posts: 170
Re: Jan Ridders Otto 4 stroke build
« Reply #62 on: March 02, 2011, 02:51:47 PM »
Just thinking about that piston pin (Gudgeon pin as we used to call them),  I suppose that if one was very careful then one could machine a groove at each end in the pin hole (like the circlip groove in the full size pistons) and fit a tiny spring clip,  say, a turn off a coil spring.  That would solve the problem.

Could be fun holding the piston whilst you do it though.

Dave.

Seems like you would be able the hold it in the 4 jaw.  On the webster I spent about an hour pondering just that for some tiny tiny internal cir clips I have around.  A coil of a spring would work better.

Doug
"if you can pay someone to do it, then you can do it... just might cost more and take longer."  ~Grandpa Vanderbilt

Offline dbvandy

  • Full Member
  • ***
  • Posts: 170
Re: Jan Ridders Otto 4 stroke build
« Reply #63 on: March 02, 2011, 06:20:05 PM »
Well,  I am officially out of things to do until the lighters arrive.  I will probably work on the vapor tank tomorrow, but I plan to use the one off the webster in the beginning.

I plan to put a belt powered fan on the engine after she starts running.  Might not do much, but will look cool.  The round groove will have an o-ring the will be connected to a small shaft, thus giving about a 1 to 10 ratio, driving the fan fast.


The pulley is adjustable along a slot to tighten the belt.  You can see the o-ring waiting to drive the fan....


Engine as she sits tonight...


And a little video showing the compression and valve action.  I have just eyeballed the timing for now, will get it right later...


More to come...

Doug
« Last Edit: March 02, 2011, 06:23:47 PM by dbvandy »
"if you can pay someone to do it, then you can do it... just might cost more and take longer."  ~Grandpa Vanderbilt

Offline NickG

  • Madmodder Committee
  • Hero Member
  • *****
  • Posts: 1890
Re: Jan Ridders Otto 4 stroke build
« Reply #64 on: March 03, 2011, 02:22:36 AM »
Looks great Doug, can't wait to see the fan, like the pulley idea it will add more visual appeal.

Nick
Location: County Durham (North East England)

MrFluffy

  • Guest
Re: Jan Ridders Otto 4 stroke build
« Reply #65 on: March 03, 2011, 04:26:21 AM »
Probably a little late in the day, but on short duration between rebuild bike engines (say under 300 hours), its a preferred option to use a tool steel gudgeon (wrist) pin narrower than the outside diameter of the piston, with teflon buttons either end to make up the pack spacing to the width of the piston. It does eventually polish the bore, but at that point its long past rebuild time anyway and it is a lot less painful than having a circlip pop out mid pass and causing mayhem inside.
I think for a model engine it would be just fine wear wise.

Offline dbvandy

  • Full Member
  • ***
  • Posts: 170
Re: Jan Ridders Otto 4 stroke build
« Reply #66 on: March 04, 2011, 12:18:47 AM »
Got Gas...

Got Spark...

Got To Go!!!!!!!!!!!!!!!!!!!!!!!!!!!!

THE OTTO LIVES!!!!

I had another coil from junk weed eater and I got tired of waiting for the lighters to get here, so I epoxied some neo magnets to the flywheel and used one of the original coil mounting brackets from the Webster to mount the coil to the Otto.  I also used the working vapor carb from the Webster, but will make one just for this engine soon.  Not looking for pretty right now, just want to hear some pop...

After some eyeball timing, I pulled the cord and it popped popped...  but, it kept jumping ignition time, retarding about 45 degrees, I would reset, it would fire 4-5 times, then jump time 45 degrees again.  


Turns out the three tiny 8-32 set screws did not have enough bite to hold the flywheel on the 8mm shaft, so I tapped them out for 1/4-20 set screws and all is well.  will probably thread the end of the crank shaft and put on a locking nut and star washer.  

Then she came to life after some fine tuning of the intake and exhaust timing.  But, the camera battery died so this is all for now...


Got too late to run it more because everyone was in bed,  so I will fine tune it more tomorrow...

More to come...

Yeah.....

Doug

« Last Edit: March 04, 2011, 01:27:06 AM by dbvandy »
"if you can pay someone to do it, then you can do it... just might cost more and take longer."  ~Grandpa Vanderbilt

Offline Bogstandard

  • Bogs Group
  • Hero Member
  • *****
  • Posts: 1107
Re: Jan Ridders Otto 4 stroke build
« Reply #67 on: March 04, 2011, 01:52:41 AM »
Very well done indeed Doug.

A good informative post and a runner at the end, what more could we ask for?


Bogs
If you don't try it, you will never know if you can do it.

Location - Crewe, Cheshire

Skype - bandit175

Offline sbwhart

  • Global Moderator
  • Hero Member
  • *****
  • Posts: 3530
  • Country: gb
  • Smile, Be Happy, Have Fun and Rock Until you Drop
Re: Jan Ridders Otto 4 stroke build
« Reply #68 on: March 04, 2011, 01:59:38 AM »
Great Job Doug

Excelent thread with a running engine completed.

 :clap: :clap: :clap: :clap: :clap: :clap: :clap:


Stew
A little bit of clearance never got in the road
 :wave:

Location:- Crewe Cheshire

Offline saw

  • Hero Member
  • *****
  • Posts: 1003
  • Country: se
  • lucky amateur
    • Svenssons AckordsWerkstad
Re: Jan Ridders Otto 4 stroke build
« Reply #69 on: March 04, 2011, 03:38:22 AM »
Nice gratilations  :clap:
_________________________
Greetings / Benni
http://myprojecty.wordpress.com/category/steam-engine/

Offline andyf

  • In Memoriam
  • Hero Member
  • *****
  • Posts: 1795
  • Country: gb
    • The Warco WM180 Lathe - Modifications
Re: Jan Ridders Otto 4 stroke build
« Reply #70 on: March 04, 2011, 03:58:35 AM »
Wonderful  :clap: !

I can't get my head round the fact that in mid February you showed the cylinder and one or two bits and pieces, and only three weeks later the engine is up and running  :bugeye:

Andy
Sale, Cheshire
I've cut the end off it twice, but it's still too short

Offline ozzie46

  • Sr. Member
  • ****
  • Posts: 260
  • Country: us
Re: Jan Ridders Otto 4 stroke build
« Reply #71 on: March 04, 2011, 05:49:53 AM »


   Good job and fast build too.


 Ron

Offline DavidA

  • Hero Member
  • *****
  • Posts: 1219
  • Country: gb
Re: Jan Ridders Otto 4 stroke build
« Reply #72 on: March 04, 2011, 09:23:43 AM »

Inspirational . :clap: :clap:

Now you need to get it running on hydroxy .which is why I wanted to build the engine;  as a test bed.

Dave :nrocks:

Offline DavidA

  • Hero Member
  • *****
  • Posts: 1219
  • Country: gb
Re: Jan Ridders Otto 4 stroke build
« Reply #73 on: March 04, 2011, 09:27:53 AM »
Nick,

...not sure whether it's good practice or not but seems to work....

That used to be the standard way of holding the old single cylinder motor bike engine pins. You had to warm up the rod end before fitting the pin;  same to remove it.

Dave.

First bike, 1948 Royal Enfield Model G. 350cc

Offline MikeA

  • Jr. Member
  • **
  • Posts: 76
Re: Jan Ridders Otto 4 stroke build
« Reply #74 on: March 04, 2011, 12:06:56 PM »
Hello Doug,

Amazing work as well as speed! Compared to you I'm moving a bit slower than a glacier - Oh well!

Congratulations on another successful build - love the sharp crack of the exhaust.

Best,
Mike
'Better is the enemy of good enough!'