Author Topic: Small simple turbine engine  (Read 17552 times)

Offline arnoldb

  • Hero Member
  • *****
  • Posts: 515
  • Country: na
  • Windhoek, Namibia
Small simple turbine engine
« on: February 28, 2011, 12:37:50 PM »
I want a small turbine, and the great Mr. Elmer Verburg published plans for one.  My build is loosely based on his design, and about the same size, but I'm taking some liberties and doing some things my way - which might just bite me in the back   :lol:

Having said that, I feel it is also VERY important to stress that turbine builds should not be taken lightly.  At high pressures and very high rates of rotation even a small turbine can be a little bomb waiting to disintegrate - it is NOT the type of engine for people who are inclined to want to test engines "to destruction".  My aim is to build a small breath-powered turbine for display purposes - nothing more.  I really hope I can get it to run on breath power, but therein lies a problem; if it can run on breath power, it will be a dangerous engine if used on high pressure compressed air.  From my research, a turbine needs to be built pretty darn accurately; the rotor needs to be as balanced as possible and tolerances should be kept tight.

I wanted to post this up yesterday evening, but weariness overcame and I settled for a quick dinner and bed instead  :lol: :lol:

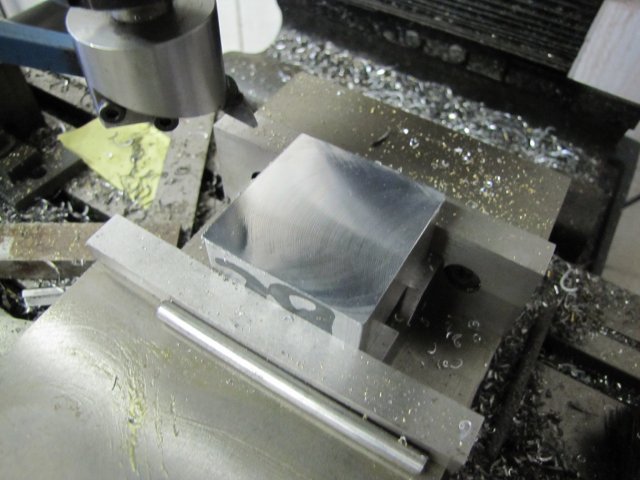
A week ago Sunday afternoon I started off with a block of aluminium for the main engine body. This is my first deviation from Elmer's plans - which call for some pieces bolted together.  I want to practice some milling techniques, hence the solid block.  It was first flycut square on the mill:
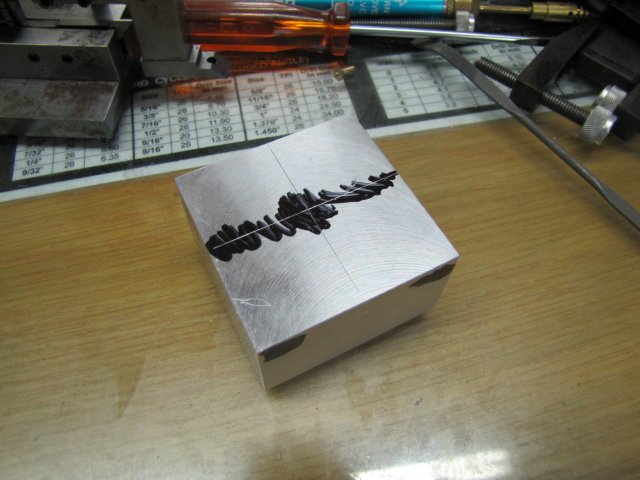

Then marked out:


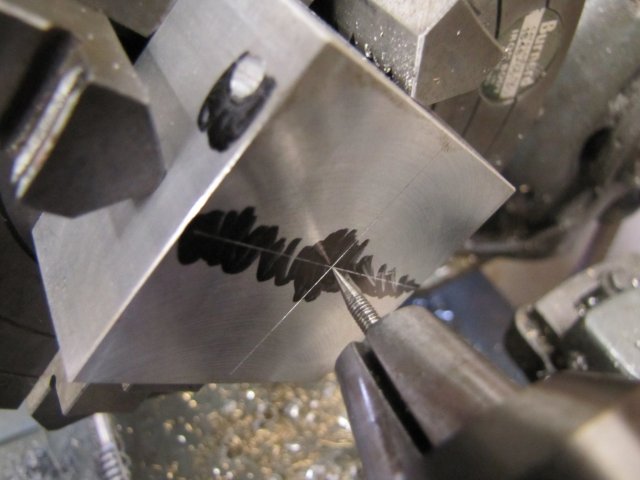
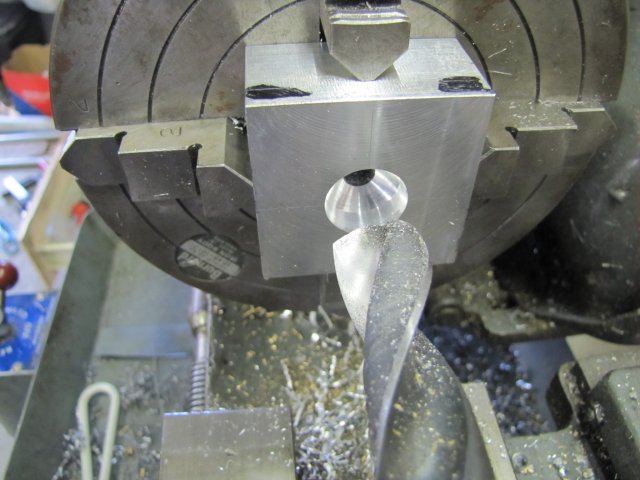
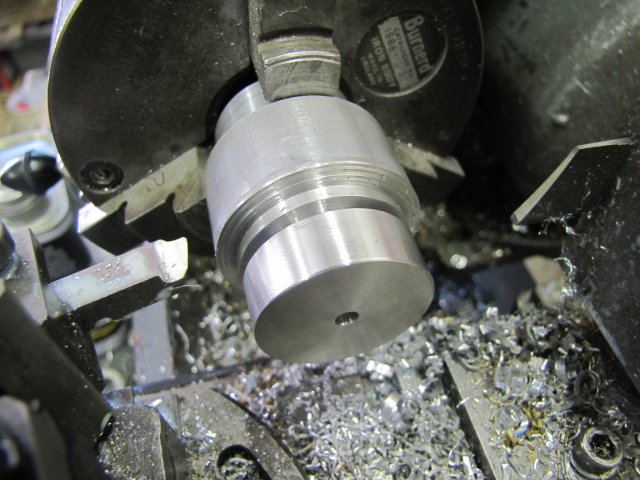
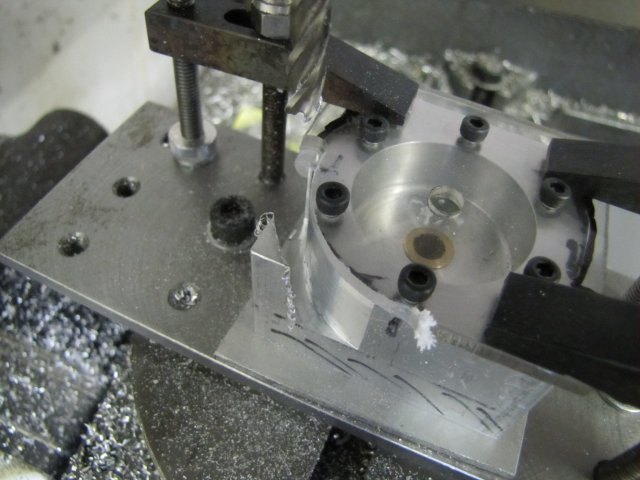
The main "steam port" was drilled out 2mm to the top center of the block and then opened up to 4.2mm to be threaded for a 5mm steam connector.  Then the block was centered up in the 4-jaw on the lathe.  You can see the hole for the steam connector on the side.  I'm using a sharp pin in the tailstock drill for alignment; this is accurate enough at this stage and gets me to within 0.02mm.  I still can't center punch a hole accurate enough to use a DTI and center finder to beat this ::):


That lot was then center drilled, drilled 7.8mm and reamed through to 8mm:


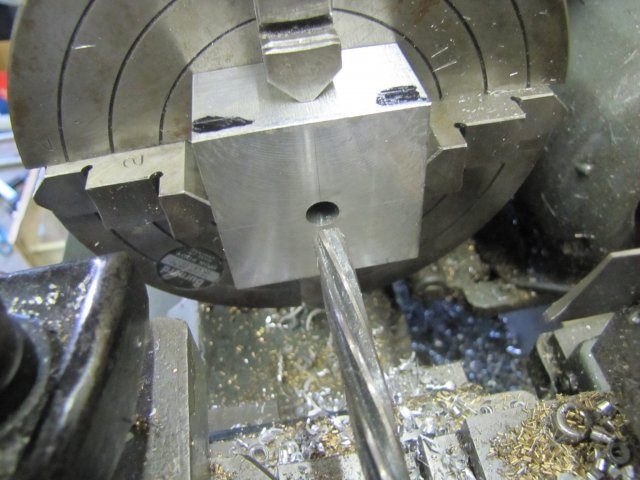
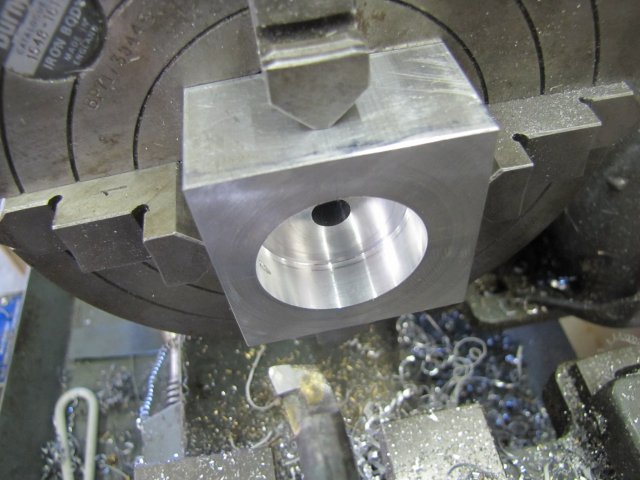
Then drilled with a 19mm drill to a depth of 12mm at the drill's tip:


And bored out to 32mm diameter 12mm deep:


I then changed chucks - without removing the engine body from the 4-jaw, I fit the 3-jaw.
Elmer specified 2 bushes pressed in from both sides; I went for one bush - turned from some hex brass -  turned to 8.02mm OD and drilled to 5.9mm and ready to be parted off:


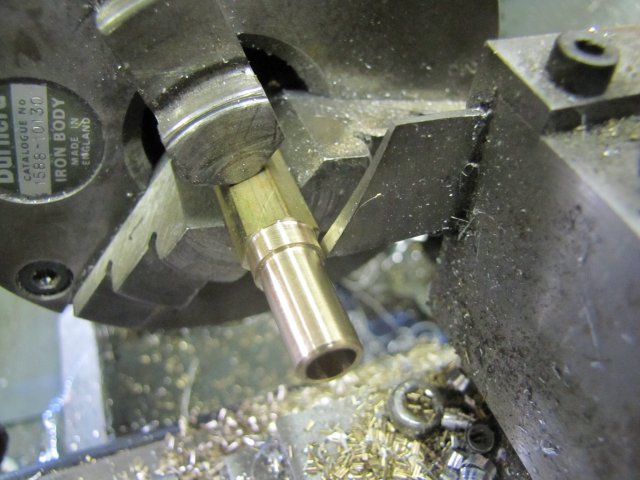
After parting, it had a 0.2mm thick flange - intentionally:


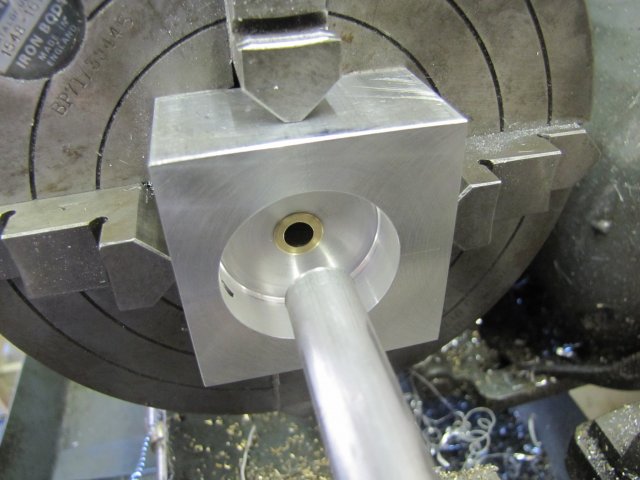
I then re-mounted the 4-jaw and pressed in the bush with a bit of aluminium gripped in the tailstock chuck - with a smidge of bearing retainer to make sure it would stay put:


I didn't get anything done on Saturday, so on Sunday I started off on the rotor.  Some oversize aluminium turned down, and parted down part-way:


With the dividing head mounted in the mill vise, I started whittling away at it - at an angle chosen by eye:

My starting cut was a bit aggressive, and I broke one of the Richon Tools cutters on it.  Purely my fault; a 2mm HSS cutter can not take a 2mm depth of cut at a silly feed rate - and 1200RPM is a bit slow for it as well  :loco: - So I settled back to an acceptable 0.6mm DOC and a sensible feed rate; I can't do anything about the spindle speed; that's max for my mill.

A little while later, and with a new angle on the cutter:

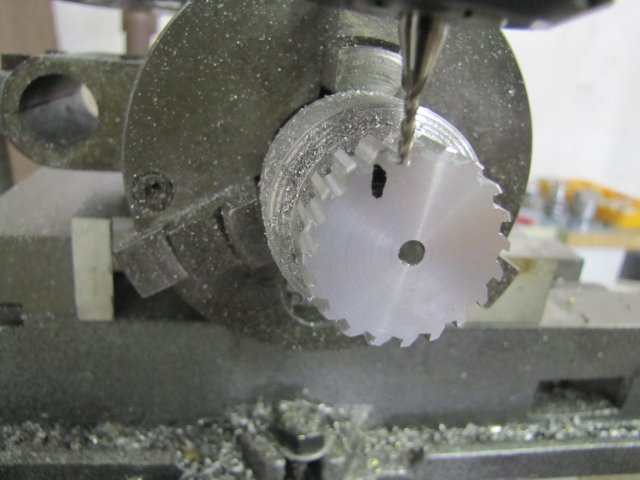
It would look (and maybe function) a lot better if I had a 2mm ball-nose for this.  I'll include that on my next order.

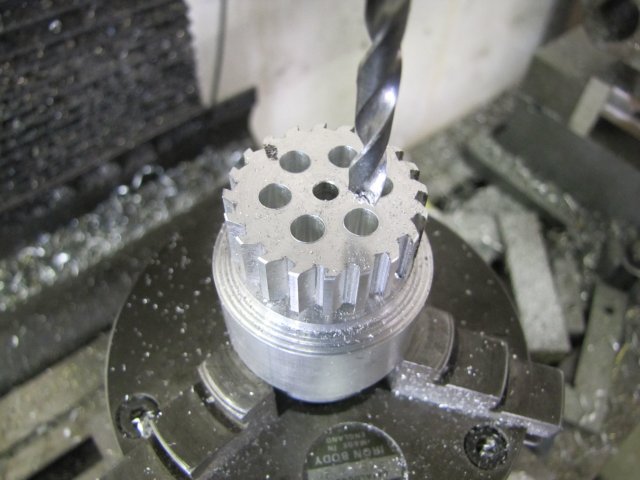
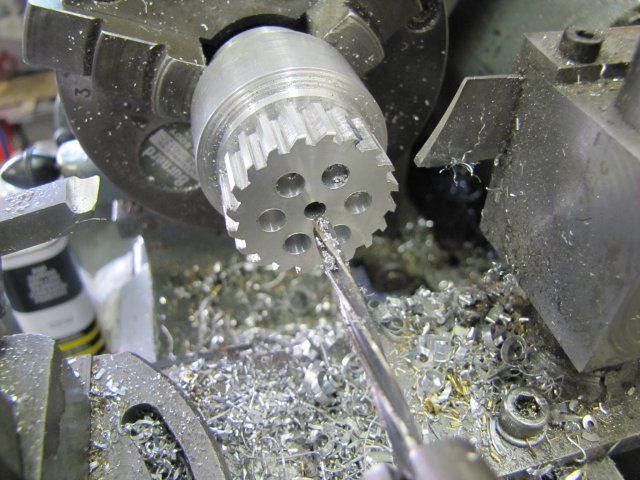
On to the rotary table with the chuck, and poked some 5mm holes in the rotor to lighten it up a little:


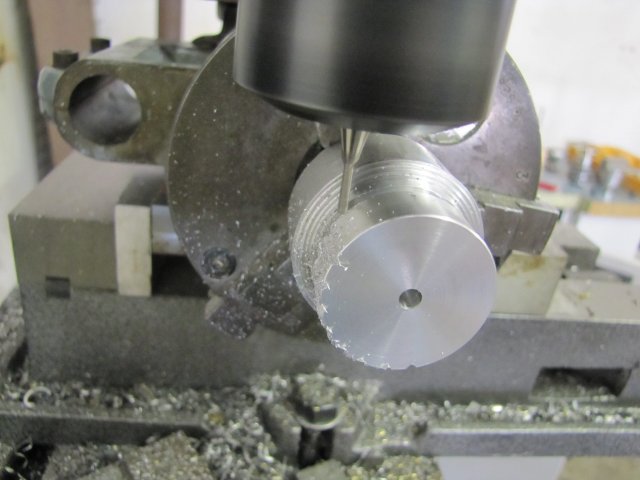
Finally, back on the lathe, and drill 3.9mm deep enough for the 4mm reamer to ream out the center hole:
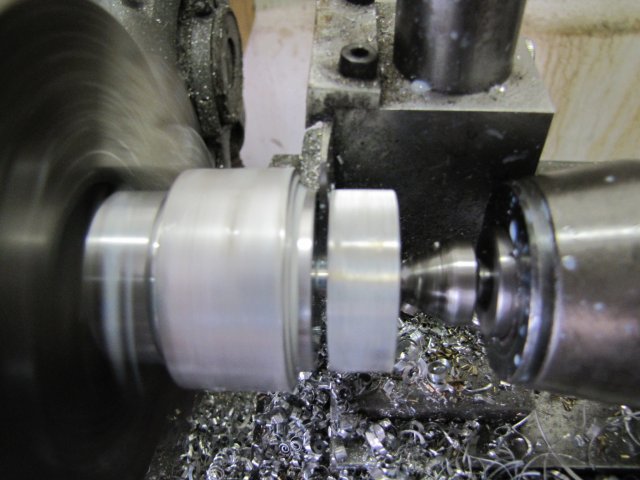

Part it off:


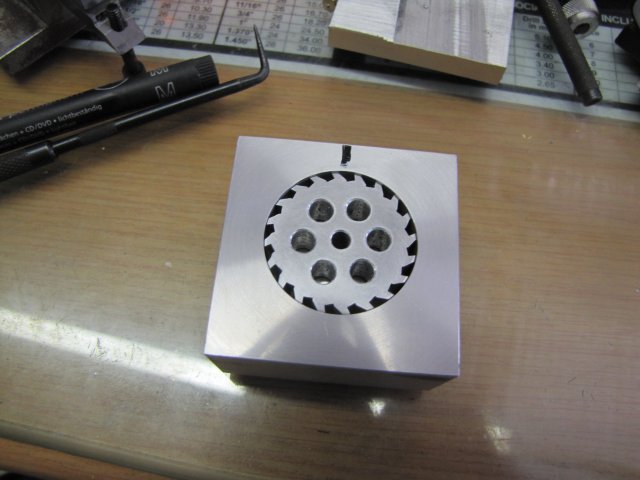
A year or so ago, parting off was one of my worst nightmares, and a challenge I set myself to conquer.  It's not fully conquered yet, but improving all of the time.  This was the result of the above parting - after I used a countersink to clean up the holes:

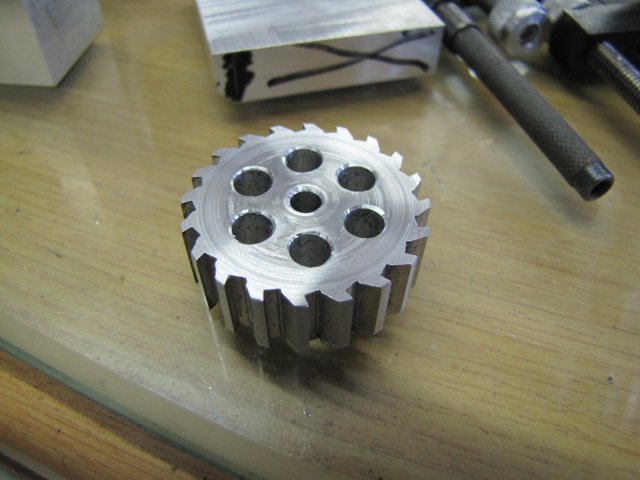
There's still a lot of rough bits, but a heck of a lot better than what I did in the past, and a lot less brown stuff in the pants!

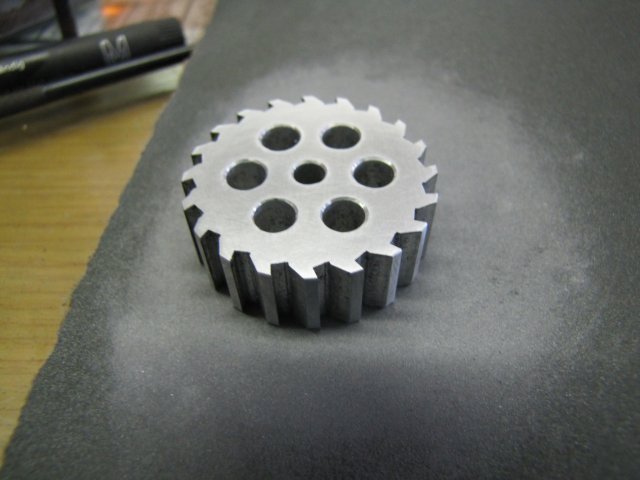
A quick rub on some 600 emery, and no-one would be any the wiser - except for everyone reading this, that is  :lol:


It fits nicely in the block as well:


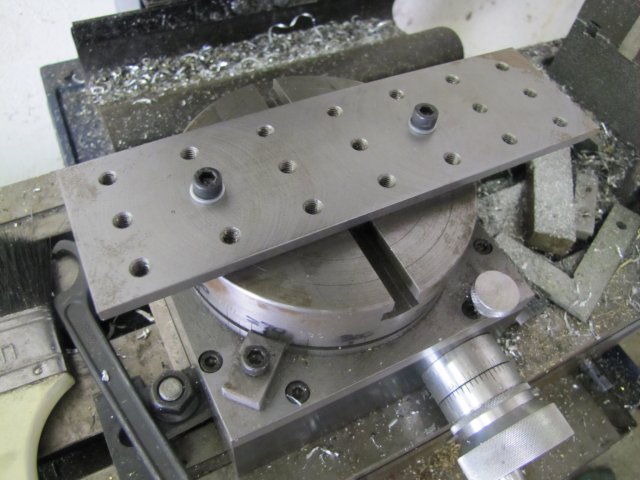
There was a short hiatus on tooling work to mount my tooling plate on the rotary table.  A pair of high tensile M6 cap screws with the back section turned down far enough so that they can screw through the tooling plate with washers, and then spin freely so that they can pick up T-nuts in the rotary table slots:


Mounted:


Back to the engine, and I started on some mounting holes for a clear perspex cover for the engine - with 2.5mm holes drilled for threading M3:


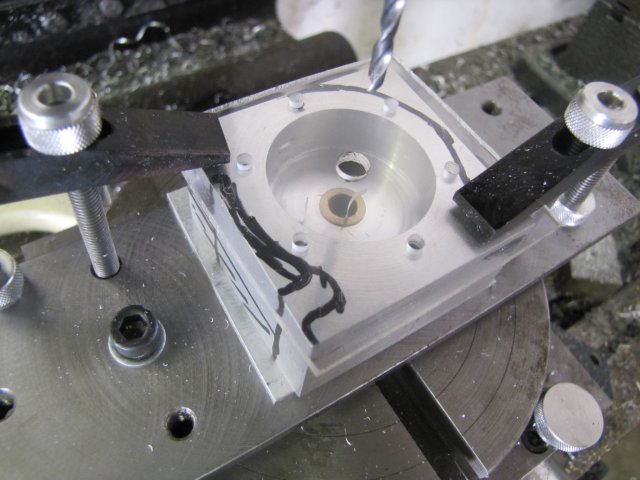
And a bit of fettling with a 6mm mill:


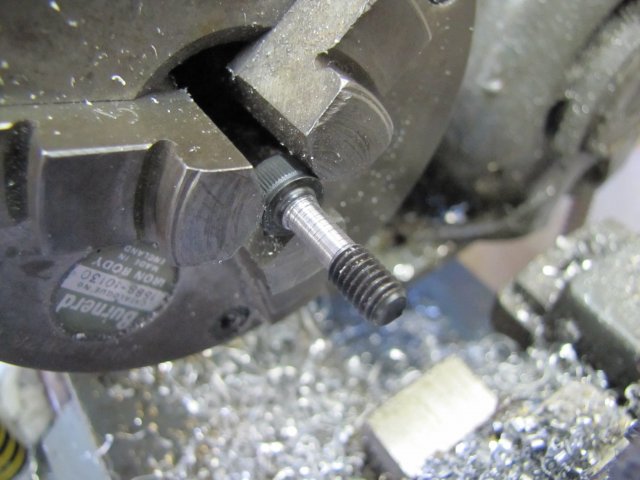
There's quite a bit of fettling left to do, but time caught up, and I quickly made the main shaft to check things out.  My collet chuck is pretty accurate, but not good enough.  A turbine needs to be dead on, so I clocked a bit of 6mm silver steel up in the 4-jaw - with less than 0.005mm (that's about two tenths of a thou for the imperial blokes) run-out on the end, and turned it down to 4mm to fit the rotor, and then threaded it M4 with a tailstock die holder to take a nut:


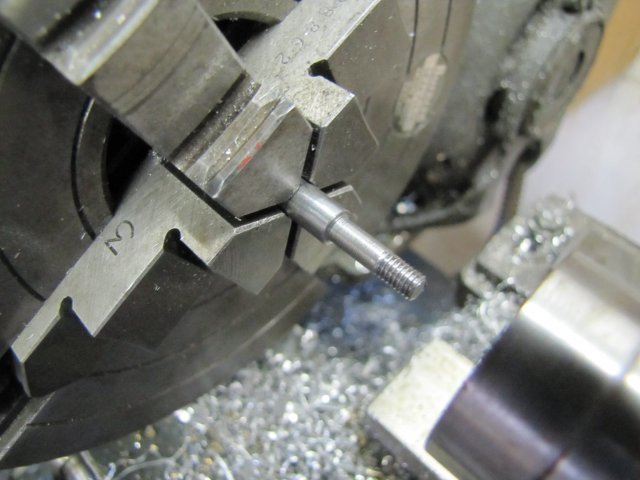
Where I ended up for Sunday:

 :ddb: - at least, if I blow in the hole, it turns, but it looks like it will need an exhaust passage as well.

 :beer:, Arnold

Offline Bogstandard

  • Bogs Group
  • Hero Member
  • *****
  • Posts: 1107
Re: Small simple turbine engine
« Reply #1 on: February 28, 2011, 01:09:30 PM »
Hi Arnold,

I don't know if this will help or not.

You need to get rid of the internal pressure as quickly as possible, otherwise things start to work against you. What is called a tangential exhaust works rather well, and this is shown in the sketch that I used for my triple rotor turbine I made a while ago.

On my first turbine, I had it drilled on the next corner around, facing downwards, and it didn't work as well.


John
If you don't try it, you will never know if you can do it.

Location - Crewe, Cheshire

Skype - bandit175

Offline saw

  • Hero Member
  • *****
  • Posts: 1003
  • Country: se
  • lucky amateur
    • Svenssons AckordsWerkstad
Re: Small simple turbine engine
« Reply #2 on: February 28, 2011, 02:09:08 PM »
Looking very nicley.  :thumbup:
_________________________
Greetings / Benni
http://myprojecty.wordpress.com/category/steam-engine/

Offline Stilldrillin

  • Global Moderator
  • Hero Member
  • *****
  • Posts: 4972
  • Country: gb
  • Staveley, Derbyshire. England.
Re: Small simple turbine engine
« Reply #3 on: February 28, 2011, 03:41:18 PM »
Very nice project Arnold!  :clap: :thumbup:

David D
David.

Still drilling holes... Sometimes, in the right place!

Still modifying bits of metal... Occasionally, making an improvement!

Offline arnoldb

  • Hero Member
  • *****
  • Posts: 515
  • Country: na
  • Windhoek, Namibia
Re: Small simple turbine engine
« Reply #4 on: March 01, 2011, 11:05:27 AM »
Thanks very much Gents  :beer:

John, thank you - just what I needed  :thumbup: - I was thinking of only one biggish (6mm) exhaust port situated like the top one in your drawing.  Two smaller ones at 4mm each would actually allow better air scavenging and look a bit better from the outside.

Kind regards, Arnold

Offline arnoldb

  • Hero Member
  • *****
  • Posts: 515
  • Country: na
  • Windhoek, Namibia
Re: Small simple turbine engine
« Reply #5 on: March 05, 2011, 02:24:18 PM »
 :D I had a bit of shop time today.  I was hoping to get the engine done, but time flies when one's having fun   :lol:

First off, I cleaned some excess off with a 6mm ball nose mill.  I've had the bare minimum experience with using ball nose mills, but it cuts surprisingly easy, and leaves a nice smooth finish to boot:

 :palm: There's a very ugly spot to the left of the groove milled with the ball-nose; that happened last Sunday when the draw-bar on the collet chuck came loose.  I was a bit slow hitting the E-stop on the mill...  Fortunately it can be fixed; just a bit of effort needed.

Next I very roughly started hogging away some excess aluminium:


Rather than using the tooling plate for the next step, I centered the rotary table to the mill spindle and zeroed the X and Y dials taking care to remember in which direction for each axis I'd taken up backlash.  Then I mounted the chuck adapter and 4-jaw on the RT.  With a bit of 6mm rod to fit the workpiece bearing, I chucked it up; lightly touching each chuck jaw against the side of the workpiece, and then going round tightening each jaw just a little till things were clamped down properly.  Not very accurate, but plenty good enough for the profiling I'm going to do:


Then I started profiling with a 6mm end mill again:


A considerable while later, things looked like this - with a 3mmx3mm step left around the profile:

Not pretty, but OK for now.

Then I used the 6mm ball nose mill to clean up the step - and lightly cut deeper against all the sides with it to clean up the poor finish from the previous step as well:


John kindly gave me some pointers on exhaust holes - Thank You!.  I couldn't go exactly to his recommendations, as there is the matter of a screw that's in the way that I had to work around.  I drilled the first hole with a center-cutting 4mm 2flute cutter:

The second one was done the same; but nearly in-line with the inlet port - barely missing the screw hole.

On my previous engine builds, I've been very lax about adding oil holes in the bearing blocks, but this one definitely needs it:


Then I spent a couple of hours with files, needle files, riffler files and emery paper to get rid of some of the tool marks:


 ::) Some latent insanity surfaced and I wondered what it would look like buffed up a bit.  I'm not sure if I like it; I'll sleep on that tonight.  If I want it buffed, I have to make a plan to get into all the little corners with a buff.  That will require some careful work with the Dremel and perhaps lateral thinking.  I might just give the whole thing a rub-down with some 600 or 800 emery to get back to the satin-like finish:


So, a lot of faffing around today - but some valuable exercise.  I've not done a lot of profiling with the mill, so this is all new to me, but I'm fairly happy with the result.  More practice needed though   :dremel:

 :beer:, Arnold

Offline Bogstandard

  • Bogs Group
  • Hero Member
  • *****
  • Posts: 1107
Re: Small simple turbine engine
« Reply #6 on: March 05, 2011, 02:31:42 PM »
That is looking just fine Arnold.

If the finished engine runs as well as it looks, then you are onto a winner.


John
If you don't try it, you will never know if you can do it.

Location - Crewe, Cheshire

Skype - bandit175

Offline sbwhart

  • Global Moderator
  • Hero Member
  • *****
  • Posts: 3530
  • Country: gb
  • Smile, Be Happy, Have Fun and Rock Until you Drop
Re: Small simple turbine engine
« Reply #7 on: March 05, 2011, 03:56:00 PM »
Thats a nice bit of sculpting Arnold,  :clap: :clap: :clap: :clap:

I prefer the satin finish but thats just me.

You'll have a great looking engine either way.

Stew
A little bit of clearance never got in the road
 :wave:

Location:- Crewe Cheshire

Offline andyf

  • In Memoriam
  • Hero Member
  • *****
  • Posts: 1795
  • Country: gb
    • The Warco WM180 Lathe - Modifications
Re: Small simple turbine engine
« Reply #8 on: March 05, 2011, 04:20:23 PM »
Really nicely shaped!

Like Stew, I prefer satin finish (maybe with the rotor polished for contrast, as the cover will be transparent) but it isn't my engine.

If you want to try satin, polish it up really bright, wash in solvent, and then (no greasy fingers) dunk it in a solution of caustic soda/lye/sodium hydroxide and let it fizz for a minute. Experiment on a polished offcut first, to see if you like the effect.

Andy
Sale, Cheshire
I've cut the end off it twice, but it's still too short

Offline John Hill

  • The Artful Bodger
  • Madmodder Committee
  • Hero Member
  • *****
  • Posts: 2016
  • Country: nz
Re: Small simple turbine engine
« Reply #9 on: March 05, 2011, 04:54:18 PM »
Excellent project!  Now I really am lusting for the day when I can buy my mill!

From the den of The Artful Bodger

Offline foozer

  • Full Member
  • ***
  • Posts: 194
  • Camano Island WA
Re: Small simple turbine engine
« Reply #10 on: March 05, 2011, 06:00:45 PM »
I'm loosing hair over the elbow engine and here you go with another "Oh its so simple"

a little sandblast and paint scheme also is nice :)

Looks good

Robert
Ignorance is Bliss, thus I aim for Perfection

Offline arnoldb

  • Hero Member
  • *****
  • Posts: 515
  • Country: na
  • Windhoek, Namibia
Re: Small simple turbine engine
« Reply #11 on: March 06, 2011, 12:49:02 PM »
Thank you John Bogs.  After today's work it runs OK, but I'm not entirely happy, as its not too good on breath power.  On compressed air it goes great guns though.

Stew, Andy, Thanks chaps; I normally prefer the satin look as well, but this one's going to be shiny.  I think it's the weather we've been having of late here in Namibia - not our regular allotment of sunshine ::)

Thanks Robert.  Don't worry; you're getting along just fine - you lack a lot of the tools I have now that makes this look simple and quick to do.  A year and a half ago, this would have taken me many weeks to do with just a lathe and none of the time saver bits of tooling I've made around.  I thought of paint - I've done very little of that on my projects.  But I first want to get a hold of "How (not) to paint a locomotive" - as I've never been good at painting.  And my compressor's a bit small for sandblasting; that might soon be rectified though, as I have a bit of extra cash coming my way end of April and a new bigger compressor is a definite on the expenses list  :D

Thank you John H.  It's a fun little project.  You're getting nicely set up in your new house now  :thumbup:  I'm also looking forward to what you get up to when you get your mill - I know the feeling of anticipation very well; took me quite a while to save up for mine - but boy-oh-boy, what a pleasure; even if it's not the best quality around!

This morning I finished the axle; first I milled a flat for the pulley/retaining ring's grub screw to engage on:


Then I widened the recess on the shaft that I made for oil retention slightly.  This also makes the bearing surfaces slightly smaller - hopefully to reduce friction a bit:

The axle was then sawn off to length and the sawn end cleaned up.

To retain the shaft, I decided to turn a pulley instead of just using a plain ring.  Some "scrap" aluminium that was used on a previous project was turned down and profiled a bit; I didn't have a suitable radius cutter for the pulley groove, and was not in the mood to grind one up, so just used a largish round needle file to profile it:

The pulley was then just center drilled, drilled out to 5.9 and reamed to 6mm to fit the shaft before parting it off.  A quick trip to the drill press and a 2.5mm hole was drilled and threaded M3 for a grub screw to engage on the flat on the axle.

Next I turned up an air connector from some 8mm hex brass.  All the threading and profiling for the pipe connection was done first, before drilling it out in the center to 3mm.  Doing the drilling out last saves a lot of heartache, especially when doing threading!:

That was then just parted off as well.

In yesterday's post I was wondering about how to polish into the nooks and crannies...  That was solved with an ear bud cut in half and mounted in the Dremel.  The first one broke off very quickly close to the Dremel's chuck, went into orbit, and landed in an inaccessible part of the shop.  To prevent this, I used the other end, and just inserted a piece of straight wire in the plastic "handle".  Worked a treat at lowish RPMs on the Dremel:


The engine still needs a base.  With my aluminium plate stock running low, I didn't want to use any of that for the base, so wood is the only other viable alternative from my stocks.  I _really_ was not in the mood for fiddling with wood today, so I'll make that up when I do a bit of woodworking again.  Saves on cleaning up as well  :lol:

All the parts for the engine:


And all assembled:


 ::) I noticed too late there were some drops of oil I didn't wipe down!

Does it run ?
Well... yes, but not as well as I'd hoped on breath power.  It takes a fair bit of blowing power to get it running, and it seems the bearing is a bit tight for breath power.  It works OK on its side though.  And I learned today just how much air friction there is in 1.5m of aquarium pipe!  With a 30cm piece of pipe I got it to run; but by blowing straight into the pipe connector it goes quite well.
The first part of the video is on breath power (and NO - those are not farts  :palm:) and the second part off the compressor with 20 psi maximum pressure:


The final result reminds me of some women I've met; pretty from far, but up close far from pretty  :lol:

 :beer:, Arnold

Offline saw

  • Hero Member
  • *****
  • Posts: 1003
  • Country: se
  • lucky amateur
    • Svenssons AckordsWerkstad
Re: Small simple turbine engine
« Reply #12 on: March 06, 2011, 12:59:21 PM »
Nice Arnold  :D
_________________________
Greetings / Benni
http://myprojecty.wordpress.com/category/steam-engine/

Rob.Wilson

  • Guest
Re: Small simple turbine engine
« Reply #13 on: March 06, 2011, 01:00:57 PM »
 :bugeye: :bow: :bow: :bow: :bow: :bow: :bow: :bow: how cool is that mate  :clap: :clap: :clap: :clap: :clap:

You really made a fine job of the machining ,, i especially like the casing  :bow: :bow: :bow:


It has a lovely wine to it  :med:  ,,,,, how fast do you reckon it is revving too   :smart:


Rob

Offline foozer

  • Full Member
  • ***
  • Posts: 194
  • Camano Island WA
Re: Small simple turbine engine
« Reply #14 on: March 06, 2011, 02:13:26 PM »

Thanks Robert.  Don't worry; you're getting along just fine - you lack a lot of the tools I have now that makes this look simple and quick to do. 


Its the little things that drive me bonkers, need some 2-56 screws, quarter inch long, do they have them locally NOOO! of course not, Grr. half inch long? sure by the hundreds, so its now to drill and tap a quarter inch plate to thread the screw into and trim em down. And of course Ill put the little plate down when done and never find it again should next time its needed

All good fun tho, regardless of the end product. Best to give it a try, than wonder if it can be done.

Robert
Ignorance is Bliss, thus I aim for Perfection

Offline cfellows

  • In Memoriam
  • Sr. Member
  • *****
  • Posts: 303
Re: Small simple turbine engine
« Reply #15 on: March 06, 2011, 03:18:41 PM »
Very Nice, Arnold.  It's a very pleasing engine to look at, near or far!  I might have to try one of those, but I'll probably use ball bearings...

Chuck

Offline arnoldb

  • Hero Member
  • *****
  • Posts: 515
  • Country: na
  • Windhoek, Namibia
Re: Small simple turbine engine
« Reply #16 on: March 06, 2011, 04:45:26 PM »
Thanks Benni !

Rob, thanks mate  :beer:.  I don't know how fast it gets there...  But fast enough for me to chicken out and not let it run faster  :bugeye: - maybe 10 to 15 thousand RPM  :scratch: - I need to get/build something that can measure it though  :dremel:  Its gets scary; just sits there and whine - and no indication that anything's wrong...  I took good care to keep things right but still, that "what if" pucker factor is there...

 :beer: Robert.   :lol: I thought stuffing around with small screws was a personal "punishment"  :lol: - I got over it; if I can't buy 'em I make 'em.  All part of the fun.  A pain in the behind sometimes, but still, well worth the effort  :thumbup:  Then again, maybe I'm a bit "nuts" myself.  #2-56 isn't all that bad!

Thanks Chuck.  Ball bearings would work a lot better! - I'm saving the ones I can get my grubby paws on for some machine mods though.  And for building your horizontal 4 cylinder  :D

 :beer:, Arnold

Offline fixit

  • Jr. Member
  • **
  • Posts: 43
  • my first engine
Re: Small simple turbine engine
« Reply #17 on: March 07, 2011, 03:34:18 PM »
Thank's for showing this build   i'm still looking over your sholder learning and getting ideas


Steve
northolt,near Mc donalds, next to Pc World

Offline doubleboost

  • Madmodder Committee
  • Hero Member
  • *****
  • Posts: 1619
  • Country: gb
  • Newcastle Upon Tyne
Re: Small simple turbine engine
« Reply #18 on: March 07, 2011, 04:39:13 PM »
Very nice  :bow: :bow: :bow:
That makes lovely noise just like a jet winding up  :D :D :D :D
It reminds me of the bollokings i gat as an apprentice blowing bearings dry after washing them off :) :) :) :)

Offline Bogstandard

  • Bogs Group
  • Hero Member
  • *****
  • Posts: 1107
Re: Small simple turbine engine
« Reply #19 on: March 07, 2011, 05:25:14 PM »
Very good result indeed Arnold.

I have built a couple of turbines now, and both run very well. One of the easiest engine you can make, if you can work to tight tolerances.

Ball racing does make them go a lot better, but the ones I used were limited to 45K RPM, and that figure can easily be exceeded, so really, if you wanted to attempt to take one to it's limits, then very expensive ceramic bearings would be required.

They can be made to work a lot more efficiently, especially by speeding up the input air velocity by using a simple converging nozzle at the correct angle to the 'blades'.


John
If you don't try it, you will never know if you can do it.

Location - Crewe, Cheshire

Skype - bandit175

Offline ozzie46

  • Sr. Member
  • ****
  • Posts: 260
  • Country: us
Re: Small simple turbine engine
« Reply #20 on: March 07, 2011, 08:59:15 PM »


    Your truly an inspiration Arnold, what with your tool builds and models, I keep referring back to your posts for ideas.


 Ron

Offline sbwhart

  • Global Moderator
  • Hero Member
  • *****
  • Posts: 3530
  • Country: gb
  • Smile, Be Happy, Have Fun and Rock Until you Drop
Re: Small simple turbine engine
« Reply #21 on: March 08, 2011, 02:25:54 AM »
Its a screamer  :headbang:
 
:clap: :clap: :clap: :clap: :clap:

Great build Arnold

 :thumbup:

Stew

A little bit of clearance never got in the road
 :wave:

Location:- Crewe Cheshire

Offline Stilldrillin

  • Global Moderator
  • Hero Member
  • *****
  • Posts: 4972
  • Country: gb
  • Staveley, Derbyshire. England.
Re: Small simple turbine engine
« Reply #22 on: March 08, 2011, 12:47:29 PM »
Arnold.
That's gorgeous!  :clap: :clap: :thumbup:

From near, or far!  :D

David D
David.

Still drilling holes... Sometimes, in the right place!

Still modifying bits of metal... Occasionally, making an improvement!

Offline arnoldb

  • Hero Member
  • *****
  • Posts: 515
  • Country: na
  • Windhoek, Namibia
Re: Small simple turbine engine
« Reply #23 on: March 08, 2011, 02:27:35 PM »
Thanks Steve. You're welcome to any ideas, and it is my pleasure if you find something useful in my posts.  I'm certain there are no new ideas from me though; merely repetitions of, and maybe slight changes to, ideas I get from many members on the forums I frequent, and digging and scratching through the Internet and reading through as many books as I can get my hands on.  Bogs actually mentioned this same fact in quite a couple of posts I'm aware of; there's very few new ideas around; merely re-discoveries of old ones.

Cheers doubleboost  :D.  I learnt about things exploding at high RPM while cleaning computer power supplies with a blower before repairing about 20 years ago...  The fan would spin up nicely - waaay cool - and then go kaboom.  Lost a couple that way; I still had to fix the power supplies, and then my dad docked my "pay" to replace the fans with a new ones...  I was still in school and we fixed computers, screens, UPSs and so on to earn an additional income for the household as money was a bit tight; good old days though.  Give me a solder sucker and soldering iron, and I can still de-solder a faulty Z80 CPU and solder a new one in...  Don't like this new surface mount stuff though  :palm:

Thank you John.  I agree; there's a lot of factors that will improve the turbine.  And I did have a look through your original turbine build logs - a lot of information in there; Thank You!  I might experiment a bit more with turbines in future, but for now this one can go on the display case once I've made a base for it.  It's surprising how many people always ask "Have you made a turbine".  So now I can say "Yes, there's one;not much to see on it is there?  Now just look at how interesting the motions on this Grasshopper steam engine is; this rod that's connected to the piston pushes up the beam, and that then pushes down that rod that......."  On to more work on the experimental engine and a Stirling now for me.

Ron, thank you.  Likewise, you are an inspiration to me  :thumbup:.  You're doing beautiful jobs with the limited tools you have available, and your passion for your modelling shows through.  I have a hunch your passion is worth infinitely more than all the fancy tools money can buy  :bow:

Stew, thanks mate  :beer:  I'd of thought its a "whiner", but screamer sounds better  :D.  It confuses the heck out of my parrot though; If I pick the turbine up and blow it, the parrot goes Pfft Pfft Pfft - like all my other engines and when it winds up he imitates a police siren  :doh: :lol:

Thanks David  :D - but it really is nothing to write home about from near.  If you clicky here, all the gory details will show up  :bugeye:


A good friend of mine on HMEM asked about the torque this engine develops, which reminded me of a point I forgot to mention earlier in the build, so here goes:

ADDENDUM TO THE BUILD:
Jim's question about torque reminded me of something I wanted to note when I started on the build.  As stated, the build is loosely along Elmer's turbine plans, but I actually made it a mirror image of his design.

For anybody that builds Elmer's turbine as designed, I feel there is a very real possibility of the nut retaining the rotor unscrewing if the bearing seizes up or there is a load running on the pulley and the engine spins up under pressure.  The turning direction of the rotor in his design is the same direction as needed to unscrew the retaining nut.  If that comes of at a couple of thousand rpm, it could be a tad dangerous.

With the mirrored version I built, the rotor will tend to tighten the nut further - hopefully keeping things together and just shutting down the turbine if something goes wrong.  No guarantee for safe operation though, but at least a little extra comfort.

And for the record, the above is said with the greatest respect to Elmer and his legacy.


 :beer:, Arnold

Offline John Hill

  • The Artful Bodger
  • Madmodder Committee
  • Hero Member
  • *****
  • Posts: 2016
  • Country: nz
Re: Small simple turbine engine
« Reply #24 on: March 08, 2011, 02:52:30 PM »
Regarding this type of impulse turbine, I think it would be interesting to design a turbine where the angle of the nozzle changes with RPM as they do in a Pelton wheel turbine.

For starting and low speed the nozzle is close to tangental but as rpms climb the nozzle changes angle to be more radial.  I expect the result would be higher speed and/or less air.

Just my thoughts and yet another project on my list! :coffee:
From the den of The Artful Bodger