Author Topic: Back to the shop... Elmer's #43  (Read 37261 times)

Offline arnoldb

  • Hero Member
  • *****
  • Posts: 515
  • Country: na
  • Windhoek, Namibia
Back to the shop... Elmer's #43
« on: April 24, 2011, 05:54:41 PM »
I've been out of the shop for quite a while now due to non-shop-related burn injuries to both my hands.  After spending a most frustrating 5 weeks just watching TV and waiting for things to heal up, I'm ready for the shop again, and wanted a fairly simple project to get back into the swing of things.
I tossed a number of Elmer's engines in a hat, and drew #43   :)

I'll be using metric fasteners and shafting to suit my needs, and I won't necessarily be making all pieces exactly to Elmer's plans.

On Friday I started assembling whatever I could scrounge to start the build:


Friday afternoon saw the base done from some hot-rolled steel bar:


The column followed on Saturday - also from hot-rolled; I went for a single angled side on each side instead of having a parallel bit at the top of the column.  I just used a pair of drills to get a suitable angle to mill it off at:


Main bearing was a very quick turning,  reaming and parting job from phosphor bronze:


Instead of making the reversing slide from solid, I turned up a bit of brass to 5mm diameter, and drilled a 5mm hole with a generous chamfer into a bit of steel off-cut:


Out with the torch and the silver solder, and joined together:


Then I just mounted the lot in the collet chuck on the rotary table, and milled out the slot in the steel bit:


For Saturday, I ended up with this handful of bits; not much, but some progress:


At least the whole lot fits together like it should :ddb::


This morning, I started with the reverse lever - just laid it out, centered the RT on the mill, mounted the fixture plate, and clamped the workpiece to that on top of some scrap aluminium, and centered on the pivot hole:


A little while later, after some judicious drilling and milling:


Then I turned up a bush to fit the hole drilled in the reversing lever and to fit the reversing slide's shaft:


And silver soldered the two together and cleaned things up a bit:


A bit of ornamental turning and shaping with a small file:


Screwed into a nut, heated bright red hot on the thin part with a small torch, and bent over with gentle pressure from a bit of flat steel while keeping the stem red-hot.  Bent like a charm   :dremel::


Trying to get a bit of a polish on the inside of the corner is a problem, but some rope (the type that butchers use to tie up a roast) dipped in metal polish quickly gets into the back bits:


Handle done:


And today's assembly shot:


 :beer:, Arnold

Rob.Wilson

  • Guest
Re: Back to the shop... Elmer's #43
« Reply #1 on: April 24, 2011, 06:00:42 PM »
Good to see you back in the shop Arnold  :clap: :clap: :clap: :clap: :clap:

Making your usual speedy progress as well  ::) :coffee:   ,,,,,,,,,,,,,,,nice work mate  :thumbup: 

Rob


Offline DaveH

  • Hero Member
  • *****
  • Posts: 1413
  • Country: za
  • Kempton Park, South Africa
Re: Back to the shop... Elmer's #43
« Reply #2 on: April 24, 2011, 06:21:17 PM »
Arnold,

Glad to see you back :thumbup:

Love that little handle.

Me thinks too much silver soldering - you just can't keep away from hot things :D

Nice to see you are up and running :clap: :clap: :clap:

DaveH
(Ex Leicester, Thurmaston, Ashby De La Zouch.)

Offline saw

  • Hero Member
  • *****
  • Posts: 1003
  • Country: se
  • lucky amateur
    • Svenssons AckordsWerkstad
Re: Back to the shop... Elmer's #43
« Reply #3 on: April 24, 2011, 06:55:13 PM »
Good work, I will be folling this project with plesur.  :clap: :clap: :clap:
_________________________
Greetings / Benni
http://myprojecty.wordpress.com/category/steam-engine/

Offline Anzaniste

  • Full Member
  • ***
  • Posts: 207
  • Country: gb
Re: Back to the shop... Elmer's #43
« Reply #4 on: April 24, 2011, 06:58:32 PM »
Pleased your are recovering, hand injury is one of those things I don't like to think about.
I am intrigued by your rear tool post design it looks like a half formed idea that is lurking in the back of my mind. I would be interested in a bit more information such as dimensions and clamping details etc.
Scrooby, 1 mile south of Gods own County.

Offline Bogstandard

  • Bogs Group
  • Hero Member
  • *****
  • Posts: 1107
Re: Back to the shop... Elmer's #43
« Reply #5 on: April 24, 2011, 07:45:41 PM »
It's good to see you torturing bits of metal instead of yourself Arnold. Just take it steady for now.

That Elmers' machine is a very popular one, and always, from the ones I have seen, end up as a good runners.

It really is nice to see you posting again.


John
If you don't try it, you will never know if you can do it.

Location - Crewe, Cheshire

Skype - bandit175

Offline Brass_Machine

  • Administrator
  • Hero Member
  • *****
  • Posts: 5504
  • Country: us
Re: Back to the shop... Elmer's #43
« Reply #6 on: April 24, 2011, 10:43:01 PM »
Sorry to hear about your hands... Glad you are on your way  :thumbup:

The bits are looking very nice!  :headbang:

Eric
Science is fun.

We're all mad here. I'm mad. You're mad.

Offline sbwhart

  • Global Moderator
  • Hero Member
  • *****
  • Posts: 3530
  • Country: gb
  • Smile, Be Happy, Have Fun and Rock Until you Drop
Re: Back to the shop... Elmer's #43
« Reply #7 on: April 25, 2011, 01:20:11 AM »
Great to see you back in the shop and posting, I was thinking we'd not seen much of you, hope the hands carry on to heal well.

Great work with the engine  :thumbup:

Stew
A little bit of clearance never got in the road
 :wave:

Location:- Crewe Cheshire

Offline madjackghengis

  • Hero Member
  • *****
  • Posts: 717
  • big engine
Re: Back to the shop... Elmer's #43
« Reply #8 on: April 25, 2011, 10:34:32 AM »
Hello Arnold, this looks to be a very interesting engine build, and you are keeping things out of sight well enough to be intriguing on top of starting an interesting engine.  Very fine craftsmanship on the parts you've made, I'm sure it will be a fine looker, and good runner.  Just exactly how does one "toss Elmer's engine numbers in the air"?  I'd like to build one, but I don't know the numbers, or where to find them, if they are freely available, or must be bought.  Would you show a picture of tossing up those numbers, if you get the chance?  :lol:  really looking forward to this build, a very fine start indeed.   :beer:  Cheers, Jack

lordedmond

  • Guest
Re: Back to the shop... Elmer's #43
« Reply #9 on: April 25, 2011, 11:46:30 AM »

Offline Stilldrillin

  • Global Moderator
  • Hero Member
  • *****
  • Posts: 4972
  • Country: gb
  • Staveley, Derbyshire. England.
Re: Back to the shop... Elmer's #43
« Reply #10 on: April 25, 2011, 03:39:52 PM »
So sorry to hear about your hands Arnold. But, pleased you're over the problem now.

Looking forward to more of your speedy building......  :D

David D
David.

Still drilling holes... Sometimes, in the right place!

Still modifying bits of metal... Occasionally, making an improvement!

Offline arnoldb

  • Hero Member
  • *****
  • Posts: 515
  • Country: na
  • Windhoek, Namibia
Re: Back to the shop... Elmer's #43
« Reply #11 on: April 25, 2011, 05:47:47 PM »
Many thanks Gents, it's really good to be making chips again  :ddb:  Sometimes a little reality check makes one appreciate the good things in life even more.

Anzaniste, I don't have any particular measurements on the toolpost, as I made it by eye from handy bits lying around.  The pillar is about 24mm thick, welded to a bit of 10mm plate with two holes drilled in it to mount in the rear slot of the lathe toolpost.  The tool holder is just a square block of steel that I bored and slitted to fit the toolpost.  I made this lot about 1 1/2 years ago before I had my mill and were even less experienced than now, so it's a bit crude, but functional.  Here are some additional detail on it.  If you have any specific questions, do fire away, and I'll get the appropriate answers for you.

Today's little bits...

A start on the crank web from some hot-rolled rod - drilling the tap-hole for the crank screw on the rotary table as it was convenient:


After parting it off, and pressing onto some 5mm silver steel and a bit of cleanup, the crankshaft was done:


For the eccentric, I cleaned up a bit of the same hot rolled rod as for the web, and used a dial indicator to get the correct offset:

Then it was a fairly simple turning job to finish it off.

With the mill still centered over the RT, I couldn't be bothered to crank the table back to the vise for drilling the grub screw hole in the eccentric, so I just used the drill press:


The completed eccentric on the crank shaft:


The eccentric strap followed; I strayed a bit from Elmer's design and just kept to the crucial dimensions.  Here I'm boring it to fit the eccentric:


Today's bits; looks like I'm on a "make three bits per day" streak   :coffee:


Tomorrow might be less done, as I have to attend to some matters in town...  At least, a part of those concern getting some new "toys" for the shop  :ddb:

Regards, Arnold

Offline DaveH

  • Hero Member
  • *****
  • Posts: 1413
  • Country: za
  • Kempton Park, South Africa
Re: Back to the shop... Elmer's #43
« Reply #12 on: April 25, 2011, 06:02:53 PM »
Nicely done Arnold  :)
 :beer:
DaveH
(Ex Leicester, Thurmaston, Ashby De La Zouch.)

Offline raynerd

  • Madmodder Committee
  • Hero Member
  • *****
  • Posts: 2893
  • Country: gb
    • Raynerds Projects - Raynerd.co.uk
Re: Back to the shop... Elmer's #43
« Reply #13 on: April 25, 2011, 06:13:46 PM »
Coming in a bit late on this one. Good to see you back at it and excellent build so far!

Chris

Offline Anzaniste

  • Full Member
  • ***
  • Posts: 207
  • Country: gb
Re: Back to the shop... Elmer's #43
« Reply #14 on: April 25, 2011, 06:26:36 PM »
Arnold, Thanks for the info it's just what I needed. Either great minds think alike or I've maybe seen your Idea on the other web site although I hadn't thought of the keyway. I also had thought of angling the groove for the parting off blade to build in a bit of top rake and keeping the minimum of blade protruding depending what diameter I was parting and using the height adjusting facility to keep the cutting edge on centre height.

Scrooby, 1 mile south of Gods own County.

Offline saw

  • Hero Member
  • *****
  • Posts: 1003
  • Country: se
  • lucky amateur
    • Svenssons AckordsWerkstad
Re: Back to the shop... Elmer's #43
« Reply #15 on: April 25, 2011, 07:20:42 PM »
Looking good.  :thumbup: :thumbup:
_________________________
Greetings / Benni
http://myprojecty.wordpress.com/category/steam-engine/

Offline arnoldb

  • Hero Member
  • *****
  • Posts: 515
  • Country: na
  • Windhoek, Namibia
Re: Back to the shop... Elmer's #43
« Reply #16 on: April 27, 2011, 06:36:26 PM »
Thanks chaps  :beer:

Anzaniste, pleasure.  I can't claim the idea; I picked it up from somewhere; can't remember if it was from an old book or from an Internet link.  Angling the groove will work just fine; initially I considered that, but as I keep the toolpost mounted nearly permanently, it's easier for me to have the tool horizontal.  It's quick to adjust it in and out for different thicknesses of material, and I just use an oil stone on it in situ to hone up the cutting edge as needed.  Saves a lot of time faffing around setting it to center height.  Also, I'm a lazy so-and-so, so I use it to part of anything from steel to brass without any change of tool geometry; it does take a bit of care but works...

Yesterday I didn't get anything done as I was shopping around in town and had to attend to some other matters.  This morning, I collected the results of said shopping around :D:


That broke the 3-part streak, but at least I got three bits done for today:

First up was a block of phosphor bronze milled to 0.1mm over size on the bearing surfaces for the sliding block and then slit off:

I carefully filed the bearing surfaces flat to remove the toolmarks, and then flat-lapped it on some 600 grit emery to be a good smooth-sliding fit in the tilting guide.  Took 10 minutes to machine the block and a good 30 more minutes to finish it off...

Next the eccentric rod; I milled some brass to size for width and depth and left it a couple of mm over-long:

After squaring up, I drilled and reamed the one end, and drilled and tapped the other end.
Then I centered it up in the 4-jaw on the lathe and drilled a tiny hole for tailstock support, and carefully turned it down length-wise.  Sorry, no pictures   :palm:

A bit of 5mm hex brass was used to turn the "eccentric pin" from; Elmer shows slotted screws for these, but I prefer hex-head screws.  Finished bunch 'o bits for the day:


And assembled:


Well, at least it's three more bits done :lol:

 :beer:, Arnold

Offline DaveH

  • Hero Member
  • *****
  • Posts: 1413
  • Country: za
  • Kempton Park, South Africa
Re: Back to the shop... Elmer's #43
« Reply #17 on: April 27, 2011, 06:46:53 PM »
Arnold,

Coming along nicely :thumbup:

DaveH
(Ex Leicester, Thurmaston, Ashby De La Zouch.)

Offline foozer

  • Full Member
  • ***
  • Posts: 194
  • Camano Island WA
Re: Back to the shop... Elmer's #43
« Reply #18 on: April 27, 2011, 07:32:00 PM »
And here I am still dinking around making a base for the Elbow Engine, ah but at least there is your build of it to help answer some of the "How the Hecks?"

Keep up the good work

Robert
Ignorance is Bliss, thus I aim for Perfection

Offline madjackghengis

  • Hero Member
  • *****
  • Posts: 717
  • big engine
Re: Back to the shop... Elmer's #43
« Reply #19 on: April 27, 2011, 08:17:17 PM »
Looking good, and an interesting order of parts, Arnold.  I'm looking forward to seeing it all come together.   :beer:  Cheers, Jack

Offline saw

  • Hero Member
  • *****
  • Posts: 1003
  • Country: se
  • lucky amateur
    • Svenssons AckordsWerkstad
Re: Back to the shop... Elmer's #43
« Reply #20 on: April 28, 2011, 04:32:19 AM »
Well done. :clap: :clap:
_________________________
Greetings / Benni
http://myprojecty.wordpress.com/category/steam-engine/

Offline arnoldb

  • Hero Member
  • *****
  • Posts: 515
  • Country: na
  • Windhoek, Namibia
Re: Back to the shop... Elmer's #43
« Reply #21 on: April 29, 2011, 04:28:39 AM »
Thanks Chaps!

Dave, how's the weather over there in "Gauteng" - I see there's a massive cold front moving through Southern RSA, so your cold spell might be on its way...

 :lol: Robert, maybe you need to stop taking "tumbles" and just get on with the base... 

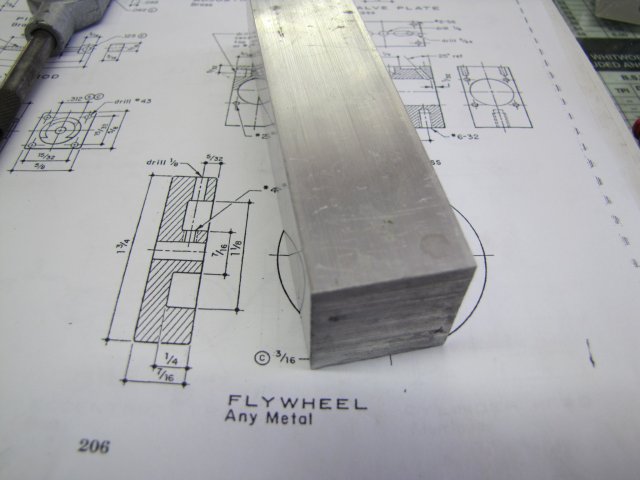
Jack, I'm just taking the parts from the plans top-to bottom - hence the weird order of fabrication.  I must give Elmer Verburg his due credit for that; his plans are complete enough to allow one to make the parts in any order; if they are made to the sizes specified, things will fit and the engine will run - there's no need to fiddle around with bits to make things fit later on.

Yesterday, I f@rted around with a block of aluminium.  The markings on the 1" square bar are indicative that this is an extrusion, and I expected it to be a bit gummy while machining:


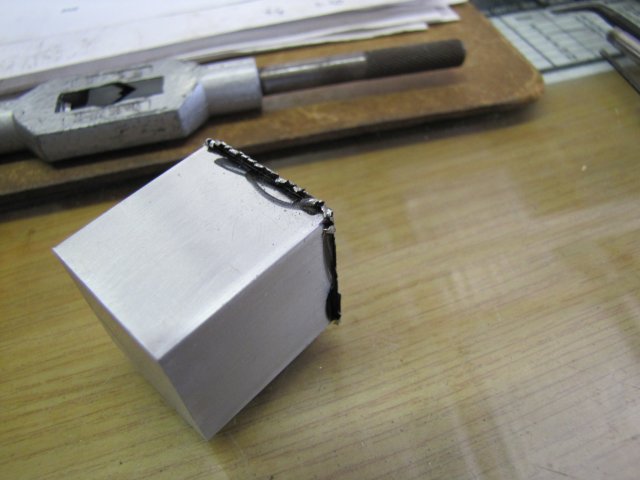
It was gummy, and left a lot of burrs from fly-cutting:


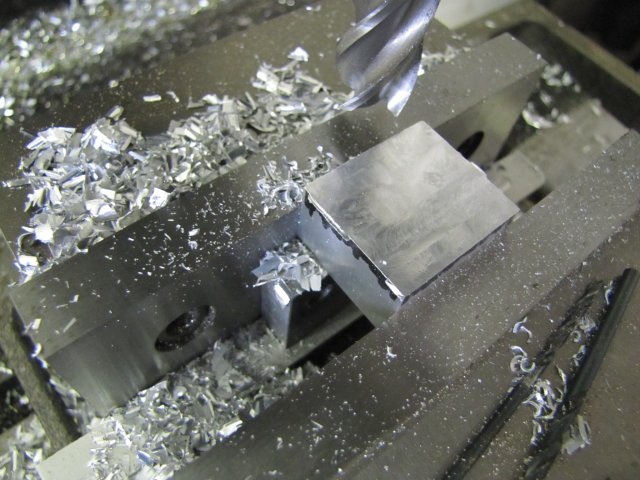
Even though not ideal for the job, it's what I had available, so I carried on trimming it down to size with a 16mm end mill:


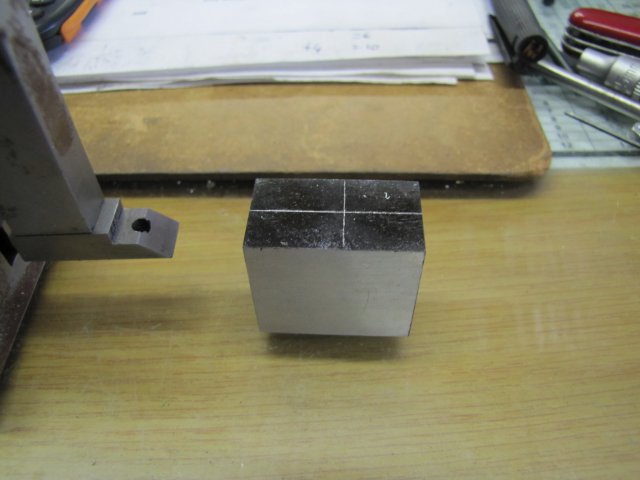
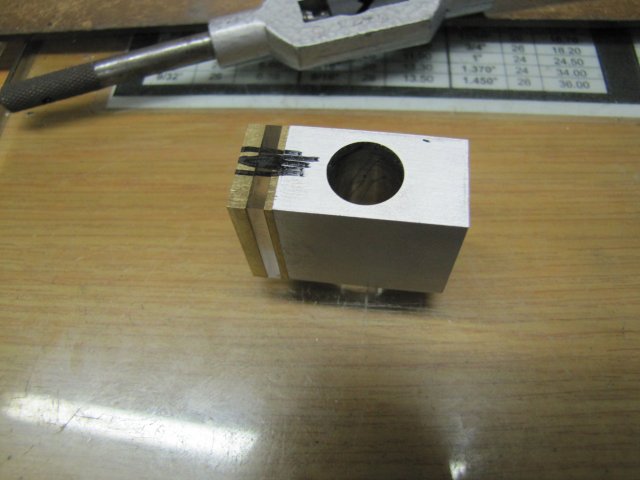
I ended up with the cylinder block and marked it out for the cylinder bore:


Then I spent quite a while mentally running the machining processes through my head.  I was spoilt for choice on machining the bore; it could go on the 4-jaw on the lathe, or I could do it on the mill using drills and a reamer or the boring head.  Even though the aluminium was gummy, I opted for the easy way of drilling and reaming, with lots of meths for lubricant while reaming:

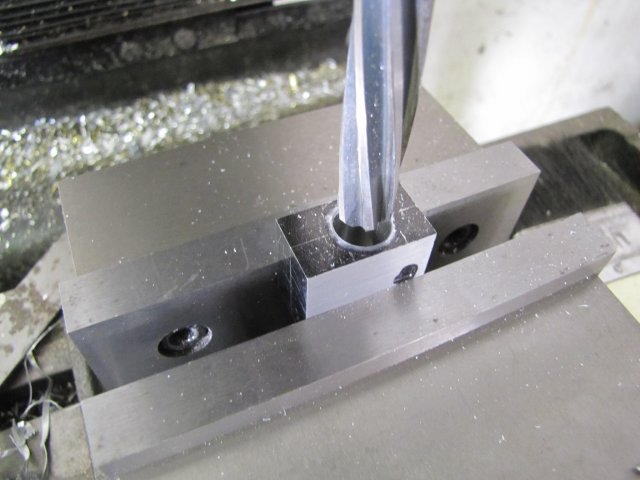
If the reamer left a bad finish, I could have bored out the cylinder with the boring head in the same position, but fortunately it came out OK with just the reamer.

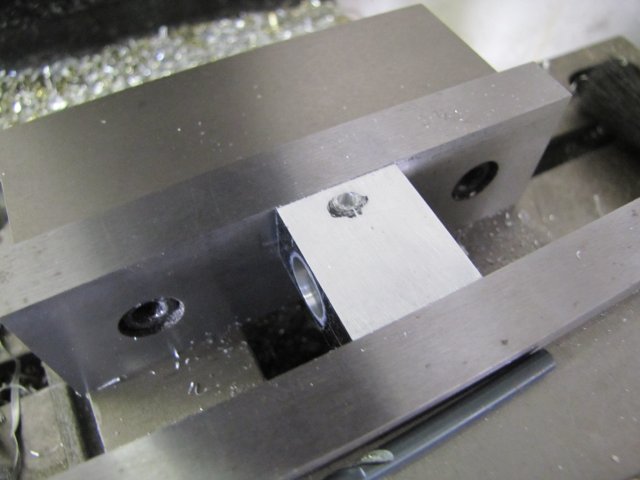
Before starting on the top of the cylinder, I drilled the exhaust passage on the side; it just makes it easier to drill the exhaust port on the top to the correct depth:


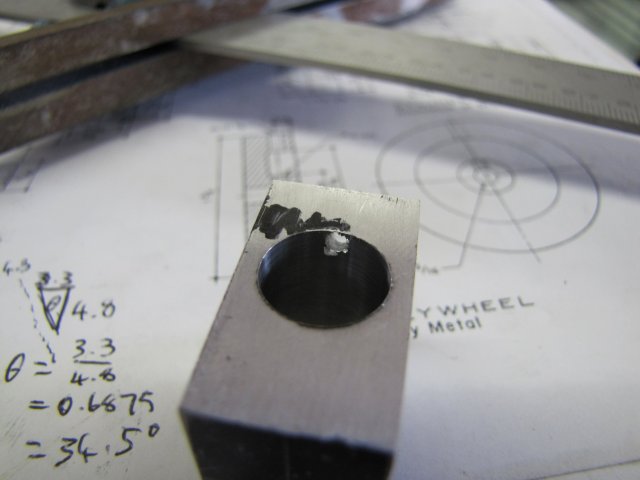
Then I started on the top.  Drilled the exhaust port through, and milled the steam passages.  The plans call for 1/8" passages 1/16" deep.  I don't have a 3mm slot mill, so I used a 2mm one and to compensate for the width, I milled the slots 2mm deep rather than the 1.6mm called for:


With the ports milled deeper, I had to calculate new angles for drilling the ports through to the bore; a quick bit of rough sketching and trigonometry sorted that:


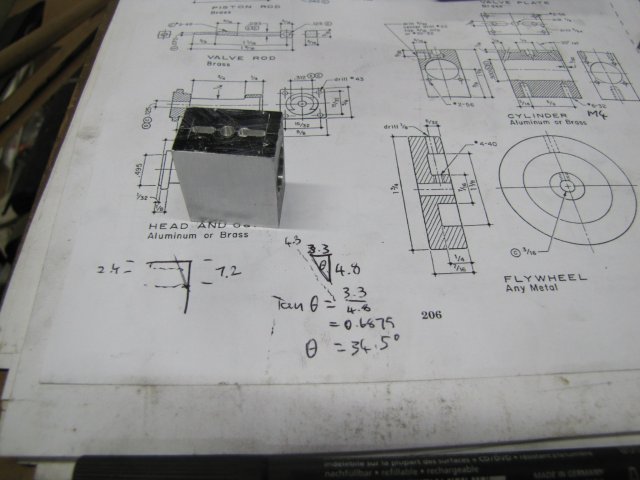
Come on daddy; the maths is boring:


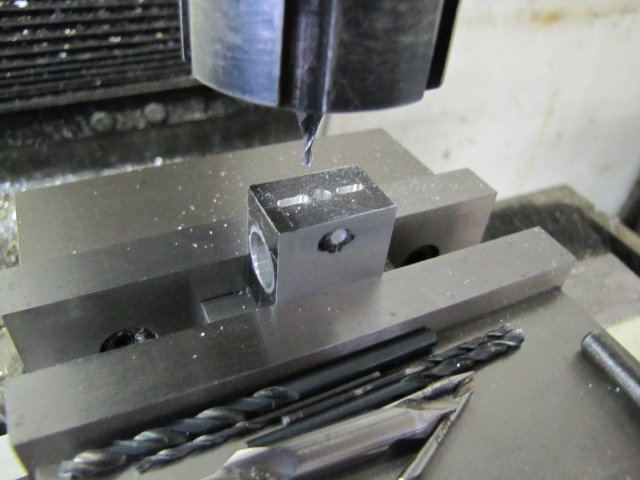
With the new angles marked, I started off the passages with the 2mm center-cutting slot mill:

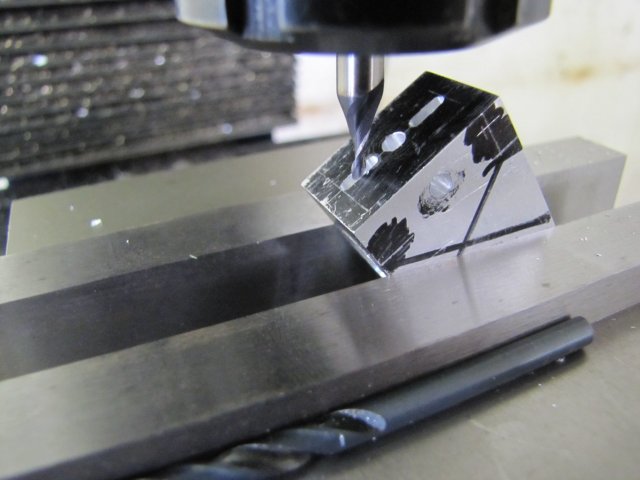
That was followed with a 2mm drill.
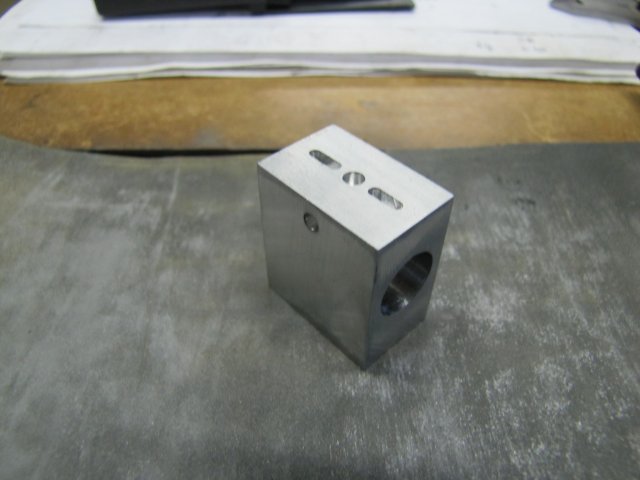
Came out spot-on:


After a quick rub-down on emery, the cylinder block looks fairly presentable:


Two bits of brass plate and a bit of perspex followed:

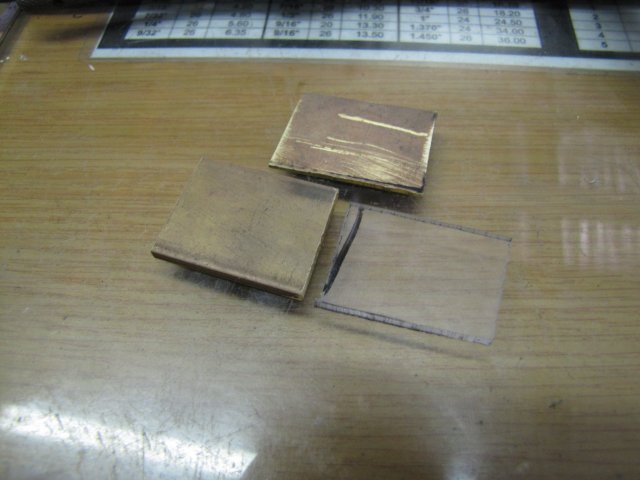
The thinner brass plate is for the valve face, and the perspex and thicker brass plate are for exchangeable valve chest covers; the perspex for running on air and showing off the valve mechanism, and the brass one should I run the engine on live steam at some future point.

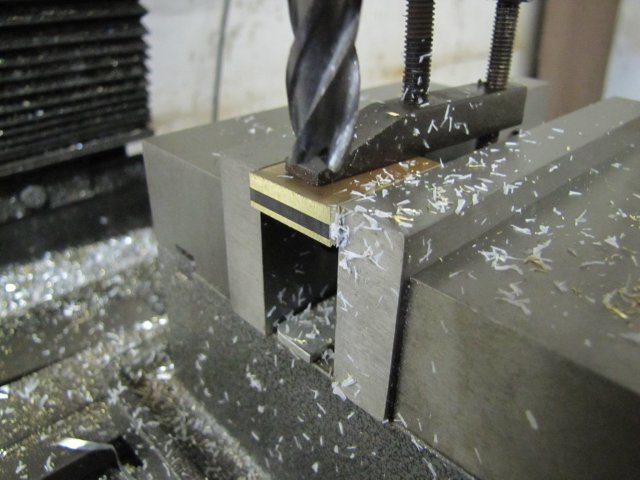
I machined the three down as a sandwich, with the perspex clamped between the brass plates, and the thicker, sturdier brass plate at the top, as end mills are inclined to want to pull up work pieces. With the perspex in the middle, it would be less inclined to want to crack or break:


Shop time ran out yesterday before I could carry on; I'll continue today:


Regards, Arnold

Offline saw

  • Hero Member
  • *****
  • Posts: 1003
  • Country: se
  • lucky amateur
    • Svenssons AckordsWerkstad
Re: Back to the shop... Elmer's #43
« Reply #22 on: April 29, 2011, 06:41:10 AM »
Beutifull  :clap: :clap:
_________________________
Greetings / Benni
http://myprojecty.wordpress.com/category/steam-engine/

Offline arnoldb

  • Hero Member
  • *****
  • Posts: 515
  • Country: na
  • Windhoek, Namibia
Re: Back to the shop... Elmer's #43
« Reply #23 on: April 29, 2011, 01:22:23 PM »
Thank you Benni  :beer:

I spent six hours in the shop today, and don't have too much to show for it  ::)

Stacked up the valve- and cover plates on the block in the mill vise and clamped the lot up with a business card folded double to take up the minute difference in size between the parts, and coordinate-drilled the screw holes - first with a center drill to start each hole accurately, then down to threading depth in the cylinder block with a 1.6mm drill for M2 tapping, and finally 2mm clearance just through the loose plates to the top of the block :


Then I started milling out the port holes in the valve plate with a 1.5mm slot mill:


The valve plate after a bit of flat lapping.  I'm not happy with it; I think I used over-heavy cuts while milling the slots, so they are very untidy.  I might just re-do this part to make it better:


The steam chest followed from some 8mm aluminium plate.  Fortunately this is a better alloy to machine than the bit I made the cylinder block from.  I finished the block to near-final dimensions on the width, and chucked it up in the 4-jaw on the lathe to turn the round bits on it, and also to drill the holes for the valve rod.  The hole in the back must be 1.6mm, with the one in the front 2mm.  I drilled deep enough with the 2mm drill through the block to just reach the point where the 1.6mm hole had to continue - that's about 28mm deep.  Then I  had to drill the last bit with the 1.6mm drill, whis is fairly short, so I barely had 6mm of it's shank chucked in the drill chuck:

My old girl (the ML7) is a bit slow for these small drills at max 800RPM, so it takes peck drilling at a slow feed and frequent cleaning with a drop of meths on the drill tip each time it comes out.  This is where I really find an advantage using meths as lubricant on aluminium over WD40 and such; the oily cutting fluids tend to make the swarf cling to the drill bit, thus clogging up the flutes more quickly.  The meths just make it slide past, hence I can take deeper pecks while drilling - 3 to 4mm deep pecks are easily done with a 1.6mm drill.

A bunch of milling followed to clear out the hole in the steam chest.  I roughed out most of the material with a 4mm 2-flute slot mill, and then followed with many fine passes with a 2mm end mill to get it to size and sort of neat-looking:


I used the brass valve cover as a template to drill the holes through the steam chest:


All done with the steam chest.  After a couple of minutes of rubbing over sand paper to tidy it up; it came out satisfactorily  :) - unlike the darn valve plate  ::) :


Regards, Arnold

Offline DaveH

  • Hero Member
  • *****
  • Posts: 1413
  • Country: za
  • Kempton Park, South Africa
Re: Back to the shop... Elmer's #43
« Reply #24 on: April 29, 2011, 01:55:46 PM »
Arnold,

Damn cold thanks, :coffee:

Tis looking very good, like the interchangeable Perspex valve chest cover. :D

The valve plate looks good to me from here. :)
 :beer:
DaveH
(Ex Leicester, Thurmaston, Ashby De La Zouch.)