Author Topic: Trials and tribulations with a 7x12 lathe  (Read 44602 times)

Offline modeldozer

  • Sr. Member
  • ****
  • Posts: 299
  • Country: es
  • Valencia, Spain
    • AJ´s Truckmodeling
Re: Trials and tribulations with a 7x12 lathe
« Reply #25 on: May 20, 2011, 07:54:23 AM »
Thanks fo the replies guys,

Stuart,

Thanks for the link, back as an aprentice we called it a standart for some reason.  Unfortuanatly mine is not that forgiving having lost 90% vision.  As is to "read" the blue have to use electronic visual aids. But keep soldering on finding differt solutions to do things.

Loply,

The Saddle originaly had good contact on the edges, only a verry narrow line at the deepest end (very top of the bedway.  The problem with lapping is as one moves up and down the bed nothing realy prevents the saddle to twist in different directons, progessivly widening the outer edges.  In hindsight should have thought this through better before doing it.

At the moment am trying a few things before going for a repacement.

Abraham

Offline loply

  • Sr. Member
  • ****
  • Posts: 260
Re: Trials and tribulations with a 7x12 lathe
« Reply #26 on: May 23, 2011, 11:40:10 AM »
Hi Abraham,

Just FYI I had a fiddle with my lathe last night.

I discovered that the fit of the gibs on the front of the saddle was not very tight, using a DTI and applying quite heavy finger pressure I could lift the saddle up about 0.03mm on one side and about 0.06mm on the other side.

I adjusted the shims bit when it comes to these tolerances despite the shimstock being 0.01mm I generally found that it would seize up if I removed any - certainly removing the amount of shimstock equal to the free play wouldn't work.

My approach was to remove enough shim so that the saddle just squeezed onto the bed, but could scarcely be moved more than a few inches.

I then used a piece of flat brass with 600, 800 and 1200 grit wet and dry to remove material from the bottom of the bed until the saddle did slide on.

By this means I was able to achieve a fit which was not possible simply by adding or removing shims, as the sanding can reliably and consistently remove a given amount of material, and can be adjusted by area according to tight spots.

I now have the saddle with free play of about 0.02mm and 0.03mm when pushed quite hard with a finger, and this has resulted in around 0.02mm of rotation tangential to the ways when pushed quite hard with fingers.

The rotation and free play does not come with any accompanying sound and feels like flex rather than anything else, ie I feel like something is bending rather than rocking around in free space.

All in all I'm pretty happy with this, I got more or less chatter free cuts of up to 2mm in mild steel prior to this, and I'm sure it will be fine from now on.

Cheers
Rich

Offline modeldozer

  • Sr. Member
  • ****
  • Posts: 299
  • Country: es
  • Valencia, Spain
    • AJ´s Truckmodeling
Re: Trials and tribulations with a 7x12 lathe
« Reply #27 on: May 23, 2011, 06:22:36 PM »
Rich,   Thanks for the feedback. A question if I may, where can I get some 0.01mm shim stock?  Had to use various thicknesses of paper as I don´t have anything that thin.  Have looked on the web but thinnest I found is 0.05mm.

After spending the weeked filing,sanding,fiddeling,,,, I am now at final adjustments.  Am also between shim sizes so am also tweeking the bottom of the bedways.  Had to hand file and sand the gib mounting surfaces of the saddle to get them parallel to the bed (0.04mm difference left to right), surprisingly got them to within 0.01mm.

At the moment (only front adjusted) I have no detectable play up/down but still get 0.02mm "rotational", and think my orriginal conclution of flex/deformation somewhere was correct. It would be interesting to know the measurements of some of the bigger heavier lathes for comparrison. BTW the adjustments and readings were done wth oil on the ways and I have a nice slightly dragging, but smooth slide.

The final verdict will come when some test pieces can be cut. (Don´t know if after all the fiddeling it slill cuts square)

Have also ordered some bits for some of the mods.

Abraham

lordedmond

  • Guest
Re: Trials and tribulations with a 7x12 lathe
« Reply #28 on: May 25, 2011, 06:59:05 AM »
to answer your question


my Myford coni big bore ( £ 10k worth ) tested at the rear of the cross slide 250mm from the centre of the bed i.e. point of rotation in is 0.005mm that is after two years use with no adjustment from me , i.e. as supplied form Myford ( only 5 miles away  :) )

so there you go mind you my cross slide is nearly the length of your bed width wise


Stuart 

Offline modeldozer

  • Sr. Member
  • ****
  • Posts: 299
  • Country: es
  • Valencia, Spain
    • AJ´s Truckmodeling
Re: Trials and tribulations with a 7x12 lathe
« Reply #29 on: May 25, 2011, 10:17:01 AM »
Stuart,

Thank you for the info. I expected it to be a lot less.  The narrow bed and short cross slide was always a bit of a concern to me.  The other concern is there is not a lot of material on top of the "V" in the saddle and it might be speading under force.

For the moment am finishin the rebuid so I can do some test pieces.

Abraham

Offline modeldozer

  • Sr. Member
  • ****
  • Posts: 299
  • Country: es
  • Valencia, Spain
    • AJ´s Truckmodeling
Re: Trials and tribulations with a 7x12 lathe
« Reply #30 on: May 25, 2011, 03:51:57 PM »
Hi to all form a very happy modder  :) :D :ddb:.

After making lots of shims, sanding and tweeking it is all adjusted and working nicely.  Up/down play at all 4 corners less than 0.01mm and ....... the rotational down to just under 0.01mm ( do not have anything that measures finer)

I would like to take a moment to thank everybody for their advice, information and support, without witch I most probably would have given up long ago.  So to all have a few on me  :beer: :beer: :beer: :beer:.

And  :mmr:

More to follow soon.
Abraham

Offline loply

  • Sr. Member
  • ****
  • Posts: 260
Re: Trials and tribulations with a 7x12 lathe
« Reply #31 on: May 26, 2011, 05:53:05 AM »
Morning Abraham,

Probably a bit late now but I got my shim stock just off eBay somewhere - just searched for 'brass shim' or something.

Congrats on finishing the tine tuning, certainly sounds like it ought to be smooth as hell now.

May I ask how you managed to measure the slant on the saddle gib? And how did you manage to sand the saddle flat with accuracy?

Offline modeldozer

  • Sr. Member
  • ****
  • Posts: 299
  • Country: es
  • Valencia, Spain
    • AJ´s Truckmodeling
Re: Trials and tribulations with a 7x12 lathe
« Reply #32 on: May 26, 2011, 06:25:48 AM »
Hi Rich,

Had to do a bit of   :scratch:, I will try to explain.
First measured from the top side surface to the bottom faces where the gibs mount at all 4 corners then at the back between same top surface and the rear flat sliding surface at the bottom, at the front i used a 6mm guide rod from an old printer in the "v" and measured between it and the top, this gave me 8 readings. Then calculate the dfference between the readings for the gib mounts and slide surfaces at each corner, now 4 values. Next i calculated the difference letf/right for the front and the back. Then it was a matter of carefull filing to remove the exess on the high points and finishing on a piece of 360 W&D on my lapping glass.
I will try to do a C-o-C to clear it up if necessary.

Abraham

Offline modeldozer

  • Sr. Member
  • ****
  • Posts: 299
  • Country: es
  • Valencia, Spain
    • AJ´s Truckmodeling
Re: Trials and tribulations with a 7x12 lathe
« Reply #33 on: May 28, 2011, 06:40:35 PM »
Hi all,

Next are some modifications to the lead screw guard supports.  The right hand one had an extension piece to allow for the thread indicator to locate, as I do not use it and will be adding DROs, the extension was removed and the pieces soft soldered with lead free solder (do not have silver soldering equipment).  From the heat when soldered the blackening of the pieces came off.  My only option was to paint the parts.  The left hand one had a piece added to cover the opening on the slanted apron.


Both finished with the template that was used to make the add on piece.


Lead screw installed and some close ups.  The mod on the right extended the travel by some 30mm.


Today made one C-spanner and started the other for the castle nuts on the spindle.


Abraham


Offline Henning

  • Full Member
  • ***
  • Posts: 136
  • Country: no
  • All the kit and no clue!
Re: Trials and tribulations with a 7x12 lathe
« Reply #34 on: May 30, 2011, 09:00:39 AM »
Nice work this far!  :headbang:

I notice you have covered the lead screw. Where did you find the cover? I got one half of a "full size" one the other day and was wondering if i could cut that in two and use that, but i have other things on at the moment so so far it's just sat there on my bench.
Henning

Just because i can't, doesn't mean i shouldn't?
Tool- lover, with a collection to show for it!

Offline modeldozer

  • Sr. Member
  • ****
  • Posts: 299
  • Country: es
  • Valencia, Spain
    • AJ´s Truckmodeling
Re: Trials and tribulations with a 7x12 lathe
« Reply #35 on: May 30, 2011, 12:22:04 PM »
Henning´

They came with the lathe, just modified them slightly.

Offline modeldozer

  • Sr. Member
  • ****
  • Posts: 299
  • Country: es
  • Valencia, Spain
    • AJ´s Truckmodeling
Re: Trials and tribulations with a 7x12 lathe
« Reply #36 on: June 05, 2011, 01:53:07 PM »
Hi to all,

Progress is a bit slow due to rain. :(
The other spanner was finished. Have included some progress pics.


The spindle was then removed from the headgear with a makeshift puller.  Taper bearings and a metal gear were ordered.


Next after lots of measurements the gearshift mechanism was drawn to scale so the correct profile for the shift fork could be determined.  A template was printed and stuck to a 6 x 40mm cold rolled flat bar.  From this the new fork was made.  A template was also used to locate the centre for the shaft piece, the hole has to be offset towards the top.  A hole was drilled and taped M4.


Next a piece of 8mm round bar was squared, the centre found and centre punched.  This was also drilled and tapped M4.  A short grub screw was then used to join the pieces.


A test fit of the new fork was made and all seems to work very well.  Once the lathe is running I will make two spacer sleeves to fit on the lay shaft to prevent the gear from traveling to far.


Abraham

Rob.Wilson

  • Guest
Re: Trials and tribulations with a 7x12 lathe
« Reply #37 on: June 05, 2011, 03:06:46 PM »
Hi Abraham 

Your sure doing a fine thorough job of putting the lathe right  :clap: :clap: :clap: :clap:  ,, i am sure it will be a pleasure to use when finished  :dremel:


Rob  :thumbup:

Offline Stilldrillin

  • Global Moderator
  • Hero Member
  • *****
  • Posts: 4972
  • Country: gb
  • Staveley, Derbyshire. England.
Re: Trials and tribulations with a 7x12 lathe
« Reply #38 on: June 05, 2011, 03:44:43 PM »
Abraham.
I've been quietly watching, until now......  :wave:

Wonderful attention to detail.  :clap: :clap:

The lathe is going to be a cracker, when you've finished!  :thumbup:

David D
David.

Still drilling holes... Sometimes, in the right place!

Still modifying bits of metal... Occasionally, making an improvement!

Offline modeldozer

  • Sr. Member
  • ****
  • Posts: 299
  • Country: es
  • Valencia, Spain
    • AJ´s Truckmodeling
Re: Trials and tribulations with a 7x12 lathe
« Reply #39 on: June 06, 2011, 06:35:43 PM »
Hi Rob and David,  thank you for the encoragement.  It is slow going at the moment as I am wiating on some parts.

Abraham

Offline modeldozer

  • Sr. Member
  • ****
  • Posts: 299
  • Country: es
  • Valencia, Spain
    • AJ´s Truckmodeling
Re: Trials and tribulations with a 7x12 lathe
« Reply #40 on: June 15, 2011, 05:20:49 PM »
Hi to all,

Finally made some more progress.  The spindle assembly was measured and drawn to scale so I could sort out the spacers and bearing covers.  New bearing covers were designed incorporating lip type seals.  As the lathe is out of commission tool paths was programmed to cut the covers on my CNC router.


The parts also arrived and I went in search of some raw materials.  Found a great non-ferros supplier only 20min drive from our home.  One of the other members on here from Spain actually gave me the name of the supplier, they even sell off cuts at reduced rates.   :mmr: 
The mild steel I got from a friend at a large manufacturing plant.


A template was printed and the cover roughed out in a piece of 10mm alu plate.  It was set up on the router using my web cam centre finder.


It was then machined.


After deburring and cleanup with the seal installed.  An added advantage of the cover is it gives more support for the lay shaft bearings.


Next up is cleaning the spindle and reassembly.  The rear cover will be done on the lathe when it is at a usable stage.

Abraham


Offline loply

  • Sr. Member
  • ****
  • Posts: 260
Re: Trials and tribulations with a 7x12 lathe
« Reply #41 on: June 16, 2011, 07:36:42 AM »
Hi Abe,

Looking good! You're probably already aware but another thing to make is a new spacer for the preloading of the bearings on the external rear of the spindle. If your lathe is like mine the original was about 5mm oversized and just spun around like a lunatic when the lathe was ran! (Who on EARTH designed it?!). I made one with a very thick OD so that it contacted the bearing on the largest possible area for even preloading. I had to mill out a gap to allow the key for the gear to sit.

Big suppliers offcut sections are definitely the place to go for materials - I used to buy odds and ends off eBay but it was very poor value - I recently got 60cm of 50mm steel bar (a hefty lump!), and 1.5m of 20mm steel bar, for £10, and he was trying to give me more!

Got about 5 meters of 50x25x5 steel box and two lengths of 30mm and 40mm steel rod for £10 last time too. Can't beat it  :clap:

Offline modeldozer

  • Sr. Member
  • ****
  • Posts: 299
  • Country: es
  • Valencia, Spain
    • AJ´s Truckmodeling
Re: Trials and tribulations with a 7x12 lathe
« Reply #42 on: June 16, 2011, 05:46:22 PM »
Hi Rich,

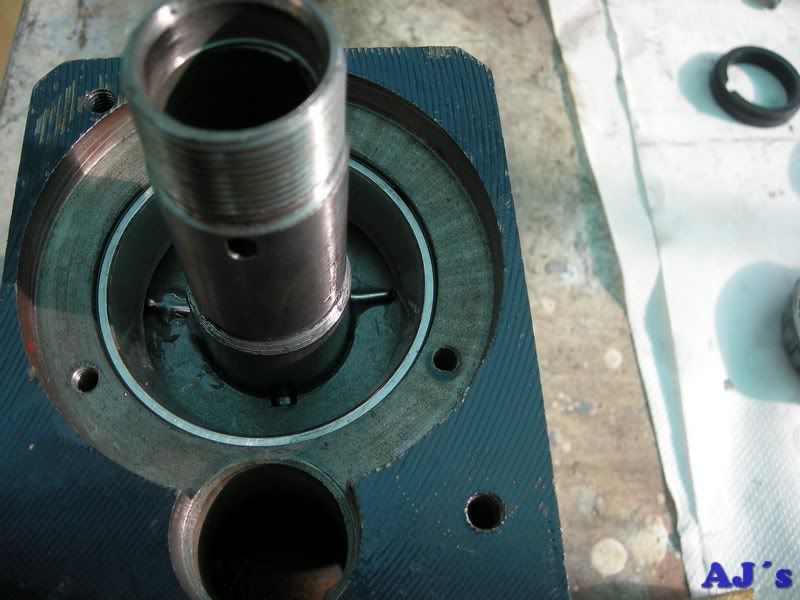
The spacers are actually the reason I drew the assembly, it just did not make sense to me.  After drawing it all I actually found that with the normal bearings, spacers and gear assembled, the distance between the insides of the two bearings was 2+mm more than the registers in the housing.  With the taper rollers it ends up 0.5mm to short, makes one think.  :scratch:  I will also be making a fatter rear one from mild steel for the rear lip seal to ride on.(still need to get the length once all is in its place)

 :update:
The spacers next to the bearings needed a step cut to clear the cages.  They were machined with the CNC router.


Everything was given a thorough cleanup, there was a lot of casting sand still embedded on the inside surfaces of the housing.  The “hub” on the spindle where the new seal will ride was polished.
All ready for assembly.


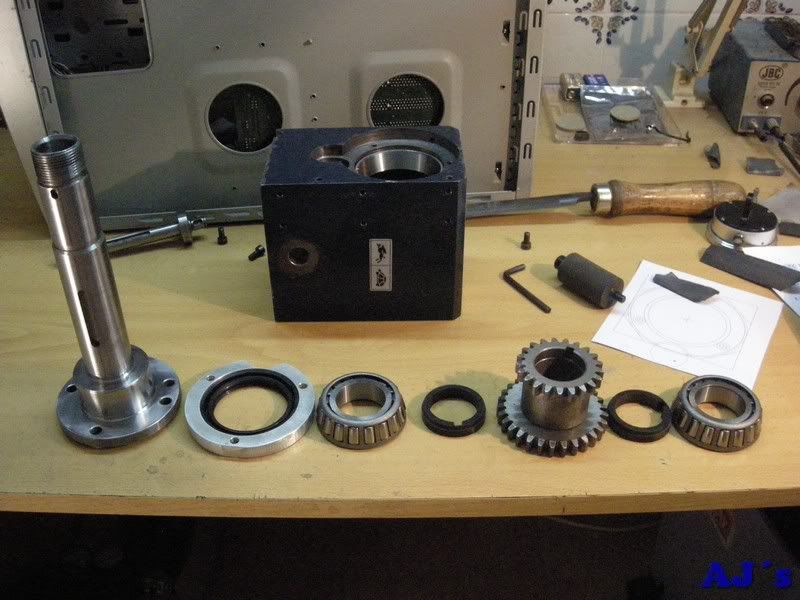
It was then all assembled dry and alignments checked.  I took some measurements to make two spacers for the lay shaft to act as stops, preventing over travel of the change gear.
Next I used a method we use in the adjustment of taper bearings in machine transmissions.  Between the gear and last spacer two pieces of soft solder is trapped, the preload is then adjusted and all disassembled. By measuring the thickness of the flattened solder the spacer thickness is determined.


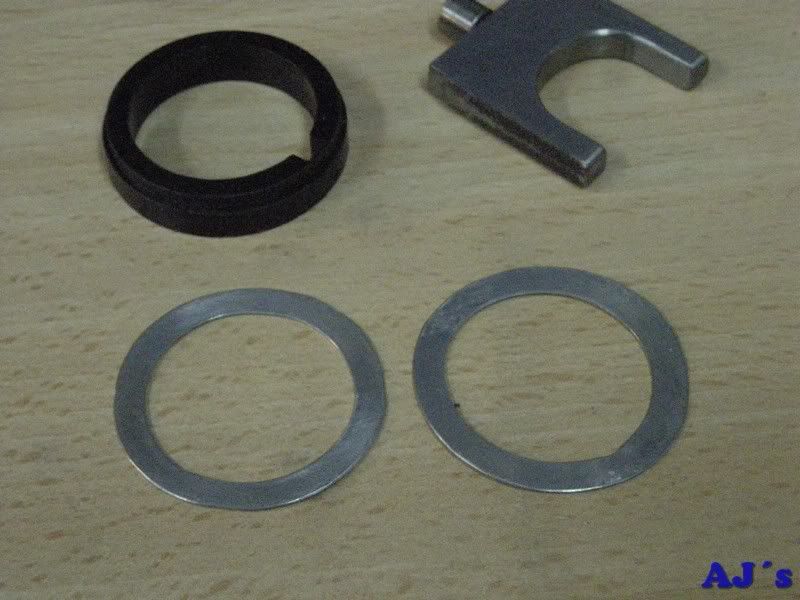
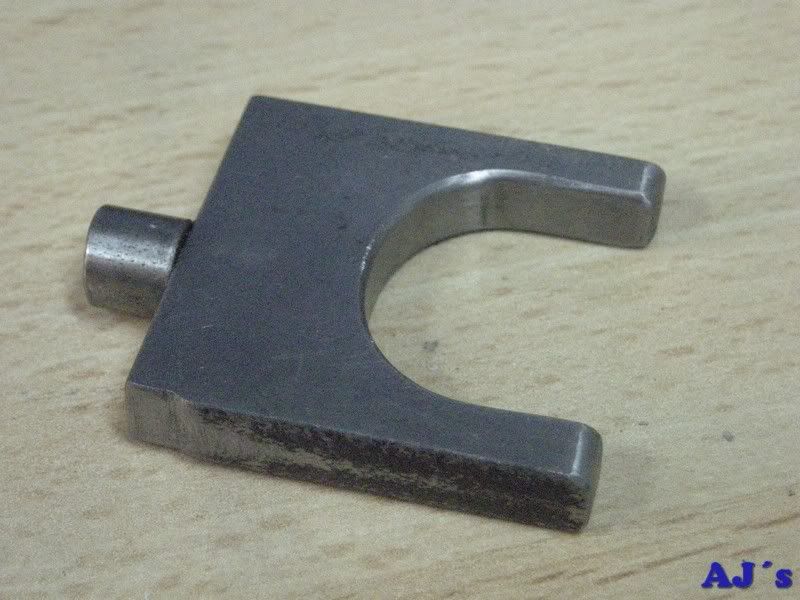
Here it averaged out to 1mm, so I made two 0.5mm ones from alu sheet to go both sides of the gear assm.  Also rounded over the ends of the shift fork to prevent any foul-ups. A small relief was also made in the fork to clear the shift lever shaft.


Hopefully final assembly is next.

Abraham

Offline ozzie46

  • Sr. Member
  • ****
  • Posts: 260
  • Country: us
Re: Trials and tribulations with a 7x12 lathe
« Reply #43 on: June 16, 2011, 07:41:25 PM »


 A very timely thread as I just received the bearings to redo my 7 x 12.

 You're doing a nice job of explaining things.

  Ron

Offline doubleboost

  • Madmodder Committee
  • Hero Member
  • *****
  • Posts: 1619
  • Country: gb
  • Newcastle Upon Tyne
Re: Trials and tribulations with a 7x12 lathe
« Reply #44 on: June 16, 2011, 07:53:35 PM »
This machine will be a credit to you  :clap: :clap: :clap: :clap:
John

Offline andyf

  • In Memoriam
  • Hero Member
  • *****
  • Posts: 1795
  • Country: gb
    • The Warco WM180 Lathe - Modifications
Re: Trials and tribulations with a 7x12 lathe
« Reply #45 on: June 17, 2011, 03:28:27 AM »
If anyone needs the dimensions of the 7x minilathe spindle, Little Machine Shop's drawing is reproduced at http://www.toolsandmods.com/mini-lathe-parts-drawings.html

Andy

Sale, Cheshire
I've cut the end off it twice, but it's still too short

Offline loply

  • Sr. Member
  • ****
  • Posts: 260
Re: Trials and tribulations with a 7x12 lathe
« Reply #46 on: June 17, 2011, 04:45:34 AM »
I believe the original spacers on my spindle were also too small - my replacement bearings were thicker than the originals, yet, I had to make thicker spacers to make them fit with no free play on the gear?

Had me confused for ages, I think it's assembled with the upper gear just loose with a spacer to prevent it moving "too much" but it can move back and forth by a bit. It's quite a tight push fit though.

May explain why they break so easily.

Offline modeldozer

  • Sr. Member
  • ****
  • Posts: 299
  • Country: es
  • Valencia, Spain
    • AJ´s Truckmodeling
Re: Trials and tribulations with a 7x12 lathe
« Reply #47 on: June 17, 2011, 08:19:13 AM »
Thanks guys for the encorragement and link.

Bussy with the assembly, but ran into yet another snag :bang: for some reason once the laysaft is installed the bearings end up so tight it hardly turns.  Lunchtime here so the ivestigation will start later.

Anyone knows where one can find standard press fit data?

Abraham

Offline dsquire

  • In Memoriam
  • Hero Member
  • *****
  • Posts: 2275
  • Country: ca
  • Kitchener, Ontario, Canada
Re: Trials and tribulations with a 7x12 lathe
« Reply #48 on: June 17, 2011, 08:53:15 AM »
modeldozer

I believe that information is in the Machinist Handbook.  :D

Cheers  :beer:

Don
Good, better, best.
Never let it rest,
'til your good is better,
and your better best

Offline modeldozer

  • Sr. Member
  • ****
  • Posts: 299
  • Country: es
  • Valencia, Spain
    • AJ´s Truckmodeling
Re: Trials and tribulations with a 7x12 lathe
« Reply #49 on: June 17, 2011, 06:47:58 PM »
Hi all,

Don, thanks for the reply .

Managed to find the bearing fit data on the SKF website. The lay shaft was 0.01mm oversize causing the bearing inners to expand too much and bind.  Used my pillar drill and some W&D to carefully reduce the diameter.

With the spindle assembled and preloaded I temporarily installed the feed tumbler assembly and main drive to check the length for the rear spacer. Turns out the alignment are good with the current length.


All assembled.


The headgear was then fitted to the bed and the alignment with the bed ways checked.  It has a slight taper both vertical and horizontal (0.04mm over 200mm).  At the moment I am busy adjusting this.


Abraham