Author Topic: Craynerd builds Wilding's - Woodward's Gearless Clock  (Read 133035 times)

Offline raynerd

  • Madmodder Committee
  • Hero Member
  • *****
  • Posts: 2893
  • Country: gb
    • Raynerds Projects - Raynerd.co.uk
Craynerd builds Wilding's - Woodward's Gearless Clock
« on: June 10, 2011, 10:49:58 AM »
Despite not having any pictures for this post, I think it is about time I make an intro to my next project as it is spilling into other threads. I`ve now got the Stuart 10V running very nicely and I`ve recently got the Webster IC Engine running to a seemingly acceptable level (I`m chuffed with it running!!), I`d like to move onto my next project - which actually is the first project I ever started!

Back in 2003/04 the professor and my tutor at Uni was mad into Patek Philippe watches. He clearly must have been on a great wage packet as their cheapest design, the Calatrava starts at many thousands of pounds. He had a couple of calatrava’s as well as a few grand complications!  :drool:  Hoping to one day be on those dizzy heights (don`t worry, those thoughts have now permanently been crushed!) I had a bit of interest. Because Patek make hand made watches they after show images of their production shops and this brought out my hidden engineering interests. Knowing I couldn`t buy a Patek, I purchased some old pocket watches off ebay to take apart (Smiths for those interested). I later found out it must have been total luck, but I managed to fix one and suddenly thought I was a clock maker. I decided to buy a Unimat 3 lathe off ebay that I somehow won at a fantastic price (I made a few hundred pounds on it when I sold it!). I made a few posts on the NAWCC (National Association of Watch and Clock Collectors) forum and a kind chap over in Yorkshire invited me around to see his Unimat 3 mods and how he was setting up for wheel cutting ect.  In his home I noticed an ME article showing John Wilding who had just finished writing his plans for Dr Woodward's Gearless Clock and was posting them in Model Engineer mag.  Being a fool, I ordered all the materials, purchased the copy of ME (which was actually his second post, I`d missed the first episode). I asked my dad for some help and one Saturday morning we drilled 3 mounting holes for the brass back plate and failed when it came to soft soldering 3 washers on the back!!! I realised very quickly that I didn`t have the skills to make a clock and the materials and lathe were sold.

So now in 2011, with a couple of years experience behind me, I`m going to give this another bash! I recently ordered all the brass plate and received this a couple of weeks ago and I`m just waiting on the remaining materials, mainly imperial bar stock to arrive from College Engineering Supplies. I`ve also taken delivery of a length of nylon cord and some 0.006” spring steel. Last week while on holiday, I appreciatively took delivery of some 1/8” ID bearings from Clive off Madmodder! The only material which I managed to miss off my orders was a 12” length of 2” dia steel. I took my Grandma her birthday card on Wednesday evening and asked her if I had left any materials at her house from the clock (they had been storing it before I sold it). She called me up because the piece she had was too heavy – the only thing for some bizarre reason I did not sell was the 2” dia, 12” length of steel – freaky hey?!!

This is the clock:


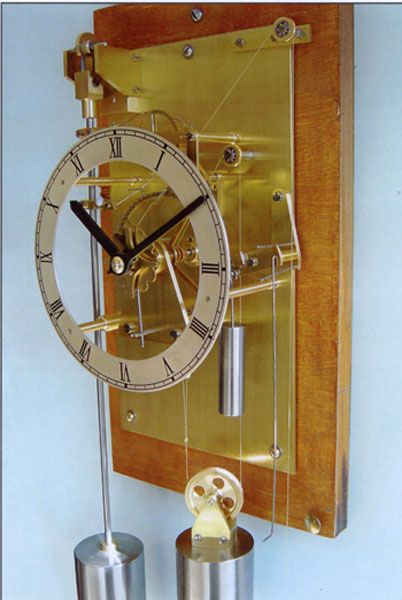
Dr Woodward originally wrote about the design in his book – My Own Right Time. Sadly I just not prepared to pay £40-50 for a copy of ANY book which seems to be what this one dictates. I have of course purchased John Wildings lovely write up of the plans and build process. He mainly cuts the clock using a Unimat, I`ll be following his methods unless I can utilize my small mill to better effect which he doesn`t use.
I should state right away that this build log has be written already by the notorious GadgetBuilder who details fantastically his build of this clock. He has made some excellent modifications of Wiliding’s design, especially the automatic maintaining works. Unfortunately I`m not confident, intelligent or daring enough to deviate from the plans other than a couple of fasteners where I`ll be using metric instead of the specific BA series.  
http://www.gadgetbuilder.com/GearlessClock/Gearless_Clock.html

The clock uses a really unique method to run. A series of colliding pawls, hooks and rods give the pendulum an impulse, with the energy provided by the large weight.

Until I have pics to explain in more detail, the best way I can explain is:
There are two main aspects, the running train and the daisy motion. I`m going to start back-to-front and talk about the daisy motion first. Basically the “clock” mechanism rotates a main arbor once each hour – the minute hand is connected to this. The daisy motion is used to convert that 360 degree hour spin, into a 1/12 of a turn for the hour hand. Here is a youtube video made by gadget builder:


This is a really neat and novel idea allowing you to generate your hour movement from the minute movement – remember, without gears!! The smart thing is, a taper pin is removed and the entire daisy motion mechanics can be removed! This is why I mentioned this first, that just leaves us with the rest of the motion works.

Probably best to look at gadget builders explanation but here goes:
This clock only receives an impulse to the pendulum once every 60 seconds! This means everything involved with the count wheel must be very low on friction. Look at the pendulum and you will find two brackets. The upper one catches a tooth on the count wheel (the top wheel that looks like an escape wheel, NOT the pin wheel) and the pendulum is of such a length that in 60 seconds the count wheel goes around once. I`m wondering if a minute hand could be attached to the countwheel??
You probably can`t see in the photo, but one tooth on the count wheel is slightly deeper than the rest. When the pawl on the pendulum drops into this tooth, it pulls a lever down at the rear of the wheel. This lever has two section a bit like this “ > “ so as the top lever is pulled down anticlockwise, the bottom lever also moves down. This bottom section pushes down on the bottom “impulse pawl” of the pendulum (the pawl connected to the bottom bracket of the pendulum rod). This actually pulls the count wheel (the pin wheel) anti-clockwise for a second but at this point the weight which is wrapped around the count wheel to pull it clockwise, pulls the wheel back clock wise again. Now however, the levers are not bearing down on the impulse pawl (the count wheel pawl is back in a normal small tooth) and it is free to lift up out of the pin it is holding (the pin wheel also moves through a gate and moves forward by one pin, i.e one minute!!!!)  but now the pendulum is at a higher position again – i.e the pendulum has been given an impulse! The pin wheel moves on by one pin every minute and therefore with 60 pins, the pin wheel does one revolution every hour – the minute hand!
Add the daisy motion to this and you have your minute and hours!

I`m not going to rush this but to be honest, with no gears the parts don`t look overly complex so I expect to make good progress. I expect like I have experienced with my Webster IC, most of the time will be in the troubleshooting, getting it to run!
Pictures will hopefully be following!

Chris


Rob.Wilson

  • Guest
Re: Craynerd builds Wilding's - Woodward's Gearless Clock
« Reply #1 on: June 10, 2011, 12:08:26 PM »
Hi Chris


Good read mate ,,,,,,,,,,,,, look forward to seeing you make this clock  :med: ,,,,,,,,,,,, interesting project  :dremel:


Rob

Offline raynerd

  • Madmodder Committee
  • Hero Member
  • *****
  • Posts: 2893
  • Country: gb
    • Raynerds Projects - Raynerd.co.uk
Re: Craynerd builds Wilding's - Woodward's Gearless Clock
« Reply #2 on: June 12, 2011, 02:20:16 AM »
Thanks for your reply Rob. Probably a bit boring story but just thought I`d tell my little tail of why I`m building this engine.  

It is also worth adding that I know I started Colin Thornes Skeleton clock some time ago but I also started that too early and lacked skills and patience and I now realise that most of it needs remaking. I`d rather get a bit more experience before I restart that again and this gearless gets away from cutting any more pesky gears - although feel confident with gears when I next need to cut some (those on my Webster engine work a treat!)

OK, here are some photos for you. Most materials and then the first few pics of swarf.

This is the brass sheet required for the construction along with Wildings build book, some spring steel and the nylon chord.


Just some proof of the validity of my story about the 2" dia steel bar coming from my original purchase of these materials. I don`t know why I never sold this piece and equally don`t know why I didn`t order this piece when I re-ordered the materials last week. Freaky.... notice the news paper it is wrapped in - 2004!


Here is the paxalon rod and the Invar. I think I was talking rubish in a post made here : http://madmodder.net/index.php?topic=4987.0   I don`t think the paxalon is for the pendulum rod   ooops sorry!  :palm:  I`ll be using my Invar now I`ve got it anyway.


The rest of the materials - lots of imperial bar stock is on order still from College Engineering Supplies. It has been a week now but I`m guessing the order is quite fiddly with lots of different sizes in small quantities. Hopefully it`ll arrive this coming week.

So I made a start. The first job is to simply prepare the back plate which was £22 of brass! The plate is 9" x 6" but the material is 13-14" x 6.1" as the excess is used for something else. First job was to cut off the excess. I prefer to spend time setting it up on my mill and cut it that way as it leaves a good finish and I prefer it to sawing., besides my saw wouldn`t cut all the way so I`d need to meet from either side which would be doomed to failure. This worked really well using the brass square section to clamp it onto a pair of parallels.


I filed the edges square which took a while but worked really well, nice and square. The file is slowly becoming my friend!


The next job was to drill three 5/32" mounting screw holes, 2 at the bottom and 1 at the top and then soft solder some 1/16" thich washers to the back of the plate to lift it away from the mounting board when screwed down. I didn`t have any 1/16" washers and although it isn`t critical, I decided to make some. Here it is soft soldered and quickly tidied up. Needs a little more work to remove a little excess solder but has turned out well so far.


Next job is to make the pendulum mounting bracket.


Offline Stilldrillin

  • Global Moderator
  • Hero Member
  • *****
  • Posts: 4972
  • Country: gb
  • Staveley, Derbyshire. England.
Re: Craynerd builds Wilding's - Woodward's Gearless Clock
« Reply #3 on: June 12, 2011, 04:30:30 AM »
Chris.
I don't understand clocks, and such.......  ::)

But, this looks a cute little (?) project!  :D

Good  luck with it!  :thumbup:

David D
David.

Still drilling holes... Sometimes, in the right place!

Still modifying bits of metal... Occasionally, making an improvement!

Offline spuddevans

  • Global Moderator
  • Hero Member
  • *****
  • Posts: 1618
  • Country: 00
  • Portadown, Northern Ireland
    • My Photo website
Re: Craynerd builds Wilding's - Woodward's Gearless Clock
« Reply #4 on: June 12, 2011, 04:35:46 AM »
I'm watching this with great interest, I hope to build a clock as my next project.

Tim
Measure with a micrometer, mark with chalk, cut with an axe  -  MI0TME

Offline raynerd

  • Madmodder Committee
  • Hero Member
  • *****
  • Posts: 2893
  • Country: gb
    • Raynerds Projects - Raynerd.co.uk
Re: Craynerd builds Wilding's - Woodward's Gearless Clock
« Reply #5 on: June 12, 2011, 05:34:10 AM »
David, in my opinion this very much is a engineers clock - no gears and lots of colliding leavers!

Tim - that excites me a lot, I like your work, your photos and your build logs, so that will be interesting. Despite getting no-where in the build, I still think Collin Thornes Skeleton Timepiece is a lovely clock however it is just plans and no build journal and guidance as Wildings clocks all have. That being said, his book that I reviewed a while ago on here, I forget its name, I think Clock Making for the Model Engineer is excellent and complements the plans. Now you have mentioned it, I`ll be  :poke: :poke: you until it is started....certainly after your V engine is finished!

Chris

Rob.Wilson

  • Guest
Re: Craynerd builds Wilding's - Woodward's Gearless Clock
« Reply #6 on: June 12, 2011, 05:41:04 AM »
Probably a bit boring story but just thought I`d tell my little tail of why I`m building this engine.  

Not at all Chris  :med: :thumbup:

Do the weights get plated ? 

Rob

Offline raynerd

  • Madmodder Committee
  • Hero Member
  • *****
  • Posts: 2893
  • Country: gb
    • Raynerds Projects - Raynerd.co.uk
Re: Craynerd builds Wilding's - Woodward's Gearless Clock
« Reply #7 on: June 12, 2011, 07:56:57 AM »
I`ve read the plans and build notes through a few times and I`m pretty sure I`ve not read that they do. I`d be interested to know what makes you say that ?

Chris

Offline DaveH

  • Hero Member
  • *****
  • Posts: 1413
  • Country: za
  • Kempton Park, South Africa
Re: Craynerd builds Wilding's - Woodward's Gearless Clock
« Reply #8 on: June 12, 2011, 08:02:37 AM »
Chris,

I quite like this, no gears my type of clock. :D

Haven't a clue how it all works :scratch:  but as the build proceeds I'm sure I will be enlightened  :D

I could do with being a bit lighter :D

 :beer:

DaveH
(Ex Leicester, Thurmaston, Ashby De La Zouch.)

Offline raynerd

  • Madmodder Committee
  • Hero Member
  • *****
  • Posts: 2893
  • Country: gb
    • Raynerds Projects - Raynerd.co.uk
Re: Craynerd builds Wilding's - Woodward's Gearless Clock
« Reply #9 on: June 12, 2011, 10:37:15 AM »
Dave, it took me hours of reading the same 2 pages of the book and then even a video that gadgetbuilder kindly posted for me on request that I managed to figure it out.

I hope to take lots of pictures in this build. I don`t know if you noticed but in my last few builds I`ve been a bit reluctant to post pictures of my actual machining as was worried about what people think of my methods. I feel more confident now and to be honest, I`ve spoke to so so many older engineers who do things totally different to how everyone says that I`m quite happy showing my methods as long as I`m safe. If people can give me better ways of doing things then great and I will take it on board, but by that time the part will be made anyway....

The point is, hopefully I`ll slowly build the main train on the back plate and you should see how it works. One of my aims is to try and explain the mechanism as it is put together.

Chris

Offline DaveH

  • Hero Member
  • *****
  • Posts: 1413
  • Country: za
  • Kempton Park, South Africa
Re: Craynerd builds Wilding's - Woodward's Gearless Clock
« Reply #10 on: June 12, 2011, 01:02:02 PM »
Chris,

Thanks, I will look forward to it. :D

There are always many many right ways of doing something, if the job comes out right, then you did it the right way. :D

Think safe - you will be fine :D

 :beer:

DaveH
(Ex Leicester, Thurmaston, Ashby De La Zouch.)

Rob.Wilson

  • Guest
Re: Craynerd builds Wilding's - Woodward's Gearless Clock
« Reply #11 on: June 12, 2011, 04:18:24 PM »
I`ve read the plans and build notes through a few times and I`m pretty sure I`ve not read that they do. I`d be interested to know what makes you say that ?

Chris

Hi Chris ,,,,,,,,,,,,,, its just they look very shiny in the photo ,,,,,,,,,,,,  :)


Rob 

Offline raynerd

  • Madmodder Committee
  • Hero Member
  • *****
  • Posts: 2893
  • Country: gb
    • Raynerds Projects - Raynerd.co.uk
Re: Craynerd builds Wilding's - Woodward's Gearless Clock
« Reply #12 on: June 12, 2011, 06:47:53 PM »
I did notice that, just presumed it was elbow grease!


Got a little more done this past hour or so as I couldn`t sleep. With the back plate now ready to hold some new parts, the first one is the pendulum bracket. I cut a couple of pieces of 1/8" brass sheet and used double sided tape to secure them together. Machined them square and started profiling them


Still together I drilled the support holes and filed the top suspension "V", finally separating them:


I then machined up the centre piece and now I`m left here:


Wilding now says to clamp these side piece together to the centre piece to drill through and tap so they can be secured. It is late and I`m tired, but I had to stop here because I couldn`t get my head around a method to do this. I only have large clamps over 1" and so any clamp would cover the holes. I could really do with a narrow clamp large enough to go around the whole unit but narrow enough to fits between both holes so they can be done in one sitting. Damn - I hate it when I don`t have the required tooling. I normally always get away with things, they either fit in my small 1" clamp or I can get them with my larger clamps...... hummm...can`t think of any other way of holding it all together and square!

Until tomorrow.....

Chris


Offline Bernd

  • Madmodder Committee
  • Hero Member
  • *****
  • Posts: 3688
  • Country: us
  • 1915 C Cab
    • Kingstone Model Works
Re: Craynerd builds Wilding's - Woodward's Gearless Clock
« Reply #13 on: June 12, 2011, 07:45:18 PM »
Chris,

Don't know what you'd call them over there, but have you got a pair of visegripes? (locking pliers). They may have a narrow enough jaw on them to go between the holes.

Bernd
Route of the Black Diamonds

Offline 75Plus

  • Hero Member
  • *****
  • Posts: 624
  • Country: us
Re: Craynerd builds Wilding's - Woodward's Gearless Clock
« Reply #14 on: June 12, 2011, 08:49:42 PM »
Since the holes in the plates were drilled while they were stuck together the holes should be in identical locations. If this is the case the then with the center piece secured in the mill vise one plate can be used as a guide to drill thru it. This would solve the clamping problem.

Joe

Offline raynerd

  • Madmodder Committee
  • Hero Member
  • *****
  • Posts: 2893
  • Country: gb
    • Raynerds Projects - Raynerd.co.uk
Re: Craynerd builds Wilding's - Woodward's Gearless Clock
« Reply #15 on: June 13, 2011, 02:10:26 AM »
Thanks for the suggestions. 75 Plus, although they are identical, I just wanted them in position so I know they were all square. The important thing is that the V grooves line up 1 1/4" from the plate. I may be well use some visegrips or at least see how they "feel". Otherwise I`m going to have to simply use them as a template in turn.

Chris

Offline Anzaniste

  • Full Member
  • ***
  • Posts: 207
  • Country: gb
Re: Craynerd builds Wilding's - Woodward's Gearless Clock
« Reply #16 on: June 13, 2011, 02:28:04 AM »
If you go for the vice grips I suggest you use soft packings to avoid marking your lovely shiny brass bits.
Scrooby, 1 mile south of Gods own County.

Offline raynerd

  • Madmodder Committee
  • Hero Member
  • *****
  • Posts: 2893
  • Country: gb
    • Raynerds Projects - Raynerd.co.uk
Re: Craynerd builds Wilding's - Woodward's Gearless Clock
« Reply #17 on: June 13, 2011, 04:02:15 AM »
Thanks Anzaniste ... I`ve been having to use some small brass strips that I`ve cut and rounded the edges of to hold all my brass sections so far. The brass had backing plastic on it but it was uneven and you just couldn`t mark out with it on so that has been removed leaving the brass exposed. The little brass packings have been working well so far and I found that the brass is very soft cutting so obviously the vice has to be tight but not tightened to death!!

I`ll let you know how I get on.

Chris

Offline NickG

  • Madmodder Committee
  • Hero Member
  • *****
  • Posts: 1890
Re: Craynerd builds Wilding's - Woodward's Gearless Clock
« Reply #18 on: June 13, 2011, 07:45:42 AM »
Nice 1 Chris, you're on a roll!

I'll be watching this one too then!

Nick
Location: County Durham (North East England)

Offline kvom

  • Hero Member
  • *****
  • Posts: 520
Re: Craynerd builds Wilding's - Woodward's Gearless Clock
« Reply #19 on: June 13, 2011, 08:10:33 AM »
You might try some loctite to secure the pieces temporarily while drilling.  Then some heat to release.

Offline raynerd

  • Madmodder Committee
  • Hero Member
  • *****
  • Posts: 2893
  • Country: gb
    • Raynerds Projects - Raynerd.co.uk
Re: Craynerd builds Wilding's - Woodward's Gearless Clock
« Reply #20 on: June 13, 2011, 06:40:53 PM »
Hi Chaps, sorry Kvom, only just read your reply. Yes, I`ve never used locitite as a temporary clamp, however have started using double sided tape for large flat parts as recommended on here and that works well.

I couldn`t use the grips they would`t go wide enough and wouldn`t clamp is square. Some how seemed to pull it up at the back. I decided to run around to my mates to borrow one and was in luck:


I then aligned it square:


And now it sits nice and square in the top corner - the first part mounted on the backing plate!


Next onto the pendulum suspension....


Offline Bernd

  • Madmodder Committee
  • Hero Member
  • *****
  • Posts: 3688
  • Country: us
  • 1915 C Cab
    • Kingstone Model Works
Re: Craynerd builds Wilding's - Woodward's Gearless Clock
« Reply #21 on: June 14, 2011, 09:44:26 AM »
Kris,

I think your next porject after finishing this clock would be a few sets of those "machinist clamps".  :dremel:  :beer:

Bernd
Route of the Black Diamonds

Offline DaveH

  • Hero Member
  • *****
  • Posts: 1413
  • Country: za
  • Kempton Park, South Africa
Re: Craynerd builds Wilding's - Woodward's Gearless Clock
« Reply #22 on: June 14, 2011, 10:03:29 AM »
Chris,

That's to way to do it! :D

Good start.

 :beer:

DaveH
(Ex Leicester, Thurmaston, Ashby De La Zouch.)

Offline raynerd

  • Madmodder Committee
  • Hero Member
  • *****
  • Posts: 2893
  • Country: gb
    • Raynerds Projects - Raynerd.co.uk
Re: Craynerd builds Wilding's - Woodward's Gearless Clock
« Reply #23 on: June 14, 2011, 06:41:51 PM »
I think you are right Eric!  :doh:

I managed to make the lower pendulum clamping bracket this evening which was a really nice combination of milling and turning. The part will hang off the bracket I made earlier with the pendulum rod screwed into the bottom.

I started with a rough cut 1. 1/2" length of .5" square brass and milled a 1/4" slot at the end.


I then rought cut a 1/4" piece of guage plate, milled one side flat, butted it upto the edge of the groove I`d just cut, clamped together and bolted it through:


Tidied each side up in turn, stopping just short of the brass width:


I then transfered the  work to the 4 jaw and centred it. I drilled the end 2.BA for the pendulum rod and turned down the square to round (I think this is just for looks)


Finally finished with a countersink on the clamping steel and used a nice 4BA screw. Here is the part finished:


The spring still is clamped between the brass and steel sections. The other end connects to the pendulum rod. Tomorrow I`ll try and get some done on the spring steel and top clamp...

Offline doubleboost

  • Madmodder Committee
  • Hero Member
  • *****
  • Posts: 1619
  • Country: gb
  • Newcastle Upon Tyne
Re: Craynerd builds Wilding's - Woodward's Gearless Clock
« Reply #24 on: June 14, 2011, 06:51:58 PM »
Looking good Chris
You often find toolmakers clamps on EBAY very handy bits of kit (easy to make as well)
John