Author Topic: a Jerry Howell "duplex vacuum" stirling engine build  (Read 22925 times)

Offline madjackghengis

  • Hero Member
  • *****
  • Posts: 717
  • big engine
a Jerry Howell "duplex vacuum" stirling engine build
« on: September 29, 2011, 01:36:51 PM »
Some time ago, I was admiring someone's build of a very nice looking stirling cycle engine, and on inquiry, was given the name of Jerry Howell, and with an exchange of money for prints, I got the plans.  It's been so long I've forgotten when I got them, but after fiddling around with some flame suckers, I decided it was time to build something I'd paid good money for the plans, and it was time to build a stirling.  This engine is a "beta" type, with the power piston and the displacer working in the one cylinder, and like most of my engines, it will definitely digress from the plans, as I always seem to run across material which will work, but isn't exactly the size or shape the plans call for, yet I'd rather not buy material when I have a suitable substitute in my shop stock.
   As usual for me, I started with the cylinder, and of course the deviation started right there.  The stock list calls for an inch and a half square piece of stock, and what I had was a piece of inch and 3/4ths round, so I chucked a piece of it in a three jaw, set up the tailstock and drilled a center hole, and started with cutting fins on the blank, and going with a piece of brass tube pressed and locktited in place for the graphite piston to slide on.


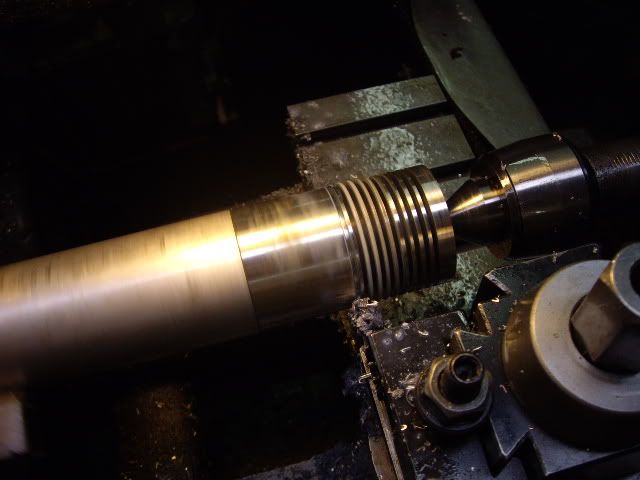
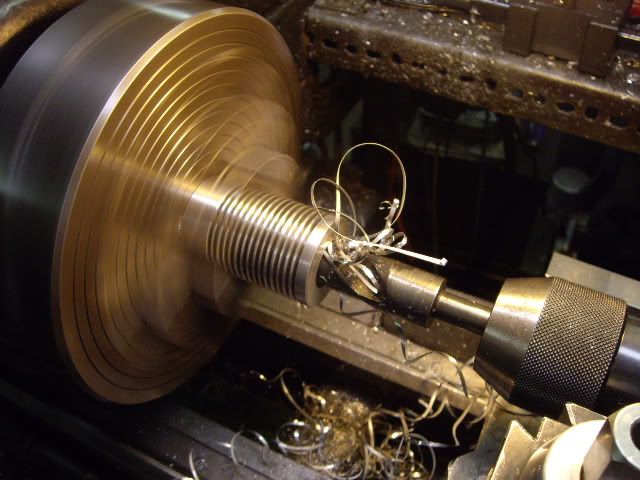
This is the stock as I start making fins, using a .093 cut off blade with the end tapered and radiused.  The stock is cleaned up at 1.720 for a nice finish before starting the fins.


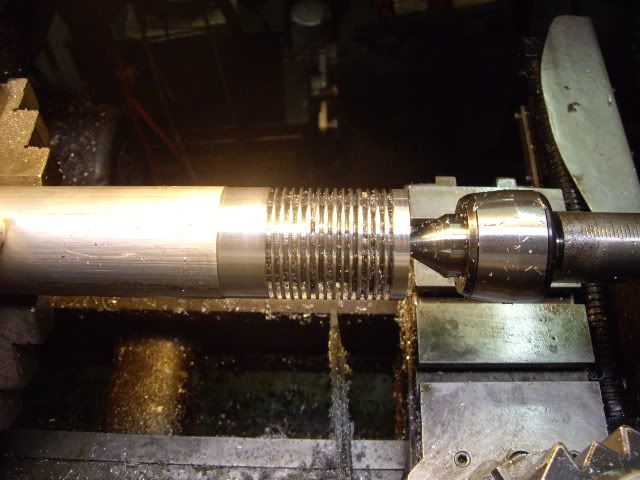
finishing up the fins, about ready for cutting off, I just have to round over the fins with a triangular file and I'm done with this part.


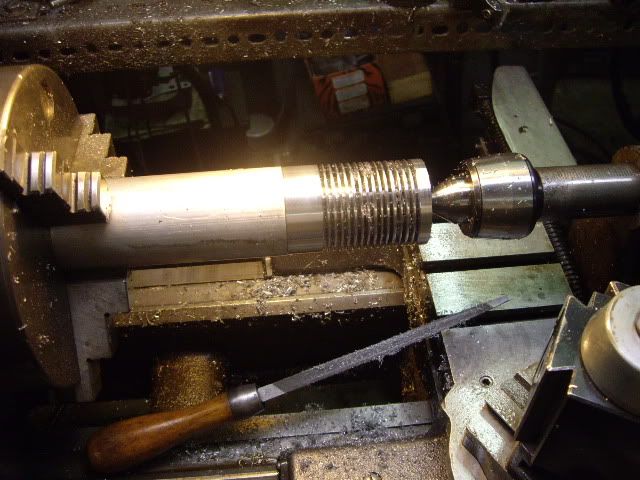
ready to cut off, nice shiny round edged fins, done rather easily with just rolling the file from one fin to the next, hitting first one side and then the next.


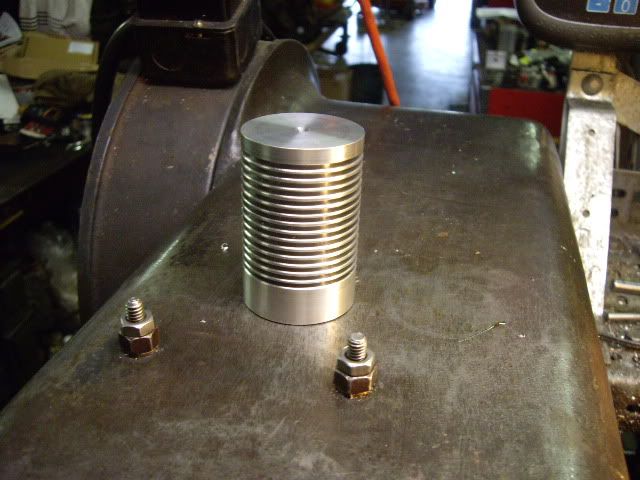
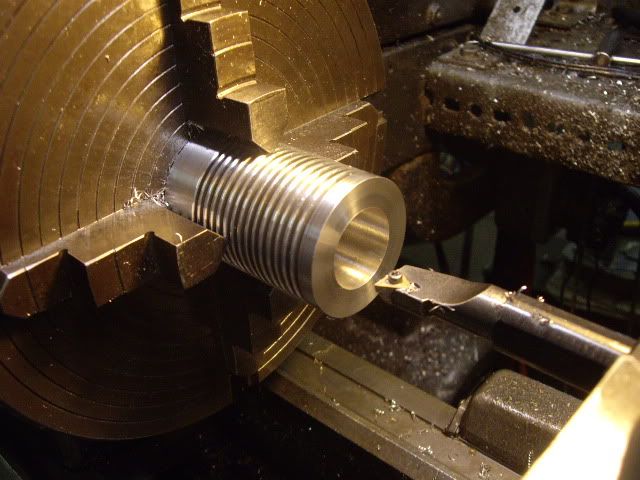
Cylinder cut off, ready for boring for the brass liner.


I tried the cylinder in the three jaw, but didn't like six thousandths runout, so its in a four jaw, and step drilled up to 15/16ths, to be bored for 1 inch brass tube, laying around, not the 3/4 it's supposed to have, but things have a way of working out anyway.


Bored to size, I smeared loctite inside the cylinder and outside the brass liner, and put it in the press.  Unfortunately, the sleeve stopped about a quarter of an inch short, but the cylinder is slightly long on purpose, so I cut off the excess brass sleeve, and put the cylinder back in the four jaw, and centered it up to bore the brass liner.


Taking a final pass as my finest power feed, the bore is somewhere about .921 with about half a thousandth of taper which will get lapped out later.  For now, I have to make some adjustments in the plans because my cylinder puts the stanchion holes in different locations, and I have to use some angle stock rather than plain 1/4 flat stock.


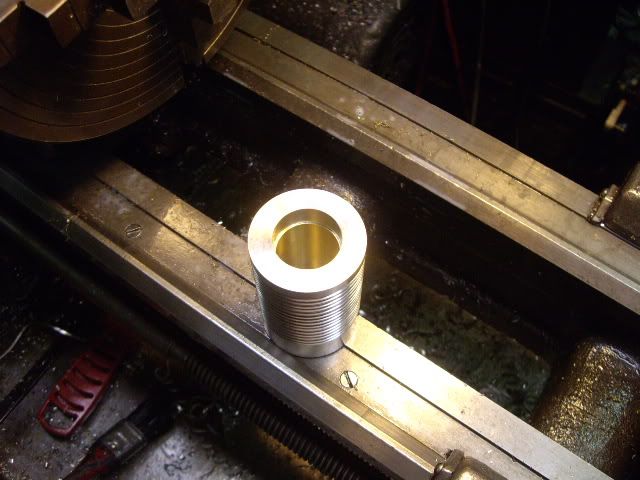
cylinder bored, ready to clean out.


sitting on the bench, you can see the shortfall of my pressing action, and the gap left, this will be filled with the upper part of the stainless heat cap, mostly and with insulation and won't interfere with piston or displacer travel.


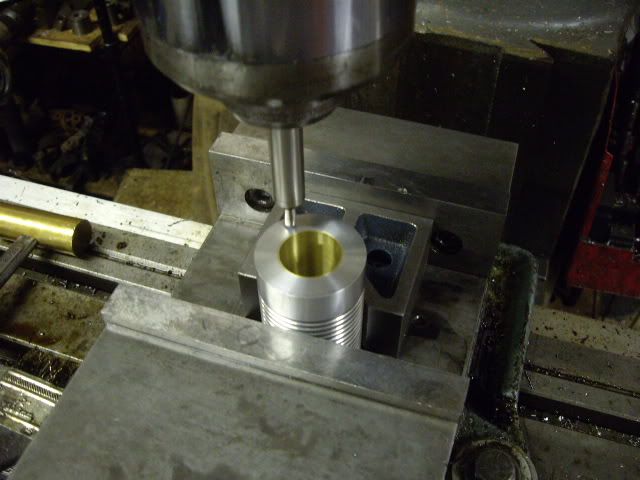
With the cylinder in a V block clamped in my milling vise, I centered the cylinder with a wiggler, and set up for four holes to affix the stanchion to.


Four holes, center drilled, drilled and tapped for 10-24 screws, now some calculations to put the stanchions for the mainshaft and operating levers in proper relationship.


holes done, sitting next to the piece of channel I will cut the stanchion parts from, the angle gives me metal to move the sides out from center, distance lost by using the round stock versus the square.  It is split down the middle, and the two halves clamped together in the milling vise, the width of the base milled, taking equal amounts off both sides, then the holes will be drilled for the screws to hold them to the cylinder.


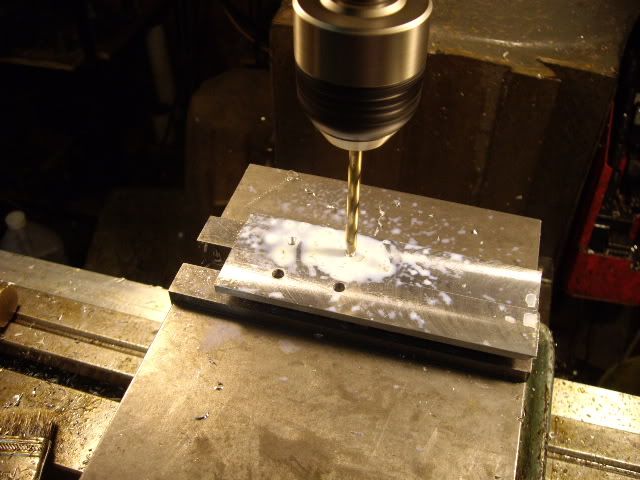
holes located from the edge with a wiggler, then center drilled, and drilled clearance size for the #10 screws


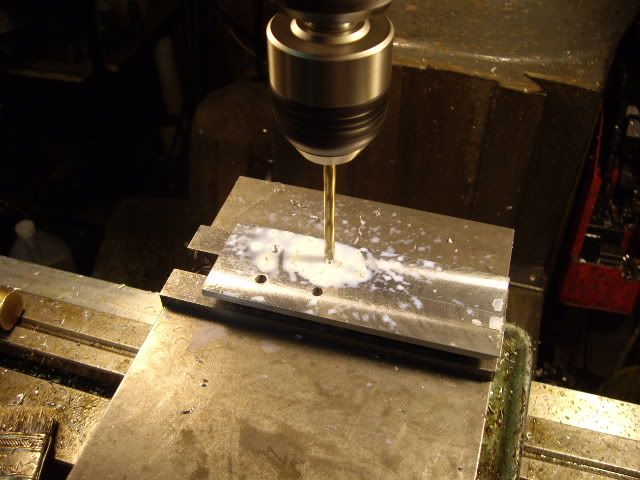
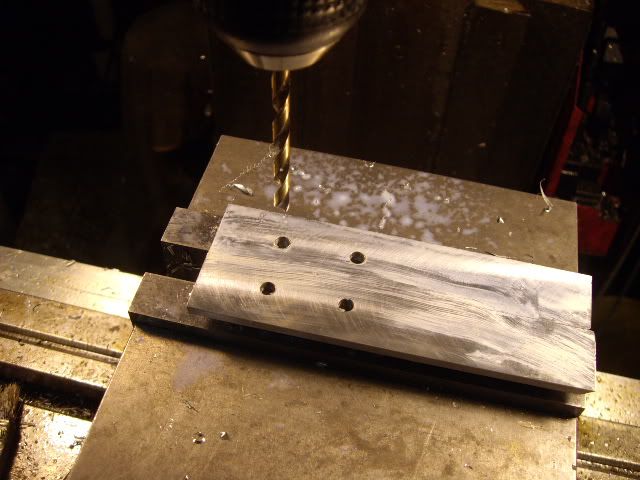
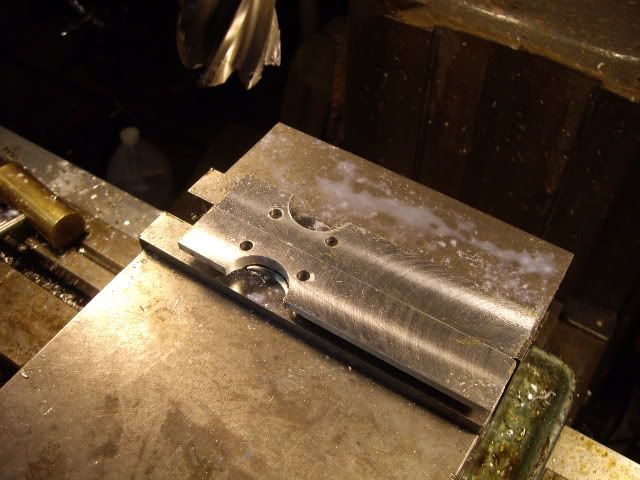
holes completed, now it's time to clear space for the rod and actuating arms to work through.


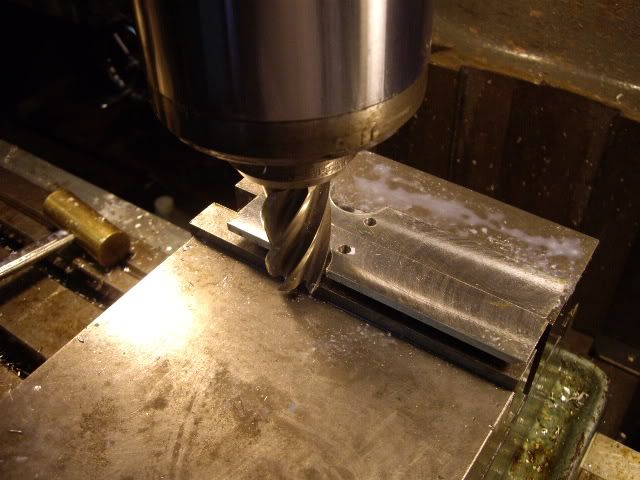
I used a 1 in end mill, and centering it between the holes, used it as a bore, taking a .100 bite at a time until I'd gone in .500 from the edge, and then touched off the opposite side, and did the same thing, with the stock being clamped by the uprights which will serve as the stanchions.


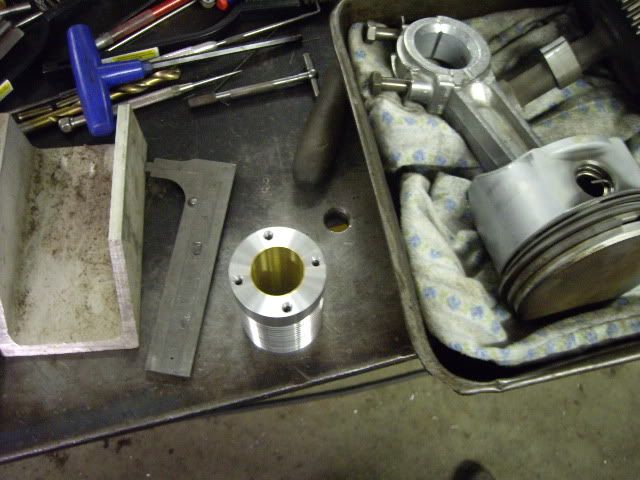
here you can see the cut-outs which will encircle the cylinder when bolted in place.


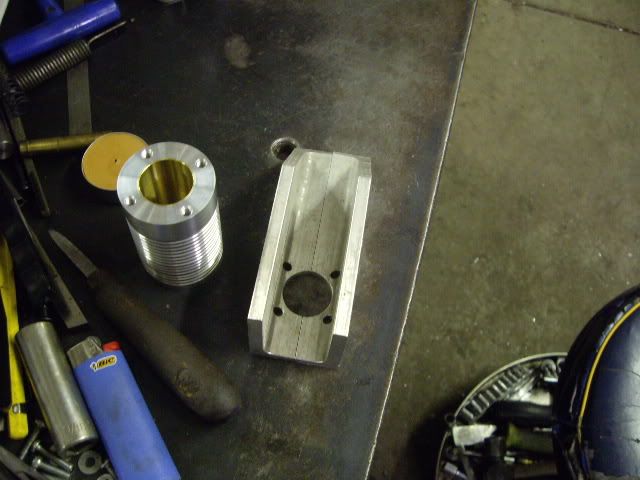
here is the cylinder, next to the two pieces of angle which are in the position they will finally be in, after all the excess is removed, and they look like stanchions.  The box next to them is the engine of my lawn tractor which got filled with water with our last flood, and is being rebuilt after drying out.  I hope this build log is as enjoyable to others as so many have been to me.  Cheers, mad jack


Offline shipto

  • Hero Member
  • *****
  • Posts: 809
  • Country: gb
  • Redditch, UK
Re: a Jerry Howell "duplex vacuum" stirling engine build
« Reply #1 on: September 29, 2011, 01:51:15 PM »
nice work so far, I will be watching this with interest.
I have been trying to make one of the simple coffee cup ones but have not had any luck so far.
Turns out this life c**p is just one big distraction from death but a good one. For the love of god dont give yourself time to think.
https://myshedblog.wordpress.com/

Offline arnoldb

  • Hero Member
  • *****
  • Posts: 515
  • Country: na
  • Windhoek, Namibia
Re: a Jerry Howell "duplex vacuum" stirling engine build
« Reply #2 on: September 29, 2011, 03:16:07 PM »
Good start Jack  :thumbup:

Though that piston you have in the one photo appears a bit too big to use  :lol:

 :beer:, Arnold

Offline dsquire

  • In Memoriam
  • Hero Member
  • *****
  • Posts: 2275
  • Country: ca
  • Kitchener, Ontario, Canada
Re: a Jerry Howell "duplex vacuum" stirling engine build
« Reply #3 on: September 29, 2011, 05:13:04 PM »
Jack

Great presentation Jack. I love the way you attack a new build and use what is at hand that will do the job. That is a skill that more people need to learn as it can save a lot of $$ and lead to new experiences.

I hope the flood damage was not to bad but I imagine that you will be repairing a lot of things that others would be tossing. All the best Jack, I'll be watching for the next episode. 
:D :D

Cheers  :beer:

Don

Good, better, best.
Never let it rest,
'til your good is better,
and your better best

Offline doubleboost

  • Madmodder Committee
  • Hero Member
  • *****
  • Posts: 1619
  • Country: gb
  • Newcastle Upon Tyne
Re: a Jerry Howell "duplex vacuum" stirling engine build
« Reply #4 on: September 29, 2011, 05:18:40 PM »
Nicely done
Great photos thanks for posting them
Looking forward to more :thumbup: :thumbup:
John

Offline sbwhart

  • Global Moderator
  • Hero Member
  • *****
  • Posts: 3530
  • Country: gb
  • Smile, Be Happy, Have Fun and Rock Until you Drop
Re: a Jerry Howell "duplex vacuum" stirling engine build
« Reply #5 on: September 29, 2011, 05:26:39 PM »
Nicely done
Great photos thanks for posting them
Looking forward to more :thumbup: :thumbup:
John

I'll double up on that Jack

 :D

Looking real good.  :thumbup:

Stew
A little bit of clearance never got in the road
 :wave:

Location:- Crewe Cheshire

Offline saw

  • Hero Member
  • *****
  • Posts: 1003
  • Country: se
  • lucky amateur
    • Svenssons AckordsWerkstad
Re: a Jerry Howell "duplex vacuum" stirling engine build
« Reply #6 on: September 29, 2011, 05:28:25 PM »
Nice work, you are an fast man  :clap: :clap:
_________________________
Greetings / Benni
http://myprojecty.wordpress.com/category/steam-engine/

Offline Dean W

  • Hero Member
  • *****
  • Posts: 571
  • My kingdom for a lathe!
    • Projects web pages
Re: a Jerry Howell "duplex vacuum" stirling engine build
« Reply #7 on: September 29, 2011, 07:02:14 PM »
You're off to a great start there, Jack.  Nice pics, too!
These are a good running engine, and the late Mr. Howell did his homework for us.  I built one
a while back, and it runs for me every time I ask it.  I'll be watching and re-living the build!

Dean
Dean W.

Shop Projects:
http://www.deansphotographica.com/machining/projects/projects.html

Praise the Lord and pass the Carbide!

Offline lazylathe

  • Jr. Member
  • **
  • Posts: 54
  • Mastering the art of reducing metal into swarf!
Re: a Jerry Howell "duplex vacuum" stirling engine build
« Reply #8 on: September 29, 2011, 09:04:04 PM »
A fine start!!! :thumbup:
I will be watching and learning a lot from this build!!! :smart:

Andrew

Offline NickG

  • Madmodder Committee
  • Hero Member
  • *****
  • Posts: 1890
Re: a Jerry Howell "duplex vacuum" stirling engine build
« Reply #9 on: September 29, 2011, 10:40:02 PM »
Nice work Jack, I'll definitely be watching this one. I am tempted to try another stirling next as I've all but finished my other poppin.

Shipto, you've started with the most difficult type ... the LTD's are a bit of a pain to get to run. I tried making a tiny LTD which ended in tears too, need to revise the design and try again! May be better trying one with a proper burner if it's your first?

Nick
Location: County Durham (North East England)

Offline madjackghengis

  • Hero Member
  • *****
  • Posts: 717
  • big engine
Re: a Jerry Howell "duplex vacuum" stirling engine build
« Reply #10 on: September 30, 2011, 09:45:12 AM »
Thanks for all the encouragement and kind words my friends, it is almost as good as a visit, and far better than it was before we could share like this.  Didn't get a lot more done, but did move forward some, and got some figuring done.


I took a piece of ali plate which happened to have four holes in the same place as the top of my cylinder, screwed the cylinder to it, and squared it up in the mill vise so I could drill the holes for attaching it to the base and closing off the hot end later.  I'm having to "manage" the screw holes because I've got a .921 bore, and the plans call for a .750 bore, but I figure the engine should be more inclined to rpm than torque with a larger bore and the same stroke.  I chose a piece of brass tubing from a water closet valve, which is an inch o.d., because it was in my scrap box, and I didn't want to turn a piece of solid bar stock into tubing.


The stanchion holes are #10-24, so I chose eight #4-40's for closing the bottom, probably overkill, but I'm hoping to have a good enough seal to put a small pressure pump to self-presurize the engine once it's operational.


eight drilled and tapped 4-40 holes, ready to go back to the lathe to get counterbored for the insulation around the stainless hot end, which will go in this end.


Here is one side of one of the stanchions, the scribed circle toward the top will take a ball bearing in each, with an oiler, and the scribed circle on the right end, will carry the shaft, in bronze bearings, which will actuate the displacer piston.  With the two sides being pieces of angle, and the scribing on the outside, I believe I will clamp them together for the basic holes to get them perfectly lined up, and then bore each separate, to avoid losing alignment trying to bore across the width of the cylinder.  That's about all I got done yesterday as I didn't take pictures of washing lawnmower engine parts, I'm just amazed that an engine so old and hard used can wash in a tank and look like new with hundreds of hours on it.  Hopefully I can get the stanchions drilled and reamed, and maybe got a start on lapping the cylinder.  I want to try to get it straight and round within a ten of a thousandth, so I can fit the piston that tight.  The bore of the brass cylinder lining looks very smooth, but will show up quite different once some cross-hatch is introduced, but brass laps and polishes very well and quickly.  By the way, this one should be fairly easy to get running as it does run off a an alcohol flame or a butane flame.  When I get to my LTD stirling, I intend to try I believe it was Nick's suggestion of a rice cake?, in any case, I like that idea, as they certainly aren't made to eat.  I'm saving that project for some bit more practice lapping.   :nrocks: :bugeye: :beer:  Cheers, all, thanks for the inspiration.  mad jack

Offline Stilldrillin

  • Global Moderator
  • Hero Member
  • *****
  • Posts: 4972
  • Country: gb
  • Staveley, Derbyshire. England.
Re: a Jerry Howell "duplex vacuum" stirling engine build
« Reply #11 on: September 30, 2011, 10:38:00 AM »
Hey Jack!  :wave:

You got away before I was ready!  ::)

Nice to see you are producing, and showing in your usual manner and speed.  :clap: :clap: :thumbup:

I'm on board and watching, now. Keep 'em coming.....  :D

David D
David.

Still drilling holes... Sometimes, in the right place!

Still modifying bits of metal... Occasionally, making an improvement!

Offline madjackghengis

  • Hero Member
  • *****
  • Posts: 717
  • big engine
Re: a Jerry Howell "duplex vacuum" stirling engine build
« Reply #12 on: September 30, 2011, 12:13:53 PM »
You're off to a great start there, Jack.  Nice pics, too!
These are a good running engine, and the late Mr. Howell did his homework for us.  I built one
a while back, and it runs for me every time I ask it.  I'll be watching and re-living the build!

Dean
Hi Dean, Nick, Still and all, if I'm not mistaken Dean, it was your build that got me onto this engine, and you gave me Jerry's address to get the plans from.  I'm happy to know it's still running great.  I have high hopes.  I appreciate the thoughts on flood damage, but if you live on a creek, you have to live with high water times, and I wouldn't give up my corner of the woods for less than about half a ton of russian ammo, and my life.  I'm happy to have such a forum to share with it is both an honor and a privilege. mad jack

Offline madjackghengis

  • Hero Member
  • *****
  • Posts: 717
  • big engine
Re: a Jerry Howell "duplex vacuum" stirling engine build
« Reply #13 on: October 02, 2011, 11:44:04 AM »
Hi all, I haven't got a whole lot more done, but a little bit, so I'll post it now, and keep it simple.  I took the blued and scribed stanchion and clamped it in my mill vise, with a parallel under it to get it aligned, and center drilled it, then drilled just an 1/8th inch hole at each location, so I can find them when I put this piece face down against the other side, to locate the holes in it accurately.


center drilling the first hole, then following with the 1/8th in drill


drilling through the second hole, which is the crank bearing hole, and will be bored out for the race once both sides are drilled.


having drilled through both holes, the scribed side is removed, aligned with the second half, which must go underneath, and using the mounting holes, the two sides are aligned for drilling through.


The second hole will carry the displacer arm shaft, so it is step drilled and then reamed out .312 for bronze bushings.


with the second hole drilled and reamed, the first hole is now bored out to .375 for the ball bearing, .125 deep on the inside of the stanchion, first cut.


after a couple more cuts, the counter bore is on size, and now this side is removed, and the second side taken out from underneath and flipped, to show off its inside for its proper boring.


having knocked the blank down onto a parallel, the first boring cut is taken.


A couple more cuts, measuring, and this counterbore is on size and depth, now it is time for the excess to be cut out, and the stanchions will take their actual shape and place in the next installment.


The two stanchions, showing both the side scribed for cutting out, and the reamed holes for the displacer arm, and the counter bore of the far side, visible now.  I think the next time will have to have the stanchions fit, and start working on lapping, so I can turn a piston and put in a crank.  Ta ta for now,  :beer:  Cheers, mad jack

Offline sbwhart

  • Global Moderator
  • Hero Member
  • *****
  • Posts: 3530
  • Country: gb
  • Smile, Be Happy, Have Fun and Rock Until you Drop
Re: a Jerry Howell "duplex vacuum" stirling engine build
« Reply #14 on: October 02, 2011, 01:44:36 PM »
Neat:- Very Neat

 :thumbup: :thumbup: :thumbup: :thumbup:

Stew
A little bit of clearance never got in the road
 :wave:

Location:- Crewe Cheshire

Offline saw

  • Hero Member
  • *****
  • Posts: 1003
  • Country: se
  • lucky amateur
    • Svenssons AckordsWerkstad
Re: a Jerry Howell "duplex vacuum" stirling engine build
« Reply #15 on: October 02, 2011, 04:41:34 PM »
Nice  :thumbup:
_________________________
Greetings / Benni
http://myprojecty.wordpress.com/category/steam-engine/

Offline DaveH

  • Hero Member
  • *****
  • Posts: 1413
  • Country: za
  • Kempton Park, South Africa
Re: a Jerry Howell "duplex vacuum" stirling engine build
« Reply #16 on: October 04, 2011, 02:23:12 PM »
Very nice :clap: :clap: :clap:
 :beer:
DaveH
(Ex Leicester, Thurmaston, Ashby De La Zouch.)

Offline madjackghengis

  • Hero Member
  • *****
  • Posts: 717
  • big engine
Re: a Jerry Howell "duplex vacuum" stirling engine build
« Reply #17 on: October 06, 2011, 01:41:53 PM »
Well, I haven't got a lot done since last time, but thought I'd better get it down while I can.  I took the marked out stanchion and put it in the mill vise, to use a milling cutter to hand trace the lines of the stanchion.


it worked, but left lots of swarf, and lots of room for improvement, so I traced it onto the other stanchion and used my bandsaw to cut to the line, it needed some odd work, cutting, turning it over to see the lines and back at it again, and the two sides are close to the same, close enough for the filer.


here is the one side as I used to scribe the other side, having to scribe on the flat side, with the pointy side being down for working on the saw.


bolted together with pins to get the alignment, and screws sticking down to keep it parallel with the filing machine table.


I didn't like the way the file fit, it wasn't straight but skewed a bit, so I removed to cap/screw holder and opened the hole in it up for the file to seat against the shaft as it should.


cleaned some of the filings off while it was open, just to lighten it up a bit.


back together working much better.  if the file is not going dead up and down, it pushes the work away, as well as putting a slope on the edge, it cuts much faster with the file in line with the shaft.


with a bit of copper to keep the vise from putting a flat on the top, the two stanchions are in the milling vise for a much needed hole to open up and give some air to the framework.


ready to drill a hole through both stanchions


here is the hole, had to move it around a bit as the pilot hole was not well centered, so I did the final hole with a 3/4 in end mill


With that, it is time to finagle room for screw heads when there isn't any, so I used my drill/driver, a counterbore bit for #10, went in at an angle, and moved it up to vertical while spraying it with WD-40, doing it for all four holes.  The large hole in the center was needed to minimize the amount of flesh that had to be removed for the one pair of screw heads.  From here, it got washed, about an hour with a roll of 320 grit paper, used to clean up the filing machine lines, and will end with 600 then polished, when all is running.


twisting the driver into vertical to get the head clearance needed


screwed to the top of the cylinder, looks like just a bit more and the stanchions will be done


another view of the stanchions, just need to round off the back ends, to follow the curve of the cylinder, and debur, and then on to more parts.  That's it for now, but should be getting to the lapping part soon, just need to find the right soft tissue to use for a lap, plastic, wood, something to take the paste as it's only brass to be lapped.  thanks for watching, and for all the comments and ideas, cheers,  :beer:  mad jack

Offline saw

  • Hero Member
  • *****
  • Posts: 1003
  • Country: se
  • lucky amateur
    • Svenssons AckordsWerkstad
Re: a Jerry Howell "duplex vacuum" stirling engine build
« Reply #18 on: October 06, 2011, 01:51:11 PM »
Wow it's looking realy good  :D
_________________________
Greetings / Benni
http://myprojecty.wordpress.com/category/steam-engine/

Offline Dean W

  • Hero Member
  • *****
  • Posts: 571
  • My kingdom for a lathe!
    • Projects web pages
Re: a Jerry Howell "duplex vacuum" stirling engine build
« Reply #19 on: October 06, 2011, 09:04:07 PM »
Looking great, Jack!  Another Mothers fan, I see..   :thumbup:
Dean W.

Shop Projects:
http://www.deansphotographica.com/machining/projects/projects.html

Praise the Lord and pass the Carbide!

Offline madjackghengis

  • Hero Member
  • *****
  • Posts: 717
  • big engine
Re: a Jerry Howell "duplex vacuum" stirling engine build
« Reply #20 on: October 07, 2011, 12:42:03 PM »
Nice work Jack, I'll definitely be watching this one. I am tempted to try another stirling next as I've all but finished my other poppin.

Shipto, you've started with the most difficult type ... the LTD's are a bit of a pain to get to run. I tried making a tiny LTD which ended in tears too, need to revise the design and try again! May be better trying one with a proper burner if it's your first?

Nick
Shipto, I also want to say, I built a Duclos "flame sucker" more than twenty years ago, half an hour here and there, and spent about six months trying to get it to run, getting all kinds of noises like it wanted to, but ended up putting it in a box and on a shelf when I moved to my "retirement home".  I was put onto this madmodder site by a friend, and one of the first things I saw was a high school kid who had just finished his Duclos "flame sucker" as part of a class project where more than a dozen or so were built, and I saw his first run.  It was that which made me spend days looking for that little engine and find it by accident, and spend about a week considering it, seeing a few flaws, and in fixing them, getting it running for the first time.  Since then, I've put about six or eight pistons in it, half a dozen cylinders, and of course, the replacement crank/cam, which was the major reason it wouldn't run, but not the only one.  You may not get your LTD stirling going right off, but don't let that bother you, it's not junk until you say its junk, until then, its "just, not finished yet", but the success at getting that "lost cause" running is a large part of my motivation in making new engines and pursuing these things which feed my need to make and build.  I find I do a better job working on full sized engines now, having worked in much tighter places, and more difficult problems to face, when the tiny ones are confronted.  Just make sure you're smiling when you leave the shop each day, because that is what life is about.  Don't ever let anyone tell you something is too complicated, or you're wasting your time, if nothing else you're learning and you're getting to use tools, what more can a man ask for?  Cheers, mad jack

Offline shipto

  • Hero Member
  • *****
  • Posts: 809
  • Country: gb
  • Redditch, UK
Re: a Jerry Howell "duplex vacuum" stirling engine build
« Reply #21 on: October 08, 2011, 06:08:58 PM »
Thanks I havent given up on it but its only something I have been messing with at work while we are a little slack.
Turns out this life c**p is just one big distraction from death but a good one. For the love of god dont give yourself time to think.
https://myshedblog.wordpress.com/

Offline madjackghengis

  • Hero Member
  • *****
  • Posts: 717
  • big engine
Re: a Jerry Howell "duplex vacuum" stirling engine build
« Reply #22 on: October 11, 2011, 11:07:22 AM »
Well folks, I got a bit of time to work on her and got a few small things done.  The back end of the stanchions was sort of a mismatch, so I put the cylinder in a chuck on my dividing head, and rolled it around a bit with an endmill to put a nice radius on the edge.


I left a slight shoulder on it, but got a good radius, and scribed a radius between the arms, opposite, and finished it off with sawing the slight bit of material and using the die filer to finish it.  Then it was time to deal with the bore.  I used stud and bearing mount locktite to press and lubricate the brass tube into the aluminum cylinder, and then bored it to a fine finish.  It was supposed to be .750 when done, but the tube I had was an inch o.d., so I thought I'd just go with a bigger bore, and it bored out to .965, with about a thousandth of taper.


I took a well seasoned piece of oak about an inch and a quarter, by an inch and a half, squared it up closer in the table saw, and stuck it in a four jaw, then put a nice center hole in the end, about a foot long overall.


After honing, lapping and stoning the cutter, I made about a dozen passes, bringing the oak close to size, and adjusting the tailstock for no taper and got it turned down, to the size of the big end of the hole, about .965


rubbing in a healthy dose of rouge with some of Mother's polish for lubrication, I started lapping the bore.  Oak is a very open grained wood, and thus holds lapping compound well, and maintains its dimension and its profile relatively stable.  About a dozen applications of rouge and Mother's, with the cylinder going on further with each application, it goes all the way on, and time to turn it around and lap from the other end, just to even things out.


Here you can see the brass the rouge picked up and left on the lap, this is almost in flakes, as the grain of the oak pulls it off, and the brass is so soft.  The brass and rouge wipe right off, and fresh is applied until the cylinder slides easily on and off, with even torque on the hand held cylinder.  Sorry no pictures of the cylinder, I didn't want to try to hold it and take a shot at the same time, and the battery went dead in the camera.


The lapping stick after the job is complete, still on size, and can be used again.  I'd use the same if lapping an iron cylinder, but I'd start with valve lapping compound, and work my way to rouge through several grits first, but the hole is round, straight, and with a mirror polish ready for a graphite piston to be fit to it.


From a chunk of two inch stainless, I cut down to 1.2 in o.d. for the hot cap, the inside will be an inch, and the outside will be profiled thinner, to reduce heat conduction, but after drilling boring, and machining the hot end where the flame will play.


with a shoulder turned on it for a heat "gasket" so it won't be stainless hot on aluminum cold, the cap is drilled, then bored to size.  I think it's 304, but that's George's guess, he left the chunk on the hood of my truck last week, when he went by.  When I return, I should have the hot cap finished with heat absorbing fins on the hidden end, and an area about an inch wide thinned down from the outside to a wall thickness of fifteen thousandths or so, to minimize heat conducted toward the cool end.  Thanks for watching and for the comments,  :beer:  cheers, mad jack

Offline saw

  • Hero Member
  • *****
  • Posts: 1003
  • Country: se
  • lucky amateur
    • Svenssons AckordsWerkstad
Re: a Jerry Howell "duplex vacuum" stirling engine build
« Reply #23 on: October 11, 2011, 11:39:33 AM »
I like to see your'e picture and read read your'e description of your'e work. It's very education and I learn a lot from you.
Thgank you for posting this project  :bow: :bow: :bow:
_________________________
Greetings / Benni
http://myprojecty.wordpress.com/category/steam-engine/

Online Brass_Machine

  • Administrator
  • Hero Member
  • *****
  • Posts: 5504
  • Country: us
Re: a Jerry Howell "duplex vacuum" stirling engine build
« Reply #24 on: October 11, 2011, 12:35:53 PM »
Great thread!!!!  :headbang:

Love Jerry's stuff!

You are doing a great job on this one!

Eric
Science is fun.

We're all mad here. I'm mad. You're mad.