Author Topic: Harrison L5 rescue  (Read 132778 times)

Offline Pete.

  • Hero Member
  • *****
  • Posts: 1075
  • Country: gb
Re: Harrison L5 rescue
« Reply #150 on: February 03, 2014, 01:04:46 PM »
Very nice!

If you painted those long bits on top instead of masking them, you wouldn't have to bother oiling them to stop them going rusty.

Just an idea...

Offline micktoon

  • Hero Member
  • *****
  • Posts: 797
  • Country: gb
Re: Harrison L5 rescue
« Reply #151 on: February 03, 2014, 04:30:56 PM »
Cheers Phil , Andrew and Pete, This should answer your question Andrew I had heating in the garage to keep things warm so it was dry enough to start putting some parts on again today, its dry but still a bit delicate so have to be a bit gentle as I go but so far so good, I need some red paint now to do inside the belt covers before I can really put much more on. The electric boxes are just assembled nothing is wired up yet , I have done these as much to get stuff that is lying about in its final place and make some space.
 
 This is it so far.


Hoping to get a bit more done tomorrow.

 Cheers Mick.

Offline awemawson

  • Global Moderator
  • Hero Member
  • *****
  • Posts: 8967
  • Country: gb
  • East Sussex, UK
Re: Harrison L5 rescue
« Reply #152 on: February 03, 2014, 05:01:36 PM »
Mick, now I know where to send my machines for re-painting. I hope you have major unloading facilities  :lol:
Andrew Mawson
East Sussex

Offline micktoon

  • Hero Member
  • *****
  • Posts: 797
  • Country: gb
Re: Harrison L5 rescue
« Reply #153 on: February 03, 2014, 07:08:03 PM »
Hi Andrew ............this might be the last machine I EVER paint lol........on a good note , the overspray situation is even better than I remembered , even things close to the lathe have dry dust on them not a fine misting of paint so things on the bench etc look grey and dusty but it just comes off like dust  :thumbup:.
  Cheers Mick

Offline jb3cx

  • Jr. Member
  • **
  • Posts: 86
Re: Harrison L5 rescue
« Reply #154 on: February 04, 2014, 04:35:02 AM »
Cracking paint job mick , :bugeye: I have just started to recon my briery drill point grinder that has been sitting at Durham for the last 8 years ,I'm sure you could do a better paint job than me .
 It

Offline Meldonmech

  • Hero Member
  • *****
  • Posts: 933
Re: Harrison L5 rescue
« Reply #155 on: February 04, 2014, 07:19:25 AM »


           Nice spray job Mick.
                                       
                                                      Cheers David

Offline micktoon

  • Hero Member
  • *****
  • Posts: 797
  • Country: gb
Re: Harrison L5 rescue
« Reply #156 on: February 04, 2014, 06:41:58 PM »
 Some more progress today lad.

 Started putting a few more bits on but first had to paint various parts red inside the webs on the bed to cabinet cupboards and inside belt guards etc. Thanks to John Doubleboost who has some nice proper old fashioned stinky oil based red paint that went on lovely with a soft brush and roller.
  This is what it looks like now, I will be to cover over with a sheet and have the room again to prepare the other parts for round two of the painting.


  More to come soon .
 Cheers Mick.

Offline Manxmodder

  • Hero Member
  • *****
  • Posts: 739
  • Country: gb
Re: Harrison L5 rescue
« Reply #157 on: February 05, 2014, 06:46:35 PM »
  Bill I have just thought why the milled part might be there, the small thin chip guard at the front of the cross slide will hit the nut and stop travel I think  when the cross slide comes back towards the handwheel, so this gap will let the cross slide reach the hand wheel end at full travel ?
  Mick
Hi Mick, she's looking grand with the wolf gray paint on.

 I've just been recapping on this project from the beginning and I can confirm for you that the cut away on top of the cross slide nut is indeed there for clearing the thin steel screw cover,but I guess you know this by now.
Also you show a photo of your cross slide nut with packing shims wedged into the adjustment slot whereas both my metric and imperial nuts don't have these and are adjusted by tightening the 2 screws only,I've never had any problems with them backing out of adjustment and I wonder if someone has added the shims on yours after it left the factory.....OZ.
Helixes aren't always downward spirals,sometimes they're screwed up

Offline micktoon

  • Hero Member
  • *****
  • Posts: 797
  • Country: gb
Re: Harrison L5 rescue
« Reply #158 on: February 05, 2014, 07:14:20 PM »
Hi Oz , funny you should mention this as I have been looking back through and also was looking at that nut thinking its been bodged up at some point, I have found a few of the usual rubbish attempts to fix things. My overall plan was to try to fix what I can when I am putting things back together, I have stripped the Norton gearbox today as that was notchy to slide from one cog to the next so I am going to give it all a good clean and with a diamond file de burr all the cogs that have edges burred etc, the apron will need the same sort of treatment too.
 I know some parts like the top plide could do with scraped etc but will get it up and running and do bits at a time I think.
 Cheers for your interest and observations Oz , I might be asking about more things as the various parts get sorted out .
  Cheers Mick.

Offline mattinker

  • Hero Member
  • *****
  • Posts: 1316
  • Country: fr
Re: Harrison L5 rescue
« Reply #159 on: February 06, 2014, 02:33:43 AM »
How will you dare even using such a pristine machine? The first scratch "ouch!"

Regards, Matthew

Offline Manxmodder

  • Hero Member
  • *****
  • Posts: 739
  • Country: gb
Re: Harrison L5 rescue
« Reply #160 on: February 06, 2014, 10:41:11 AM »
Hi Oz , funny you should mention this as I have been looking back through and also was looking at that nut thinking its been bodged up at some point, I have found a few of the usual rubbish attempts to fix things. My overall plan was to try to fix what I can when I am putting things back together, I have stripped the Norton gearbox today as that was notchy to slide from one cog to the next so I am going to give it all a good clean and with a diamond file de burr all the cogs that have edges burred etc, the apron will need the same sort of treatment too.
 I know some parts like the top plide could do with scraped etc but will get it up and running and do bits at a time I think.
 Cheers for your interest and observations Oz , I might be asking about more things as the various parts get sorted out .
  Cheers Mick.

Hi Mick,
I agree with your logic,it's best to get her reassembled and make some notes of the things you feel could be improved or modified at a later stage rather than fall into the trap of trying to remedy every single niggle at initial assembly stage.
A running lathe with  a few problems to sort is far more inspirational and easier to approach with enthusiasm than trying to perfect everything at the initial assembly stage and it turning into a project that becomes a chore. That is probably why we see so many unfinished projects for sale,where the builder has become fed up with remedying a seemingly endless list of problems with very little immediate reward and ultimately lost interest.

Back on the subject of spindle nose design and the dangers of threaded attachments coming undone when turning in reverse or stopping quickly from high speeds. Harrison circulated a spindle modification which provided a solution of sorts  involving a shallow flat bottomed groove being machined into the spindle nose just behind the threaded portion. The chuck back plate is also modified by machining and fitting of a corresponding grub screw that registers into the groove on the spindle nose in order to prevent the chuck unscrewing accidentally.

I have a copy of the factory drawing and dimensions for this mod,but I have to say it isn't a great solution. I would much prefer to have a L00 taper spindle fitting and I have been working on some ideas to make a permanently fitted spindle adapter to convert from screw nose to L00 taper thus never having the worry of a chuck unscrewing itself under load.....OZ.
Helixes aren't always downward spirals,sometimes they're screwed up

Offline micktoon

  • Hero Member
  • *****
  • Posts: 797
  • Country: gb
Re: Harrison L5 rescue
« Reply #161 on: February 06, 2014, 06:34:43 PM »
Hi Oz, The adapter idea is interesting , I had the chance of a L00 spindle once which I think would swap but I had already got most of the threaded nose stuff by then and knowing Harrison and all the minor changes they seem to have made I was not sure if it would have fitted anyway, at least without getting too involved.
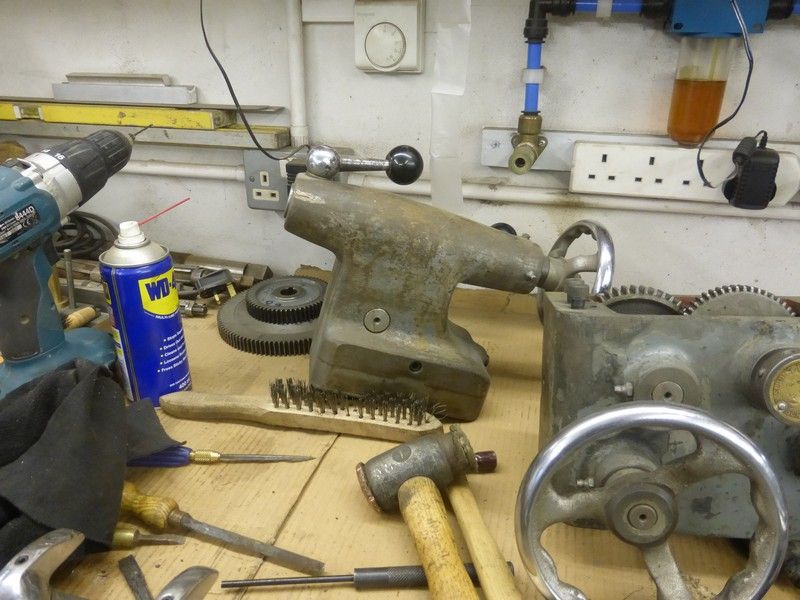
 I had already sort of made observations on what needed doing and most of it is in the parts yet to be put back on , i.e , the Norton gearbox, the Apron, tailstock and top slide. just waer and tear stuff so I will do what I can when I have things in bits but expect some things will end up coming apart in some area agian to solve all the problems.

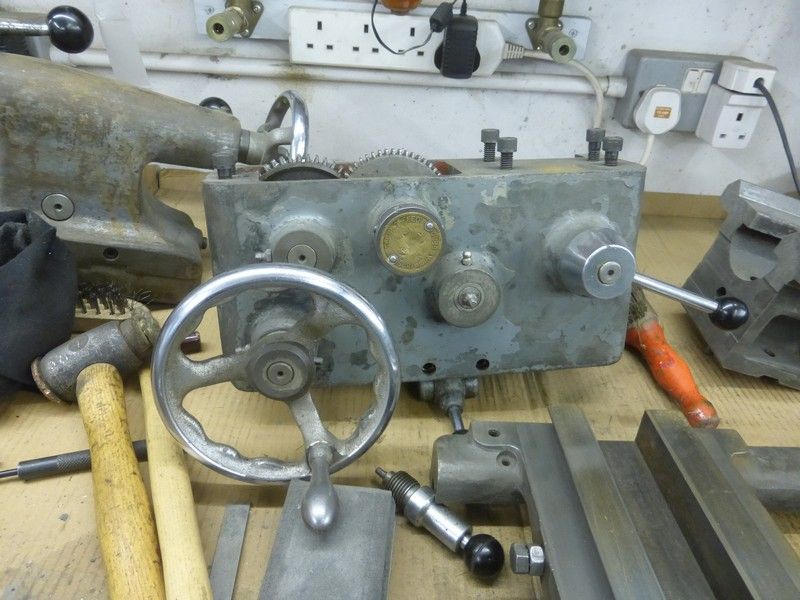
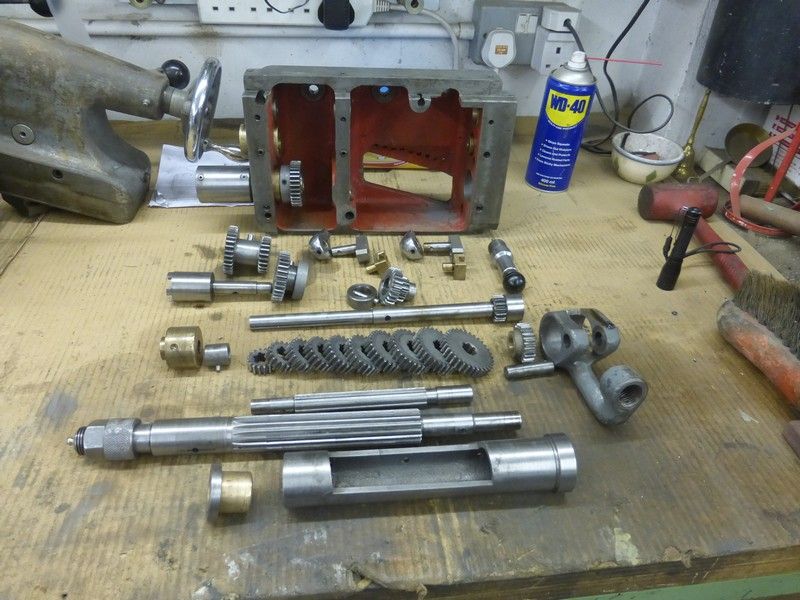
 I have started on the other 'bits' of the lathe and decided to do the oily dirty parts first, everything has had a general clean and most of the old paint scraped off ages ago but not clean enough for paint. The main lumps are , The Norton Gearbox, The Apron/saddle/Topslide and the tailstock. As you can see they are all rough looking compared to the lathe now ! . I intend to strip and inspect all these bits and repair/replace anything that is found to be not right, then anything missed will have to be discovered once the lathe is up and running and then go from there, hopefully most things should get fixed before its up and running this way.


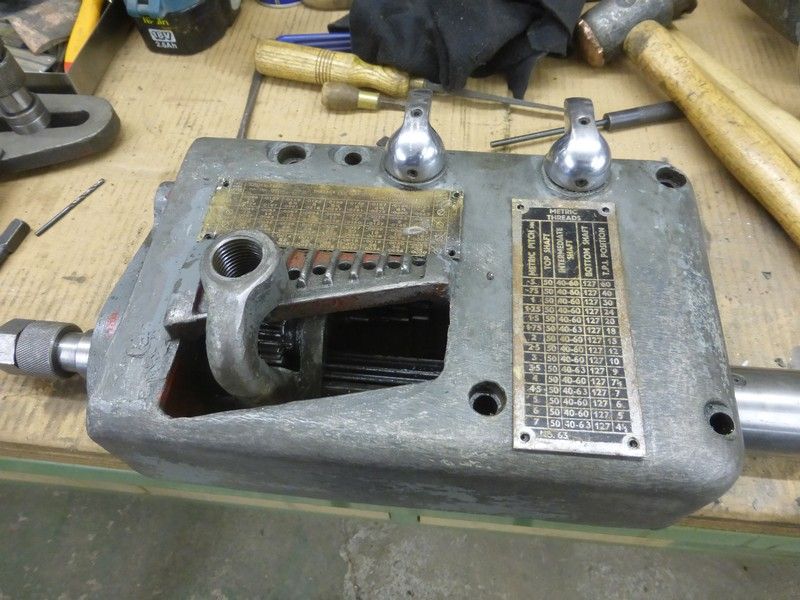
This is what the Norton box looked like after it was 'cleaned' , I have found the two front bronze bushes are worn where the lead screw and feed screw go into the box, I have just de burred all the cogs and generally cleaned up everything, oilways  had grease in them as usual. The screw cutting charts will need a cunning plan or they are going to let the job down, there was some new ones on Ebay but the wrong charts.


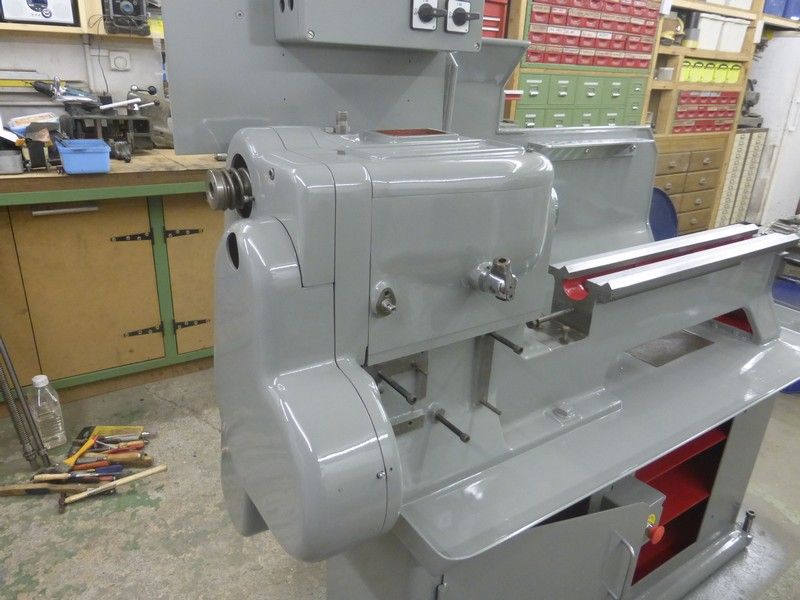
I have also got the belt covers back on so its looking more like a lathe and less parts lying about too.


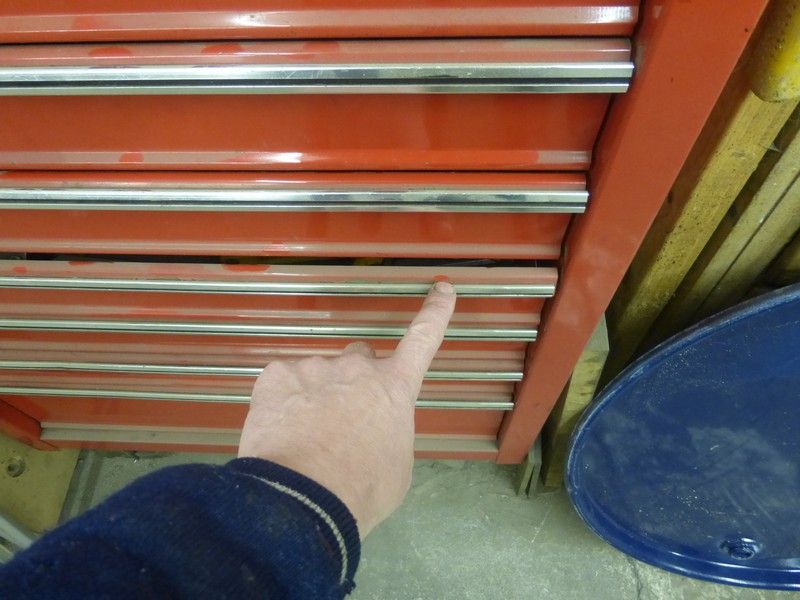
These photos are to show the tool box that was say three feet from the back of the lathe only had grey dust not paint overspray land on it, first shot finger ready to wipe off , second shot same bit wiped clean with finger and paint still red and shiny under the dust, this is a main bonus of this paint.


Cheers Mick

Offline Manxmodder

  • Hero Member
  • *****
  • Posts: 739
  • Country: gb
Re: Harrison L5 rescue
« Reply #162 on: February 12, 2014, 04:20:03 PM »
Hi Mick, there's a whole load of Harrison mods and improvements I'd like to share with you in the future but if you follow the path your on now nothing will be wasted or lost anyway as any Harrison threaded fittings you invest in would be very easily resealable for no financial loss should you decide to copy my mods.

I've been looking at some of your wood creations and think they're real nice looking,especially like the Hare :drool: :drool: :clap:
Helixes aren't always downward spirals,sometimes they're screwed up

Offline micktoon

  • Hero Member
  • *****
  • Posts: 797
  • Country: gb
Re: Harrison L5 rescue
« Reply #163 on: February 12, 2014, 06:38:40 PM »
Hi Manxmodder,
                         thanks for comments on the wood stuff I seem to flit from wood back to metal lol. The mods sound interesting, do you just mean for the spindle or other general mods too, there are a few things I would like to improve/ alter over time.
 I now have the Norton box in bits , it needs various bronze bushes replaced and the odd shaft maybe sleeved, the problems have happened because oilways were blocked with old grease probably for years and years so even if oiled the oil was not reaching the areas it was needed. The apron and tailstock are also stripped to bare bones and odd thing needs fixed with these too, I am gathering up bushes etc and will fix then paint, I have not took photos but been grinding all the castings to make painting an easier job.
  More to come soon .
 Be interesting to see some pics of your mods  :thumbup:
  Cheers Mick

Offline Manxmodder

  • Hero Member
  • *****
  • Posts: 739
  • Country: gb
Re: Harrison L5 rescue
« Reply #164 on: February 12, 2014, 06:51:13 PM »
Mick,if you find anyone who has old stock of the Norton gearbox bushes I'd appreciate it if you would share their details with me.
Cheers,OZ.
Helixes aren't always downward spirals,sometimes they're screwed up

Offline micktoon

  • Hero Member
  • *****
  • Posts: 797
  • Country: gb
Re: Harrison L5 rescue
« Reply #165 on: February 12, 2014, 07:39:45 PM »
Hi Oz , I will do, I think I am probably going to have to make some of mine or sleeve shafts as both the bush and the shafts are worn in some places so just a new bush would not really fix the problem but I will keep you posted.
 G&M tools have some L5 parts on Ebay there are some Norton box parts but not bushes listed, I contacted them about some badges and they said all they had was listed on Ebay , I dont know if they meant all L5 parts or just the badges mind.
  Cheers Mick.

Offline Manxmodder

  • Hero Member
  • *****
  • Posts: 739
  • Country: gb
Re: Harrison L5 rescue
« Reply #166 on: February 12, 2014, 10:02:29 PM »
I was looking at my screw chart plates earlier and also the photos of yours.

They do differ a bit but a possible solution, if you have to restore what you have, would be to apply nitromors and strip out the old paint from the undercut reliefs then refresh the raised chart plate lettering and surfaces on super fine abrasive paper,with the paper set on a flat plate with thin a smear of grease applied to the back to prevent it slipping around and to keep it perfectly flat whilst your lapping the chart faces.

When the raised parts are looking good then then spray a couple of thin coats of cellulose paint on the front faces and oven dry the paint till its nice and hard.
 Finish of by going back to the abrasive paper on the flat plate until you've removed enough paint from the high spots to fully reveal the numerals and lettering,then thoroughly clean and apply a coat of clear laquer. (I've used this technique in the past to restore similar type charts and badges.)
 I guess you've already considered doing something like I describe but I must emphasise the importance of keeping the abrasive paper absolutely flat on the surface plate,hence the use of grease on the backside.
 I hope some of these suggestions are of help to you but either way I'll be interested to see how you resolve the problem.
Are any of your charts chrome plated,or are they all of unplated the brass type?....OZ.
Helixes aren't always downward spirals,sometimes they're screwed up

Offline micktoon

  • Hero Member
  • *****
  • Posts: 797
  • Country: gb
Re: Harrison L5 rescue
« Reply #167 on: February 13, 2014, 04:30:29 AM »
Hi Oz,if the plates were better nick what you have mentioned was going to be my plan but these are a bit battered to start with and now look worse due to them little riverts being a nightmare to bet out, I thinkI will put an  ad on hoeworkshop, someone may have soe tucked away somewhere and plan B might be to some how try to replicate something similar ? I still have not really thought of how yet.
  At least one had been chrome or nickle plated but it was half rubbed off down to brass, either way I would be happy with brass finish
  Cheers Mick

Offline awemawson

  • Global Moderator
  • Hero Member
  • *****
  • Posts: 8967
  • Country: gb
  • East Sussex, UK
Re: Harrison L5 rescue
« Reply #168 on: February 13, 2014, 05:40:06 AM »
Mick, you could photographically etch them yourself using the same technique used for making pcbs. Get a good dense black and white photograph, print on a laser printer at the right scale to size it properly onto 'overhead projection film', spray the brass with photo resist (ebay abounds) expose to uv (sun ray lamp) through the film, wash away the exposed bits with weak potassium hydroxide solution, etch the result with ferric chloride.


Another slightly simpler way is to print onto paper, lay the paper on the brass and iron it on. The ink in laser printers is basically carbon bonded by plastic. The heat fuses the plastic and bonds it onto the brass. The plastic acts as the etch resist. Takes a bit of experimentation but it does work. You can buy special papers to make the process easier.
Andrew Mawson
East Sussex

Offline Manxmodder

  • Hero Member
  • *****
  • Posts: 739
  • Country: gb
Re: Harrison L5 rescue
« Reply #169 on: February 13, 2014, 11:01:14 AM »
Ah well,if they're a bit to knackered then Andrew is pointing you in the right direction with the photo resist or carbon paper resist and Ferric etch methods he describes(good man Andrew for pitching in there :thumbup:).

I have also used a slightly different technique to produce ferric etched clock faces for a custom show bike many years back.

What was done on that occasion was a silk screen negative was made from the the artwork master and the ink was squeegeed through the screen onto the brass blanks,and when dry they were dropped into the Ferric Chloride until satisfactorily etched then ink cleaned of with solvent.

Back then we used leteraset rub on letter and numeral transfers to create the art master,but these days I think the inkjet printer is the weapon of choice.

You could also consider asking if any members on the Harrison Lathe forum have any new/old stock L5 screw charts for sale.....OZ.    Link to Harrison Lathe Forum:
https://groups.yahoo.com/neo/groups/harrisonlathe/info
Helixes aren't always downward spirals,sometimes they're screwed up

Offline Manxmodder

  • Hero Member
  • *****
  • Posts: 739
  • Country: gb
Re: Harrison L5 rescue
« Reply #170 on: February 19, 2014, 01:17:09 PM »
Hi Mick, I just thought to post up these links to bush type replacement bearing alternatives that I have used in various applications in the past.

In many cases they provide a cheaper and superior solution than plain bronze bushes do....OZ.(other forum members may also find this info useful for their projects) see links below:

http://simplybearings.co.uk/shop/Bearings-Wrapped+Steel+Bushes/c3_4701/index.html

http://www.igus.co.uk/iglidur
Helixes aren't always downward spirals,sometimes they're screwed up

Offline John Stevenson

  • In Memoriam
  • Hero Member
  • *****
  • Posts: 1643
  • Nottingham, England.
Re: Harrison L5 rescue
« Reply #171 on: February 19, 2014, 05:46:49 PM »
Doodling tonight, bit bored, crap night down the pub.


John Stevenson

Offline micktoon

  • Hero Member
  • *****
  • Posts: 797
  • Country: gb
Re: Harrison L5 rescue
« Reply #172 on: February 19, 2014, 07:03:47 PM »
 John that looks the DOGS BOLLOCKS   :thumbup: :clap: :drool: :drool:, looks like you have the style sussed out there.
    Oz I have looked at the simplybearings site which looks good , I will check the other one out too, I will have to get all the worn stuff sized up and then see what I can find with the right OD and a smaller ID and bore to suit the shaft which is now slightly worn so smaller.
  I will be getting back to it tomorrow .
  Cheers Mick.

Offline Manxmodder

  • Hero Member
  • *****
  • Posts: 739
  • Country: gb
Re: Harrison L5 rescue
« Reply #173 on: February 19, 2014, 08:18:55 PM »
Mick, Just a suggestion, you could just consider the inside diameter to match the turned down part of the shaft and make an ally sleeve to bring the wall thickness up to the outside diameter.

Also if memory serves me right I think maybe Igus supply bushes with a finished inside diameter but a thicker than standard wall to facilitate re machining O/D to size.

They have to be mounted on a mandrell to machine the O/D to required size.


John that is a nicely done bit of artwork and the same as the one on my L6 Harrison,which is also the worse for wear.

Would it be possible to get a copy of that from you as a scaleable file for an etching template,please?
......OZ.
« Last Edit: February 19, 2014, 11:04:07 PM by Manxmodder »
Helixes aren't always downward spirals,sometimes they're screwed up

Offline John Stevenson

  • In Memoriam
  • Hero Member
  • *****
  • Posts: 1643
  • Nottingham, England.
Re: Harrison L5 rescue
« Reply #174 on: February 20, 2014, 04:19:14 AM »
Manx,
Sorry no name.

These don't scale very well outside the program, one side of the fonts gets bigger and so does the other making the letters thicker than they should in proportion.
Let me know the OD of the circle, I guessed 35mm for this one and I'll scale it, which will scale it right, save it as a DXF and let you have a copy by PM .
John Stevenson