Author Topic: Gingery Lathe and Accessories  (Read 121890 times)

Offline vtsteam

  • Global Moderator
  • Hero Member
  • *****
  • Posts: 6466
  • Country: us
  • Republic of Vermont
Gingery Lathe and Accessories
« on: February 10, 2013, 08:13:30 PM »
Quote
Any chance of a pictures of your Gingery lathe/mill in different setups? I bought the books long time ago and considered giving it a go, but then I got more work than time and tradeoff was to buy a lathe. I liked the approach of using the machine itself to make parts to the machine. I see that you have taken that approach and modularity to next level.

Pekka

Pekka and others have asked for more info on the David Gingery designed lathe I built back in 2002-3. I made several accessories for it after I built the lathe itself, including a very versatile milling attachment of my own design, and I documented a lot of this in photos at the time. I've never posted a lot of it, so I'll do that here as I can over the next week or so.

Background: The lathe was the first machine work I ever did. I was not a machinist at the time I decided to build it. I had simply bought Dave Gingery's charcoal furnace book out of curiosity, and then needed to have a reason to build the furnace -- so bought the lathe book . I learned everything by doing it, following the instructions in the Gingery books.

In fact I knew so little when I started that, I didn't really know how all the parts would fit together, or what they were. I simply followed instructions in building each, and once I had a finished piece in hand, I could see how it would fit with the others. Building this lathe was probably one of the most rewarding experiences of my life, it led to much much more.

Here is a picture of the finished lathe with some of the patterns I made for casting the parts.


« Last Edit: January 03, 2018, 11:10:55 PM by vtsteam »
I love it when a Plan B comes together!
Steve
https://www.youtube.com/watch?v=4sDubB0-REg

Offline vtsteam

  • Global Moderator
  • Hero Member
  • *****
  • Posts: 6466
  • Country: us
  • Republic of Vermont
Re: Gingery Lathe and Accessories
« Reply #1 on: February 10, 2013, 09:38:56 PM »
It all started with the furnace. The materials for building it were a Christmas popcorn tin, a piece of galvanized sheet wrapped around plywood disks as an inner form, a stainless stel canister and utensil set (to be used as a crucible and skimmers). The tin and stainless items purchased for a total of $15 at a local discount store. Also shown are some wooden spacers for ramming up the mold, a section of aluminum tube for a tuyere form, and a built up lid of sheet metal to be used as a form. I placed inside the original Christmas tin lid to give it the right diameter to fir the main body.


« Last Edit: January 03, 2018, 11:11:43 PM by vtsteam »
I love it when a Plan B comes together!
Steve
https://www.youtube.com/watch?v=4sDubB0-REg

Offline vtsteam

  • Global Moderator
  • Hero Member
  • *****
  • Posts: 6466
  • Country: us
  • Republic of Vermont
Re: Gingery Lathe and Accessories
« Reply #2 on: February 10, 2013, 09:42:05 PM »
Here is the furnace lining being rammed up. The lining was fireclay and sand, with a little perlite mixed in.

« Last Edit: January 03, 2018, 11:12:08 PM by vtsteam »
I love it when a Plan B comes together!
Steve
https://www.youtube.com/watch?v=4sDubB0-REg

Offline vtsteam

  • Global Moderator
  • Hero Member
  • *****
  • Posts: 6466
  • Country: us
  • Republic of Vermont
Re: Gingery Lathe and Accessories
« Reply #3 on: February 10, 2013, 09:45:01 PM »
The lining and lid rammed up. I put a couple sheet strap "ears" in the lid to attach a bail type wire handle. there were large nails through  the ears in the refractory to help anchor them.


« Last Edit: January 03, 2018, 11:12:46 PM by vtsteam »
I love it when a Plan B comes together!
Steve
https://www.youtube.com/watch?v=4sDubB0-REg

Offline vtsteam

  • Global Moderator
  • Hero Member
  • *****
  • Posts: 6466
  • Country: us
  • Republic of Vermont
Re: Gingery Lathe and Accessories
« Reply #4 on: February 10, 2013, 10:00:04 PM »
Here is the pattern and mold for the lathe way bed casting -- one of the more difficult in the entire project. It is the largest casting, and has sand cores where the slots are. These need draft in the pattern, which is difficult to form. In addition it is one of the thinnest castings, so is hard to pour without cold shorting. I anticipated this problem and poured the metal a little hot, so my casting came out fine, first time.

Many people think the Gingery lathes are all aluminum. They aren't. This aluminum casting supports the lathe ways, which are a slab of cold rolled steel plate. Both the bed and the actual ways are hand scraped to a true straightedge using machinist blue (or artist's oil Prussian blue) and a scraper made form a file. It takes many hours to hand scrape all of the parts on this lathe. It took about 8 hours of work to scrape this bed and the steel ways. I used a brand new high quality carpenters 4' level as my straightedge, when checking the lathe parts for truth.


« Last Edit: January 03, 2018, 11:13:19 PM by vtsteam »
I love it when a Plan B comes together!
Steve
https://www.youtube.com/watch?v=4sDubB0-REg

Offline dsquire

  • In Memoriam
  • Hero Member
  • *****
  • Posts: 2275
  • Country: ca
  • Kitchener, Ontario, Canada
Re: Gingery Lathe and Accessories
« Reply #5 on: February 10, 2013, 10:03:15 PM »
VT

Im sitting here trying to be patient watching this thread unfold. I know it's going to be a good one if what you are showing so far is any indication.

Cheers  :beer:

Don
Good, better, best.
Never let it rest,
'til your good is better,
and your better best

Offline black85vette

  • Jr. Member
  • **
  • Posts: 60
Re: Gingery Lathe and Accessories
« Reply #6 on: February 10, 2013, 10:20:43 PM »
Awesome to see the lathe and the patterns.   Impressive bit of work.   Cool to see how to get started with a furnace.

Offline vtsteam

  • Global Moderator
  • Hero Member
  • *****
  • Posts: 6466
  • Country: us
  • Republic of Vermont
Re: Gingery Lathe and Accessories
« Reply #7 on: February 10, 2013, 10:28:21 PM »
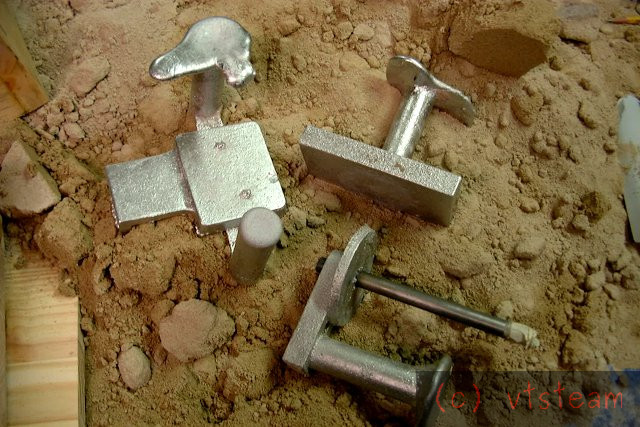
Here is an early casting of a "spray" of parts. I got impatient with making one small part at a time, so started to cast several at one go.

This phot illustrates some of the interesting methods Dave Gingery came up with. The blackened steel rods in the picture are actually cores. They have been covered with soot from a candle so they won't stick to the aluminum. On the right are 4 bearing halves for making two sets of split bearings. These will support the lead screw. The steel rod core forms a perfect bore that does not require finishing on these bearings.

In the upper left is  the leadscrew ball handle. The steel core will be knocked out of that one and a set screw will be installed to lock it to the lead screw.

In the lower right is the half nut locking lever, also cast on a steel core.

If these parts had simply had sand cores or no cores they would have had to be drilled and bored by the builder,which would have been tricky without a lathe to start with. Gingery assumes you have only a hand drill as a mechanical aid. I happened to have a small drill press which made things a little easier. The attention to the needs of a poorly equipped shop is one of the most admirable aspects of these books. You can indeed build a machine shop from nothing, because it does build itself.

Sometimes you make something for a Gingery machine, that you will re-make later, better, or more accurately, when your lathe is more operational. You redo some things that enabled you to get to a better equipped stage. Recursive construction.


« Last Edit: January 03, 2018, 11:14:02 PM by vtsteam »
I love it when a Plan B comes together!
Steve
https://www.youtube.com/watch?v=4sDubB0-REg

Offline black85vette

  • Jr. Member
  • **
  • Posts: 60
Re: Gingery Lathe and Accessories
« Reply #8 on: February 10, 2013, 10:40:28 PM »
"recursive construction"   I can appreciate that approach.

It does seem to be an affliction that once you get a basic shop together you start using the shop to make more stuff for the shop.  Sometimes the shop becomes the project and you don't make anything else.

Offline vtsteam

  • Global Moderator
  • Hero Member
  • *****
  • Posts: 6466
  • Country: us
  • Republic of Vermont
Re: Gingery Lathe and Accessories
« Reply #9 on: February 10, 2013, 10:55:16 PM »
I quickly seized on the power that I had been given to make what I needed instead of buying it. Cost was very important, because I was trying to save enough money to buy a piece of land to build a house on. All of th aluminum I used came from a $10 purchase of over 100 lbs of pistons at a marine engine rebuild shop. They had a barrel full of them, and when I told them I was building a lathe, the machinist there smiled and took me to the barrel and asked if I could use that. I said sure. He said take it. I gave the guys there the $10 for doughnuts, so it wasn't exactly a purchase, more a mutual donation.

Back to the power of what I now realized: so when the Gingery book called for a couple of purchased pillow blocks to do a temporary boring setup for the headstock, instead of buying pillow blocks, I decided to make some. Why not?

So I carved out a pattern, and then taking a cue from the steel cores, I decided to cast in a bearing -- but permanently. So I took a hardware store Oilite (sintered) type plain bearing, and soaked it overnight in some lacquer thinner to remove the oil impregnation. Then I taped up its ends and made it a sliding fit in a wooden pillow block pattern. Then I rammed that up in the sand like this:

« Last Edit: January 03, 2018, 11:14:32 PM by vtsteam »
I love it when a Plan B comes together!
Steve
https://www.youtube.com/watch?v=4sDubB0-REg

Offline vtsteam

  • Global Moderator
  • Hero Member
  • *****
  • Posts: 6466
  • Country: us
  • Republic of Vermont
Re: Gingery Lathe and Accessories
« Reply #10 on: February 10, 2013, 11:06:13 PM »
Then I removed the bearing, and packed it full of greensand and replaced it in the mold. Now I could put The mold back together and pour the aluminum around the bearing without filling it. Afterwards when it was removed and cleaned up, I would drop the whole block in a pan of heated oil to re-lubricate the sintered bronze internally.


« Last Edit: January 03, 2018, 11:15:05 PM by vtsteam »
I love it when a Plan B comes together!
Steve
https://www.youtube.com/watch?v=4sDubB0-REg

Offline vtsteam

  • Global Moderator
  • Hero Member
  • *****
  • Posts: 6466
  • Country: us
  • Republic of Vermont
Re: Gingery Lathe and Accessories
« Reply #11 on: February 10, 2013, 11:14:27 PM »
And then I realized that since I now had a pillow block and a pattern I could use the new pillow block as a pattern by taping over its bearing, and start making two at a time.

That was the beginning of the idea of reusing things, for me.


« Last Edit: January 03, 2018, 11:15:34 PM by vtsteam »
I love it when a Plan B comes together!
Steve
https://www.youtube.com/watch?v=4sDubB0-REg

Offline vtsteam

  • Global Moderator
  • Hero Member
  • *****
  • Posts: 6466
  • Country: us
  • Republic of Vermont
Re: Gingery Lathe and Accessories
« Reply #12 on: February 10, 2013, 11:42:46 PM »
Making angle plates:

Angle plates are very important to making the lathe. They are used with pillow blocks to set up a temporary boring tool on the lathe ways to bore the headstock. They are also used once the faceplate is operational to mount many lathe parts for facing AND squaring.

In fact the angle plates are used to square themselves. This is done by mounting one raw un-squared angle plate casting on the faceplate, and shimming its base until the upright leg is square to the faceplate. Then another raw angle plate casting is bolted to that upright leg so that you have a "Z" shaped assembly.

The two faceplate legs that are bolted together are square to the faceplate. The second angle plate's other leg is roughly parallel to the faceplate, but not exactly parallel, because it is a rough casting. But now you face it with the lathe tool, and it is actually parallel to the faceplate. So now the second angle plate is truly square to itself.

The first angle plate is still a rough casting, that is just shimmed square. So now you unbolt it, and invert the assembly, bolting the second (true) angle plate to the faceplate. Without shims.

And then you face the first angle plate with the lathe tool. Now the two angle plates are both truly square.


« Last Edit: January 03, 2018, 11:16:07 PM by vtsteam »
I love it when a Plan B comes together!
Steve
https://www.youtube.com/watch?v=4sDubB0-REg

Offline vtsteam

  • Global Moderator
  • Hero Member
  • *****
  • Posts: 6466
  • Country: us
  • Republic of Vermont
Re: Gingery Lathe and Accessories
« Reply #13 on: February 10, 2013, 11:48:22 PM »
Well, I guess that's all for tonight. I just wanted to thank black85vette and dsquire for your kind words. This is a great place to put this stuff!   :beer:
I love it when a Plan B comes together!
Steve
https://www.youtube.com/watch?v=4sDubB0-REg

Offline dsquire

  • In Memoriam
  • Hero Member
  • *****
  • Posts: 2275
  • Country: ca
  • Kitchener, Ontario, Canada
Re: Gingery Lathe and Accessories
« Reply #14 on: February 10, 2013, 11:53:23 PM »
VT

You are the one that should be thanked. I'll be watching whenever you have time to continue. I'm sure it will be interesting.

Cheers  :beer:

Don
Good, better, best.
Never let it rest,
'til your good is better,
and your better best

Offline terryd15

  • Newbie
  • *
  • Posts: 3
Re: Gingery Lathe and Accessories
« Reply #15 on: February 11, 2013, 04:29:00 AM »
Hi VT,

Keep the reports coming, it's a very interesting project,

Best regards

Terry

Offline Stilldrillin

  • Global Moderator
  • Hero Member
  • *****
  • Posts: 4972
  • Country: gb
  • Staveley, Derbyshire. England.
Re: Gingery Lathe and Accessories
« Reply #16 on: February 11, 2013, 05:41:17 AM »
Hi VT.
What stories you tell. Of wonderful, successful projects!  :bugeye:  :clap:  :clap:

Please keep 'em coming. I'm thoroughly enjoying your progress.  :thumbup:

David D

David.

Still drilling holes... Sometimes, in the right place!

Still modifying bits of metal... Occasionally, making an improvement!

Offline PekkaNF

  • Hero Member
  • *****
  • Posts: 2523
  • Country: fi
Re: Gingery Lathe and Accessories
« Reply #17 on: February 11, 2013, 08:26:25 AM »
Great story and very inspirational too! Keep it coming. I enjoy very much reading this.

Pekka

Offline tom osselton

  • Hero Member
  • *****
  • Posts: 1262
  • Country: ca
Re: Gingery Lathe and Accessories
« Reply #18 on: February 11, 2013, 03:47:57 PM »
I find this quite interesting and always pickup some useful information on most builds. I haven't made a furnace yet but it is in the near future. I have read some casting books and some on pattern making but haven't seen that trick with the soot used before how much force does it take to drive out the steel rod after? Do you drive it out cold or do you expand the casting with a little heat? I was thinking that it could be posible to use this method to line up the main bearings during casting.

Offline Fredbare

  • Full Member
  • ***
  • Posts: 169
  • Country: gb
  • Fakenham, Norfolk
Re: Gingery Lathe and Accessories
« Reply #19 on: February 11, 2013, 04:53:42 PM »
Thanks VT for sharing, wonderful work. I have just built a furnace, you certainly have inspired me, keep em coming.

John

Offline millwright

  • Sr. Member
  • ****
  • Posts: 273
  • Country: gb
  • Leeds West Yorshire
Re: Gingery Lathe and Accessories
« Reply #20 on: February 11, 2013, 05:13:38 PM »
Thanks for sharing this with us, Great to see what You have achieved. the pictures are excellent as well. Waiting for the next instalment.
John

Offline Brass_Machine

  • Administrator
  • Hero Member
  • *****
  • Posts: 5514
  • Country: us
Re: Gingery Lathe and Accessories
« Reply #21 on: February 11, 2013, 08:39:46 PM »
This is some pretty cool stuff!

I appreciate the walk through!

Eric
Science is fun.

We're all mad here. I'm mad. You're mad.

Offline vtsteam

  • Global Moderator
  • Hero Member
  • *****
  • Posts: 6466
  • Country: us
  • Republic of Vermont
Re: Gingery Lathe and Accessories
« Reply #22 on: February 11, 2013, 10:54:13 PM »
Wow, didn't expect this much interest! Thank you all!

 :mmr:


Here was a good day in molding -- three patterns finished and cast -- probably it was the weekend. Shown are the compound slide in the upper left, the compound swivel base at bottom, and the carriage apron, upper right.

The compound slide had some minor shrink cavities -- these were removed when filing it flat -- there was enough of a machining allowance to do it.

The compound swivel base has a steel cast-in rod which will be sawn off to leave a short dowel as a pivot. The base will get a slab of cold rolled steel attached to form the ways for the compound slide. The slot is where the compound leadscrew goes, the disk provides bearing surface for the swiveling motion and a clamping surface for the toe clips that clamp it in position when the desired angle is set. This is one of the more complicated patterns because of the draft in all parts including the slot, and the cast-in-place rod.

I felt like the lathe was really getting somewhere when I could cast 3 major pieces at a time. Of course all of these pieces needed to be filed and scraped, and needed gibs, gib screws, ways, etc to finish.

The carriage apron was very simple, but it accepts the most intricate casting of all, the leadscrew split nut. Unfortunately I didn't take any pictures of that one. But to give you an idea, you actually cast the threads of the split nut in place. You do this by placing a piece of the leadscrew threaded rod in the mold -- sooted of course to get it to release. In order for that to work, you also have to put the female threads in the wood pattern. This is done by using bondo with threaded rod coated with release agent. This is a very interesting pattern because of the unorthodox methods Dave Gingery used.

The threads came out well on my lathe -- if a little tight. For the half nut I used pot metal (zinc diecast) instead of aluminum, because it is harder and tougher. You can actually build the whole lathe out of that, instead of aluminum. But the filing and scraping will also be a lot tougher to accomplish.

The tightness of the split nut on my lathe was a result of the near zero thread clearance due to casting directly on a threaded rod. However with a little use, the leadscrew and the half nut both essentially lapped each other -- the hardware store threaded rod was a little rough to begin with, and in the process of running against the nut, the high spots were reduced, and likewise the clearance improved. Once that happened, wear and friction reduced leaving almost no backlash, and good fitting parts.


« Last Edit: January 03, 2018, 11:16:50 PM by vtsteam »
I love it when a Plan B comes together!
Steve
https://www.youtube.com/watch?v=4sDubB0-REg

Offline vtsteam

  • Global Moderator
  • Hero Member
  • *****
  • Posts: 6466
  • Country: us
  • Republic of Vermont
Re: Gingery Lathe and Accessories
« Reply #23 on: February 11, 2013, 11:10:35 PM »
Here I was beginning to make the tailstock pattern. This is the tailstock barrel being glued up on Vee blocks with a few aluminum "muffins" as weights. When you pour aluminum, usually (if you've calculated right) you have leftover aluminum. Pouring that into a muffin tin gives you some ingots for the next melt -- or gluing  weights, as needed!

The barrel has two dowel ends here -- these are core prints -- they actually represent holes in your casting. Holes formed by cores always are the opposite of holes in patterns, they are represented as solids outside of the actual casting. Next picture will show why.


« Last Edit: January 03, 2018, 11:17:32 PM by vtsteam »
I love it when a Plan B comes together!
Steve
https://www.youtube.com/watch?v=4sDubB0-REg

Offline vtsteam

  • Global Moderator
  • Hero Member
  • *****
  • Posts: 6466
  • Country: us
  • Republic of Vermont
Re: Gingery Lathe and Accessories
« Reply #24 on: February 11, 2013, 11:21:31 PM »
Here is the actual tailstock mold ready to close up and pour.. The darker brown rod in the center is a baked sand core. The purpose of this core is to leave a hole in the casting. A steel rod wouldn't work here because the hole is too long. Even sooted up it would probably be impossible to drive out.

The baked sand core does leave a rough hole -- later to be bored out. The core is made up of sand, molasses water, and wheat wallpaper paste. It has a wire reinforcement inside, It is baked in a house oven at 350 degrees for about 20 minutes. The molasses makes it smell like cookies baking, so passes the domestic bliss test for do-ability indoors.

You can see the impression of the barrel I made in the step before. The core fits in the space left by the core prints we just talked about. This is why core prints actually represent a hole in a casting, even though they look like a solid in the wood pattern.


« Last Edit: January 03, 2018, 11:18:03 PM by vtsteam »
I love it when a Plan B comes together!
Steve
https://www.youtube.com/watch?v=4sDubB0-REg