Author Topic: Half Nut Adjustment?  (Read 14609 times)

Offline wongster

  • Full Member
  • ***
  • Posts: 242
  • Country: sg
Half Nut Adjustment?
« on: April 22, 2012, 10:36:46 AM »
Hello folks,

I spent the morning before heading to church stripping the lead screw, carriage, and the apron apart. Beside wanting to make some adjustments to the gibs and slides to make the axes turn smoother, I also wanted to take a look at how the half nut works.

You see, I've been seeing the lead screw being lifted up everytime the half nut is engaged and wonder if this is the cause of the lead screw handwheel not being able to turn smoothly. So the plan was to adjust the gib plate underneath the carriage so that it glide smoothly on the ways and put the apron back on to isolate the problem.

After spending quite a long time, I managed to get the carriage gliding smoothly with no lifting and side movement. When the apron was put back and half nut engaged, turning the handwheel is still a pain.

I'm unable to strip the half nut as it seems that the 4 pins on it are holding it down very tightly on the apron. When I look at the exploded diagram in the manual, I don't see anything that can be adjusted. The idea I had was to "move" the half nut up a little so that it is in line with the lead screw and so ease off the friction. I may have think wrong though...

Here is the exploded diagram from the lathe's manual:


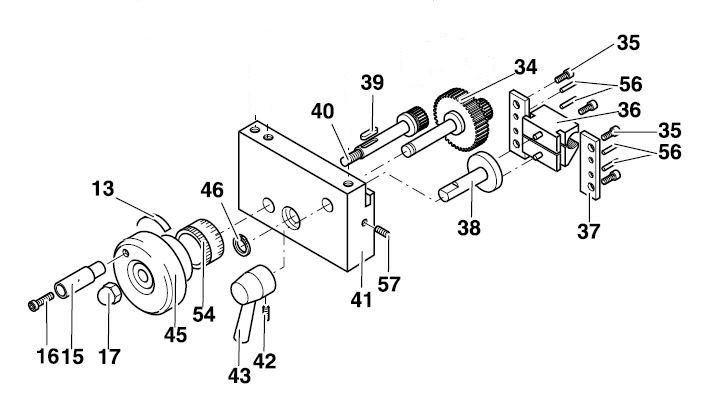
Using Babel Fish, I've listed out the terms used:
P/N
36 - Klemmmutter: Clamping Nut (this was given as "Clamping Mother" in Babel Fish...)
37 - Blech: Sheet Metal
38 - Nocke: Cam
56 - Stift: Pin
57 - Madenschraube: Set-Screw

The pics from this morning session can be found on my blog here

Before going on to making the ER32 collet chuck, I wish to get this arm-cramping-hard-turning of the handwheel out of my life.

Any help would be very much appreciated.

Regards,
Wong

Offline andyf

  • In Memoriam
  • Hero Member
  • *****
  • Posts: 1795
  • Country: gb
    • The Warco WM180 Lathe - Modifications
Re: Half Nut Adjustment?
« Reply #1 on: April 22, 2012, 12:09:30 PM »
Hi Wong,

I think the trick here will be to adjust the position of the leadscrew so that it is better positioned within the half nuts. The leadscrew runs in a bearing at each end,  and the bearings are probably bolted to the lathe bed. Loosen the bearings a little, run the saddle as far as it will go in one direction, engage the half nuts tighten up the bearing at that end. Then repeat the operation at the other end. Then run the saddle half-way along the bed, and watch the leadscrew for any movement up or down as you engage and disengage the half nuts. If that doesn't cure the prooblem, you may need to enlarge the bolt holes through the bearings slightly to allow the bearings to settle in the right position as you repeat the whole procedure.

If the leadscrew moves sideways, you can either loosen the bolts which secure the apron (item 41) to the saddle and then repeat the end to end procedure, or shave a bit off or put shims under the bearings.

Andy
Sale, Cheshire
I've cut the end off it twice, but it's still too short

Offline David Jupp

  • Sr. Member
  • ****
  • Posts: 308
  • Country: gb
  • Teesside - UK
Re: Half Nut Adjustment?
« Reply #2 on: April 22, 2012, 02:33:00 PM »
Before trying to adjust anything, check the half nuts (especially the lower one) for swarf/dirt enbedded in the threads - it is surprising just how much this can lift the leadscrew !  It may be that all that is needed is a good clean.

Offline wongster

  • Full Member
  • ***
  • Posts: 242
  • Country: sg
Re: Half Nut Adjustment?
« Reply #3 on: April 22, 2012, 06:41:55 PM »
Thanks guys!  :nrocks:

Hi Andy,  that sounds like a workable plan for me.  From the responses I gotten off another forum and to my blog post, another way is to put a suitable shim stock between the carriage and the apron to lower the half nut position.  The meshing on the toothed rack has to be checked since the gear contacted to the apron handwheel is also lower.

The exploded diagram of the lead screw assembly:


Hi David, I gave all the components a good treatment of compress air and wipe down as much oil/grease as I can when disassembling them.  But I do wish it is some swarf caught in the bottom half of the nut.

Regards,
Wong

Offline andyf

  • In Memoriam
  • Hero Member
  • *****
  • Posts: 1795
  • Country: gb
    • The Warco WM180 Lathe - Modifications
Re: Half Nut Adjustment?
« Reply #4 on: April 22, 2012, 08:18:05 PM »
Hi Wong,

If David is right and it's just swarf, that will be an easy fix, but if the problem was  there before you started using the lathe in earnest, misalignment between the half nuts and leadscrew  is more probably the cause.

If the leadscrew is hard to turn even when the saddle is half way along the bed, swarf is the likely culprit. If it gets stiffer as it approaches one (or both) of the end bearings, that indicates misalignment.

To examine the half nuts for swarf, you will have to remove the apron, and to remove the apron you will need to remove the leadscrew, and to remove the leadscrew you will need to unbolt the bearing at the tailstock end. Thus, checking for swarf and adjusting that bearing are linked operations.

If I were you, I wouldn't lower the apron with shims. You said your leadscrew is bending upwards, so you would need to raise the apron by skimming a bit off its top surface,. That will result in the pinion trying to force the rack upwards,  so you would then have to lreposition the rack a little higher.

But that makes think of a third cause of the problem - too close a mesh between the rack and the pinion. That would be evidenced by stiffness in the saddle hand wheel when the half nuts are disengaged. However, you can see the leadscrew bending upwards as you engage the half nuts, so that is the first thing to be fixed.

I thought that it was only cheap lathes from China which came badly aligned, rather than German ones. I have now abandoned my dream of buying a Mercedes, BMW or Audi  :( 

Andy
Sale, Cheshire
I've cut the end off it twice, but it's still too short

Offline wongster

  • Full Member
  • ***
  • Posts: 242
  • Country: sg
Re: Half Nut Adjustment?
« Reply #5 on: April 22, 2012, 10:31:08 PM »
Andy,

Thank for taking the time to write.

The apron, lead screw, half nut, and the bearing at the tailstock end were all taken off the lathe and off each other  :D

I don't understand the part on skimming off the top of the apron. As the lead screw now sits lower than the centre of the half nut, wouldn't that lift the lead screw higher when the half nut is engaged? I took a video and posted it on my blog showing the lift.

I don't know about Mercedes, but I heard from friends who own BMW that they experienced quite some problems with the electronics. As to Audi, don't know they solved the clutch issue.  I'm still trusting the good old Toyota. Most mechanics know how to fix one.

Regards,
Wong

Offline David Jupp

  • Sr. Member
  • ****
  • Posts: 308
  • Country: gb
  • Teesside - UK
Re: Half Nut Adjustment?
« Reply #6 on: April 23, 2012, 02:30:21 AM »
I know of one case where the swarf in the half nut threads was not obvious - nut just looked grey /  worn.  It took a good 'dig out' with a scriber or nail to even reveal the extent of the problem (in that case, after a clean up the half nuts were near perfect).

I don't know if this is an issue for you or not - but since it doesn't require any significant work to the lathe, it is worth checking very closely before attempting more drastic fixes.

Offline wongster

  • Full Member
  • ***
  • Posts: 242
  • Country: sg
Re: Half Nut Adjustment?
« Reply #7 on: April 23, 2012, 02:55:33 AM »
I'll do so. Sure beat having to do anything else to the lathe, especially when my lathe is only 5 month old.

Regards,
Wong

Offline andyf

  • In Memoriam
  • Hero Member
  • *****
  • Posts: 1795
  • Country: gb
    • The Warco WM180 Lathe - Modifications
Re: Half Nut Adjustment?
« Reply #8 on: April 23, 2012, 07:11:59 AM »
Quote
I don't understand the part on skimming off the top of the apron. As the lead screw now sits lower than the centre of the half nut, wouldn't that lift the lead screw higher when the half nut is engaged? I took a video and posted it on my blog showing the lift.

You are quite right, Wong. You would need to lower the apron if you took that route, but that would take the pinion a little out of mesh with the rack, so for a perfect job you would need to lower the rack as well. But if the existing wriggle room on the bearing fixings isn't enough to stop the leadscrew bending, dropping the apron with shims would avoid the need to enlarge the fixing holes, and a little more backlash on the apron handwheel would probably be acceptable.

This, of course, assumes that it isn't just a lump of swarf which is causung the problem, though your video seems to show a lift of a millimetre or two, so the lump would be easy to spot.

Andy
Sale, Cheshire
I've cut the end off it twice, but it's still too short

Offline mzt

  • Jr. Member
  • **
  • Posts: 88
  • Country: it
Re: Half Nut Adjustment?
« Reply #9 on: April 23, 2012, 07:49:28 AM »
While I was looking at the video here,


I had the impression that the upper portion of the half nut stays firm in place when the engaging lever is acted.
Should it not go down towards the LS of the same amount the lower HN goes up?

Marcello

Offline wongster

  • Full Member
  • ***
  • Posts: 242
  • Country: sg
Re: Half Nut Adjustment?
« Reply #10 on: April 23, 2012, 08:25:23 AM »
Andy, I'll test it out and also look out for swarf.

Marcello, I'll take a closer look when I get home. Need to find that camera tripod to hold it do that I can get closer and, at the same time, shine a torchlight in there.

I hope it just me that is the problem, though the experience with Proxxon 4 jaw independent chuck is bad. I have a blog post on it.

Regards,
Wong

Offline mzt

  • Jr. Member
  • **
  • Posts: 88
  • Country: it
Re: Half Nut Adjustment?
« Reply #11 on: April 23, 2012, 10:58:15 AM »
Wong,

referring to Your first post, I have ideas You should have the two halves of part 36 sliding rather smoothly on the two guides #37, left and right.
Check for burrs or chips in that area, or misalignments among the guides. 
Cannot see Part 38 face from the drawings, but I suppose You'll find a couple of spiral grooves there, to engage the halfnuts pins: all the parts should move when very little force is applied.

HTH
Marcello


Offline wongster

  • Full Member
  • ***
  • Posts: 242
  • Country: sg
Re: Half Nut Adjustment?
« Reply #12 on: April 23, 2012, 11:27:33 AM »
Marcello,

The half nut opens and closes smoothly.

I've taken a video which shows that the bottom reaching the lead screw first.


Regards,
Wong