Author Topic: Log Store  (Read 74403 times)

Offline Pete W.

  • Hero Member
  • *****
  • Posts: 852
  • Country: gb
Re: Log Store
« Reply #25 on: August 20, 2013, 12:33:33 PM »
Hi there, Ross and Andrew,

A few years ago I had to saw up some 100 year-old pine matchboarding - it was so tough I thought it was hardwood.   :scratch:   :scratch:   :scratch: 

The softwood we get from local timber merchants nowadays has been hewn from the trunk of a mature stinging nettle!!!   :Doh:   :Doh:   :Doh:
Best regards,

Pete W.

If you can keep your head when all about you are losing theirs, you haven't seen the latest design change-note!

Offline RossJarvis

  • Full Member
  • ***
  • Posts: 174
  • Country: gb
Re: Log Store
« Reply #26 on: August 20, 2013, 12:46:32 PM »
Hi there, Ross and Andrew,

A few years ago I had to saw up some 100 year-old pine matchboarding - it was so tough I thought it was hardwood.   :scratch:   :scratch:   :scratch: 

The softwood we get from local timber merchants nowadays has been sawn from the trunk of a mature stinging nettle!!!   :Doh:   :Doh:   :Doh:

Pete, too right old pal.  Trying to find dry, straight and non-knotty pine down Travesty Perkins has been a bit of a trial.  I believe what they sell now is what used to be called deal, i.e. the cheapest of the cheap weakest stinging nettle!

Have not progressed far on the practical side, have been staring at the timbers and re-working-out-in-my-head some of the joints so have not yet marked them up.  However I have updated the plans so I can remember which type of joint goes where;

Procrastination; now is that an art or a craft skill?

Offline RossJarvis

  • Full Member
  • ***
  • Posts: 174
  • Country: gb
Re: Log Store
« Reply #27 on: August 21, 2013, 06:00:15 AM »
Marking out mortices and tenons with a mortice chisel and square;


Next step, blood letting with tenon saw and morticing machine. :thumbup:
Procrastination; now is that an art or a craft skill?

Offline RossJarvis

  • Full Member
  • ***
  • Posts: 174
  • Country: gb
Re: Log Store
« Reply #28 on: August 21, 2013, 02:51:50 PM »
If anyone was watching this thread I've now moved it into a forum where it seems a bit more appropriate;

http://www.ukworkshop.co.uk/forums/hello-newbie-here-timber-frame-log-store-project-t72698.html

Thanks for watching :thumbup:
Procrastination; now is that an art or a craft skill?

Offline PeterE

  • Sr. Member
  • ****
  • Posts: 458
  • Country: se
  • Gothenburg
Re: Log Store
« Reply #29 on: August 21, 2013, 03:03:13 PM »
Why not double-post? I liked this thread and will be following it.

BR

/Peter
Always at the edge of my abilities, too often beyond ;-)

Offline RossJarvis

  • Full Member
  • ***
  • Posts: 174
  • Country: gb
Re: Log Store
« Reply #30 on: August 21, 2013, 04:36:33 PM »
Thanks for the interest Peter, I'll see what I can do.  I'd been doing that before, but couldn't see an easy way to get the pictures in both, as they don't give me links to Photobucket.

Ross
Procrastination; now is that an art or a craft skill?

Offline doubleboost

  • Madmodder Committee
  • Hero Member
  • *****
  • Posts: 1619
  • Country: gb
  • Newcastle Upon Tyne
Re: Log Store
« Reply #31 on: August 21, 2013, 04:38:33 PM »
I would like you to continue with this post as well
John

Offline PeterE

  • Sr. Member
  • ****
  • Posts: 458
  • Country: se
  • Gothenburg
Re: Log Store
« Reply #32 on: August 21, 2013, 04:49:19 PM »
Thanks for the interest Peter, I'll see what I can do.  I'd been doing that before, but couldn't see an easy way to get the pictures in both, as they don't give me links to Photobucket.

Ross
Hi Ross,

Photobucket links are easy. The address link always starts with a [ img ] (please remove the spaces between the square brackets the tag won't show here otherwise. Then get a copy of the direct link to the picture in P-bucket and paste it after the "]". Then finish the string with  [ /img ] (remove any spaces between the square brackets here as well. With the "img"-tags at each end of the P-bucket URL you can just copy-paste the link into basically any forum writing pane. So copy bewteen two forums should be a copy-paste activity.

If you want to be safe, pste the complete entry in a WordPad window first so you donä't loose it all by accident.

BR

/Peter
Always at the edge of my abilities, too often beyond ;-)

Offline dsquire

  • In Memoriam
  • Hero Member
  • *****
  • Posts: 2275
  • Country: ca
  • Kitchener, Ontario, Canada
Re: Log Store
« Reply #33 on: August 21, 2013, 04:59:55 PM »
Thanks for the interest Peter, I'll see what I can do.  I'd been doing that before, but couldn't see an easy way to get the pictures in both, as they don't give me links to Photobucket.

Ross

Ross

You may have had a problem posting photos as you are a new member there. Here is what I found about posting photo's on that site.

Quote
Off site URL's to file hosting sites can be linked after you have made three forum posts.
For the images to display you need the url to be included in img tags. E.G.

Otherwise follow thru the way PeterE has shown you. Hope this helps. Any problems ask and we will do what we can for you.  :D :D

Cheers :beer:

Don
Good, better, best.
Never let it rest,
'til your good is better,
and your better best

Offline RossJarvis

  • Full Member
  • ***
  • Posts: 174
  • Country: gb
Re: Log Store
« Reply #34 on: August 21, 2013, 05:13:31 PM »
Thanks Don,

I'd got into the habit of putting images in from my desktop and haven't yet worked out the URL thingy.  I do find these type-writer-telly machines a bit confusing, particularly as I've bought a new "Apple Raincoat".
Procrastination; now is that an art or a craft skill?

Offline dsquire

  • In Memoriam
  • Hero Member
  • *****
  • Posts: 2275
  • Country: ca
  • Kitchener, Ontario, Canada
Re: Log Store
« Reply #35 on: August 21, 2013, 05:51:44 PM »
Thanks Don,

I'd got into the habit of putting images in from my desktop and haven't yet worked out the URL thingy.  I do find these type-writer-telly machines a bit confusing, particularly as I've bought a new "Apple Raincoat".

Ross

The photo's that you put in post's #26 & #27 were put in with the URL and img tags.

What is an "Apple Raincoat"? I've never heard of it before. Please don't tell me that it is a new name for computer.  :lol: :lol:

Cheers  :beer:

Don
Good, better, best.
Never let it rest,
'til your good is better,
and your better best

Offline RossJarvis

  • Full Member
  • ***
  • Posts: 174
  • Country: gb
Re: Log Store
« Reply #36 on: August 21, 2013, 06:23:33 PM »
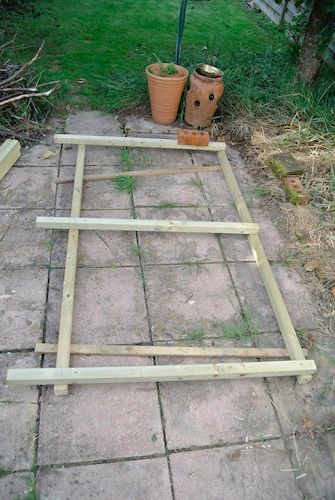
Here we go guys, next instalment.  I've copied the text off the other site and tried to match up the photos.  I couldn't find a couple, but I hope you can get an idea from the context.

The top of the far post is showing some twist (or wind I think some people call it);


The others are laying much flatter so those timbers are probably straighter. This brings up the problem of how to cut the joint. If there was going to be a tenon on the top "beam" I could cut the mortice "square" to the face of the post. When joined the joint would force the post square, straightening it. (or it would if I was good at these things and didn't leave massive gaps   ) However this puts tension into the thing which could be a problem. I could trim the face of the twisted post to be square to the beam, or cut the tenon "shoulders" to the angle of the post face. However, this is all too brain numbing so I'll just blunder in regardless and see what happens   .

As it is, for this joint the tenon is going to be at the top of the post. As the beam doesn't extend beyond the top of the post It's going to be either like a square peg with all the sides trimmed off, or more likely to have three sides trimmed off, leaving enough room for the wooden peg which'll hold the joint together. I'll still have the problem of how to deal with the twist. I think I'll "scribe" the tenon up from the top face of the beam. Which means that I'll mark the end of the tenon on the top of the post, parallel to the beam rear face.

Confused, have I lost you? Well I'm now more clueless than I was when I started, we'll just see what happens shall we 

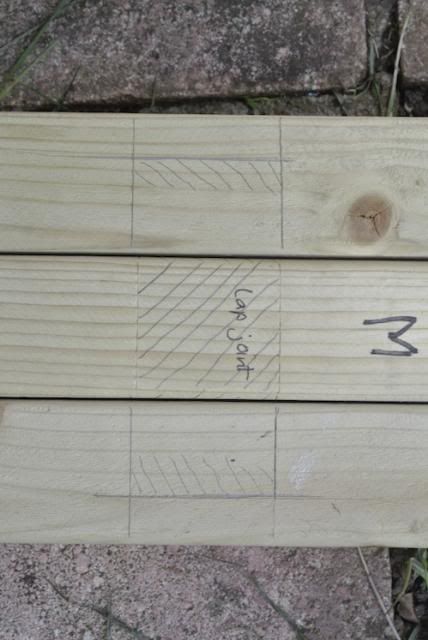
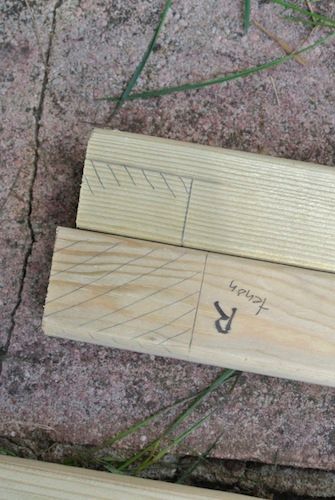
I've started to mark out the joints, first I'd numbered them (well with letters actually) and written which bit were wot and which way up it goes to save confusion later;


Then I started to mark out the tenons at the top;


I'm resting the mortice chisel on the "beam" as this is pretty square and straight. The chisel is close to a third the thickness of the wood so is a good measure to get it to work. I marked with a knife first, then pencil so I can actually see the line   On this joint, there is twist in the tenon piece so on one side the tenon will be closer to the edge than the other. It'll look "on the p***" but hopefully it'll be in line with the mortice (famous last words   ). I can plane the twisted face later to make it look straight!!   

The next piccie shows me using a square off the back face of the timber to mark the ends of mortices and shoulders of tenons. This also shows up any twist in the "beams" which are the lower timbers;


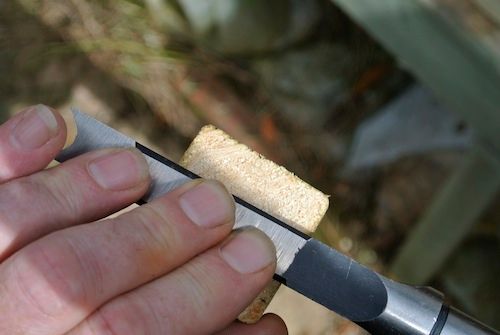
The good thing about using a knife to mark is that you can hold it flat on the edge of the chisel to get your mark dead on (that's my story anyway, and I'm sticking to it   

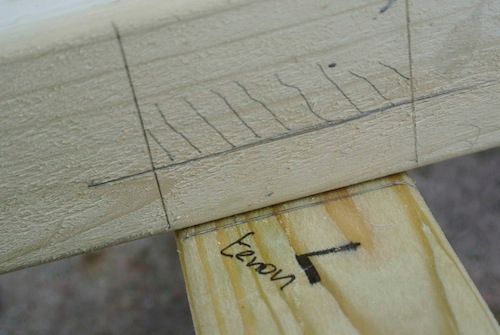
Next I'm marking in the waste, so that I don't cut out the wrong bit of the wood   ;


Step the next. Marking out on the bench.

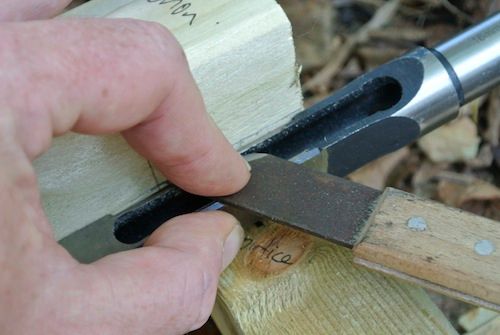
As the tenons are going into a hole cut by a mortice chisel, you can mark the thickness of the tenon with the aforementioned chisel, just remember, this works for both traditional mallet powered ones   and the new fangled hollow ones with a drill down the middle wot a motor turns. If using a proper mallet powered one don't lay the chisel on it's side as it's got a taper on it   Additionally don't lay the chisel down on the edge of the bench or anywhere where it can fall on a flagstone floor hopefully you don't need to ask why, but I did this twice     

Attachment:
 
_DSC2748.JPG [ 47.64 KiB | Viewed 48 times ]

Once you've marked out both sides (ends?) of the tenon you can join them together with the chisel.


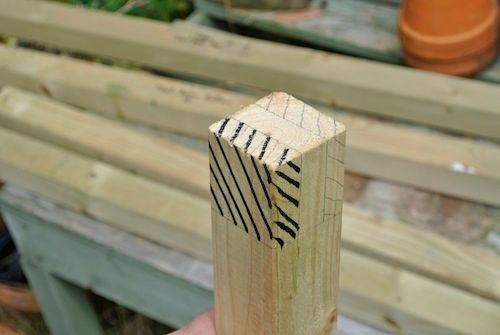
Once marked in, you can mark the waste, I use a soft pencil for this, but a marker pen or paint roller are just as good, make sure it's OBVIOUS which bit of wood you need to keep and which bit gets cut out   This is the tenon, which is on the twisted end of the post, so it's actually supposed to be on the p*** (at an angle!) honest!


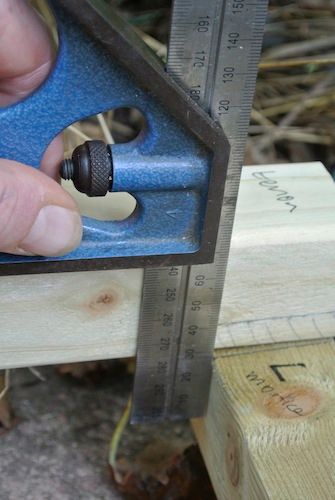
Now then, when you find you can't find your marking knife because you put it down somewhere safe, you may be lucky enough to have an American Carpenters Square and you can always use the scriber in the base.


I'm not sure why the Americans have carpenters squares like this, as it is very very similar to an engineers combination square, the only difference being that you have to fettle it first to make it work   

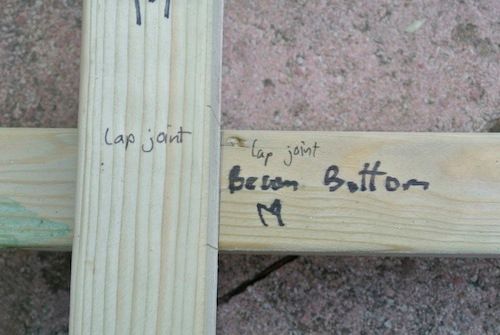
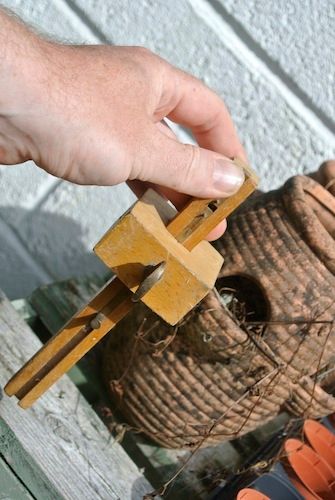
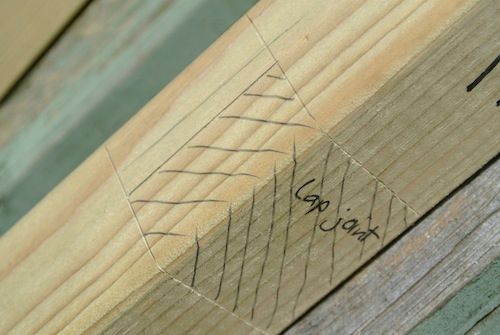
Next marking out the lap joint (I think that's what this is called, though I suppose it might be a halved joint or halving joint, I'm relatively sure it's not a housing joint). For this I'm joining two timbers cut to about midway. To get the middle line of the wood, I'm using a marking gauge. First off set it to about the middle of the timber and mark a dot in from each side;


If lucky or skilled (or both) you'll either have two dots very close together or one dot. If you've one dot you're spot on. Look at the point on the gauge and if it is set wider than midpoint then narrow the gap, if shorter than midpoint open the gap. I was taught that you do the thumbscrew up till it just bites first and tap the thin bit of the gauge on the bench to adjust the gap. When right, tighten the thumbscrew a bit more.

"Tapping the gauge" (Dear me I could do with tapping a firkin right now!!);
Attachment:


Mark the midline in from what will be the front face of the post, then square the edges of the joint and mark the waste.

Next mark the joint in the beam. You don't need to reset the gauge and it's actually better if you don't. If the two timbers are different thicknesses, this'll cause problems. Just remember to mark in from the front face of this timber too.;


I don't see the need to mark the other side of the mortices as The lines marked are off the datum, plus with the morticer the chisel, cutty, drilly thing takes care of the other side.

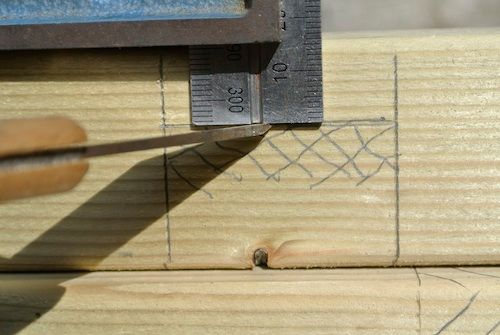
I marked the mortices for the end of the beam, by resting them flat on the ends of the posts with the front face down, I then marked them up by using the mortice chisel. A lot of head scratching occurred trying to do this in the middle of the beam, cos I couldn't get it flush due to the wide shank. I then remembered how to use the "American Carpenter's Square" as a marking gauge, this means I can probably do away with the older beech gauge I was using.

What I did was place the chisel flush to the right angled handley bit (stock?) and slid the rule down till it was flush with the chisel;


Then I could use this to mark in from the "front face", using the end of the rule to scribe along.


Then I dropped the chisel on the stone flags for a third time           

Now all the joints are marked out, it's time to do a check. As AndyT said, he likes to do the parallel timbers together, which is to my mind the best way of knowing they're right. So what I did was put all the posts together and lined up the marks at one end;


I'm not overly concerned about them being dead in line to a thou or two as this is a bit of rustic garden furniture, so tolerances are fairly loose. I then look at how the other ends line up;


You can probably see that they don't line up perfectly, and this would probably not be acceptable for a piece of fine cabinet work, but I'm happy to leave these as they are till I've cut the tenons. The two main reasons for error/difference is my own cack handedness   (I know, hard to believe, but possible!) or it could be down to some twist,wind,spring,bow, etc etc in the wood. The fact that the distances between the marks seem unequal makes me lean toward the former. If the marks, particularly for the middle post, were higher or lower it might be more likely to be the wood.

Now for the beams, line up the tenons at one end and, oops   ;


That's a bit outside tolerance, even for me! So, lay out all the bits again,


no need for levelling here, and only an "eyed in look' for square. Place the parts together lining up all the marks and then measure between the posts. It was fairly obvious the top of the right hand post was a good 1/2 - 3/4" out of where it should be. I think it got knocked a bit during yesterday's marking up/out. Obviously the bricks weren't up to holding everything together well enough. (in case you're wondering what the bricks were for, they were to pin the posts onto the beams to restrict movement. This was a "traditional method" wot I invented cos my handy clamps weren't big enough to hold the timbers together   

Once I'd put it back where it should be I could re-mark the end of the mortice and job done! In my way of working I find it best to check everything a good few times before committing myself to hewing and sawing. It doesn't prevent all mistakes, but brings the number of them down to managable levels 
Procrastination; now is that an art or a craft skill?

Offline PekkaNF

  • Hero Member
  • *****
  • Posts: 2523
  • Country: fi
Re: Log Store
« Reply #37 on: August 22, 2013, 01:14:52 AM »
Oooohhh. you are setting up a procution line! I try to enjoy sometimes making one joint at a time. Only if timber is dimenssionally true I mark and cut several. But I'm such a sissy hobbyist :lol:

I enjoy our writing style.

Pekka

Offline RossJarvis

  • Full Member
  • ***
  • Posts: 174
  • Country: gb
Re: Log Store
« Reply #38 on: August 22, 2013, 01:48:52 AM »
Oooohhh. you are setting up a procution line! I try to enjoy sometimes making one joint at a time. Only if timber is dimenssionally true I mark and cut several.

Pekka

Timber, dimensionally true?  I've never seen dimensionally true timber in our wood-yards :scratch:.

I knew it, I've always suspected it, the Finns only sell us the stuff they wouldn't use themselves :(.

Too flipping clever these Finns :thumbup:

Procrastination; now is that an art or a craft skill?

Offline PekkaNF

  • Hero Member
  • *****
  • Posts: 2523
  • Country: fi
Re: Log Store
« Reply #39 on: August 22, 2013, 04:14:57 AM »
Nooooooooooo :lol:

We sell the good stuff to Denmark and use the bad one. On british carpentter (workked here few years) told that the same quality wood is cheapper in Uk than here in Finland. I beleive that.

That treated wood is usually too crapy to be used anywhere else....that's then treated and it sells like scoutgirlcookies.

I have managed to get half decent wood here, but I have to gou out with trailer about 400 km north and find someone who does sawmilling for good time's sake.

And "dimenssionally stable" is all relative. I have some birtch plank, that has been cut 20 years ago and then been stacked some time. I use some of every now and then. I'll cut wayne sides off and cut it shorten then bring it inside for few months before using it....but wood is another matter. if you need quarantees - you need to buy a toaster.

Pekka

Offline drmico60

  • Jr. Member
  • **
  • Posts: 69
  • Country: gb
    • mikesworkshop
Re: Log Store
« Reply #40 on: August 22, 2013, 05:12:25 AM »
I lived in Sweden for a few years and, although I was surrounded by forests, the wood from a diy store was about twice the price in Sweden compared with buying in a diy store in the UK.
Mike

Offline RossJarvis

  • Full Member
  • ***
  • Posts: 174
  • Country: gb
Re: Log Store
« Reply #41 on: August 22, 2013, 06:02:31 AM »
Nooooooooooo :lol:

We sell the good stuff to Denmark and use the bad one.

 if you need quarantees - you need to buy a toaster.

Pekka

 :lol: :lol: :lol:

I bet there's a lot of Danes, sitting around drinking their fizzy beer  :beer: and telling everyone the wood they buy is rubbish too, then they will smile at each other knowingly and wink!

Damn clever these Danes :thumbup:
Procrastination; now is that an art or a craft skill?

Offline RossJarvis

  • Full Member
  • ***
  • Posts: 174
  • Country: gb
Re: Log Store
« Reply #42 on: August 22, 2013, 06:15:39 AM »
Morning all.

Well another day dawned, It rained last night and some damp seems to have got into the workshop;


Luckily I threw a tarp over the timber, so it shouldn’t be too wet, (well no wetter than it was when I got it from the wood-yard {when I say wood-yard, I actually mean a car-park down the local hardware store, not a proper wood-yard![when I say hardware store, I actually mean a branch of a well known money-removal chain with the initials TP, not a proper hardware store!]})

Anyway, where were we?  Oh yes, looking back over the previous posts I noticed I was starting to sound like a teacher and getting into a lot of possibly pointless detail.  Please chip in and tell me if I’m being boring or irrelevant, though try and be gentle about it.

Todays progress, a tenon and a lap-joint have been part completed (I’m sure it’s not called a lap -joint, surely a “lap joint” has subdued lighting and shiny poles everywhere!)

Firstly I clamped the post to my “workbench”, not having a good vice I used some clampy things.  I discovered it best to have the long arms of the clamps going under the bench, not out where your legs are (ouch).  Clamping as close to the bit you’re going to cut seems to be a good idea, but a bit tricky with long bits of wood if you want them upright.


So I had to lay this down a bit further than in the photo, I didn’t want it flat ‘cos I wanted it at an angle to see the marked lines at the top and the side.  This meant I could line the tenon saw up;


Then I sawed at an angle till the hole (kerf?) had got down to the line marked for the shoulder of the tenon;


For this bit I was using a “rip cut” tenon saw, which seems to be working well “along the grain”.  I bought this from a well known “Carpet Warehouse” (see if you can work out which shop I mean here!) a few years ago, like with most of my tools, it’s been lying around and attracting the “tin worm”.

I cut both sides (cheeks?) of the tenon and turned the wood round and came in from the other side, leaving a “v” shaped bit in the middle;


The last bit I did was cut “square” trying not to go past my marked “shoulder” line;


Nextly I cut square across the wood, using a hardpoint “tenon saw” which has a “cross cut”, this seems to be easier “across the grain”.  I tried my best to get the lines and the blade vertical, and “eyed down” the blade to get it straight;


And “bam! Roberts your father’s brother”, “job done, one slightly wobbly sided tenon;


To be continued……

Procrastination; now is that an art or a craft skill?

Offline RossJarvis

  • Full Member
  • ***
  • Posts: 174
  • Country: gb
Re: Log Store
« Reply #43 on: August 22, 2013, 07:25:26 AM »
Now it was time for the “lap joint”.   First I clamped the timber to the “workbench” (If you’re making a nice bit of furniture, make sure the bench is dry and the moss has been brushed off!).

Then I eyed up the cross-cut saw along the line, trying to remember to cut “inside the lines”, and then started sawing.  I tried holding the saw with the handle lower than the blade, so that I could see when I got to the line.  then I carefully got the saw level and cut down looking to see that I hadn’t gone too far on the other side. I then cut the other end of the joint and sawed across the middle too.  This seems a good idea, so that the “chunks” I knock out with the chisel aren’t too big, and don’t take wood away wot should stay in the timber, innit! (sorry, lapsing into yoof speak there).


Once this was done I rolled the timber on its side, with the joint away from me, so that I could whack it with a big chisel and mallet.  I did it this way round so that the chunks of wood would fly off into the beloved’s flower pots and not anything important I may have below the waist (I’m sure they’ll come in handy some day, just like all my other unused tools!).  I had the bevel of the sharp end toward me in the hope that this will stop the chisel diving into the wood;


BISH, BASH, BOSH, A few applications of the hitting stick to the chisel and there’s chunks of wood in the dahlias and a right old mess in the hole!  When I got nearer to the line, I turned the chisel round, so the flat edge was nearer the bottom of the hole and bashed a little bit softer.  I only bashed out to about halfway through this side, I think next time I’ll stop a bit further from the line and come back to it later;


Then I flipped the wood over, bashed in with the chisel from the other side, leaving a little “hillock” in the middle.  Lastly I turned the wood “flat” and shimmied in with the chisel by hand, using a “wiggling” motion, this seems to work better than forcing it or using the hitting stick;


As you can see from the piccie below, I’ve sawed down a bit too far and probably bashed out a bit too much wood, not sure if I need more saw cuts in the middle of the wood, or less bashing!  (probably both).  I was also a bit unnerved to see that I’d missed a mark, and thought I must have cut across the wood at an angle;


However checking with the square showed that I had cut across the wood reasonably well, meaning I’d drawn the line in the wrong place.  Can’t have been squaring the square, square across the wood very well, had we then!;


The edges of the joint weren’t particularly vertical, but hopefully this’ll all come out in the wash, when I fit the joint and re-apply the sharp cutty thing (if that’s not mixing too many metaphors, synonyms, whatever!);


“Et Viola” (as the musicians say in France!), after much procrastination we have a part finished post.


I’m going to cut one part of each joint on all the timbers first and then offer each one up to it’s opposite number before doing the next lot.  Hopefully this’ll help me bodge all my mistakes into some semblance of “carpentry”.

Ooer, look, it’s lunch time already and all I’ve done is start cutting two joints, I better get on and stop blathering to you and get them joints done.  (Lunch time!  MMMMMMM, where’s that frying pan gone?)
Procrastination; now is that an art or a craft skill?

Offline RossJarvis

  • Full Member
  • ***
  • Posts: 174
  • Country: gb
Re: Log Store
« Reply #44 on: August 22, 2013, 07:30:09 AM »
I lived in Sweden for a few years and, although I was surrounded by forests, the wood from a diy store was about twice the price in Sweden compared with buying in a diy store in the UK.
Mike

Never been to Sweden, though I have been through it on the way to Norway.  In Norway everything was three times the price it is in the UK, it even makes Switzerland seem cheap :clap:

What were you doing in Sweden?  A mate of mine lived there for a while doing some arty stuff, he appears to have found a wife there.  Did you get one of those too? :thumbup:
Procrastination; now is that an art or a craft skill?

Offline RossJarvis

  • Full Member
  • ***
  • Posts: 174
  • Country: gb
Re: Log Store
« Reply #45 on: August 22, 2013, 09:32:54 AM »
Aha, whilst cutting out the next “lap-joint” (oh hello…erm, what is your name? Susan. I couldn’t see your name badge…mind you I’m not sure where you’d put a name badge!)

Oh! Where was I, yes, the next lap joint.  I cut two extra slots across this, about ½” apart.  The wood chunks popped out very nicely from this and went all the way across so I didn’t have to turn it over to come in from the other side.  I stopped a couple of mm above the line, then just pushed the chisel down vertically, this sliced the wood out easily and left a nice smooth surface at the bottom of the joint, I believe you need a nice sharp chisel for this;


Five tenons and two lap-joints done and still loads of time for doing the next bits, plus sitting down with a cup of tea (no hob-nobs though, the b****y apprentice scoffed the lot when I wasn’t looking!);


see you later!
Procrastination; now is that an art or a craft skill?

Offline RossJarvis

  • Full Member
  • ***
  • Posts: 174
  • Country: gb
Re: Log Store
« Reply #46 on: August 22, 2013, 12:43:06 PM »
Oooh, just sat down on the sofa for a minute to rest my eyelids and look, here we are three hours later. The “apprentice” wanted to go round the park for a walk with a couple of tennis balls, and as I’m sure any trades-people here will know, all he did was get into a fight and sit on his balls for a while!  Won’t do any fetching or carrying that lad!  Just need a cuppa, then I’ll pop out and see to the timber.
« Last Edit: August 22, 2013, 08:19:02 PM by RossJarvis »
Procrastination; now is that an art or a craft skill?

Offline PeterE

  • Sr. Member
  • ****
  • Posts: 458
  • Country: se
  • Gothenburg
Re: Log Store
« Reply #47 on: August 22, 2013, 01:10:25 PM »
Coming along nicely Ross  :thumbup:

/Peter
Always at the edge of my abilities, too often beyond ;-)

Offline dsquire

  • In Memoriam
  • Hero Member
  • *****
  • Posts: 2275
  • Country: ca
  • Kitchener, Ontario, Canada
Re: Log Store
« Reply #48 on: August 22, 2013, 01:37:02 PM »
Ross

Nice work. I'll be sitting in the shade with a cool brew watching you work up a sweat.  :D :)

Cheers  :beer:

Don
Good, better, best.
Never let it rest,
'til your good is better,
and your better best

Offline RossJarvis

  • Full Member
  • ***
  • Posts: 174
  • Country: gb
Re: Log Store
« Reply #49 on: August 22, 2013, 03:07:05 PM »
Thanks for the comments guys.  It's nice to hear a friendly comment when you're on your own in the "workshop".
Procrastination; now is that an art or a craft skill?