Author Topic: Minilathe QCTP  (Read 10965 times)

Offline John Rudd

  • Hero Member
  • *****
  • Posts: 2525
  • Country: gb
Minilathe QCTP
« on: January 25, 2012, 09:48:55 AM »
Hot on the heels of the write up I submitted on changing the bearings to tapers for my minilathe, I thought I'd share the making of a qctp that I knocked up to replace the original toolpost as supplied by Sieg.

I'm not doing a blow by blow account of this project as it uses all basic skills...Measuring marking cutting etc...Stuff we all know.

Having already fitted a qctp to my Chester 9*20, the idea for a tp for the minilathe came easy...Just copy the bigger one!! :dremel:

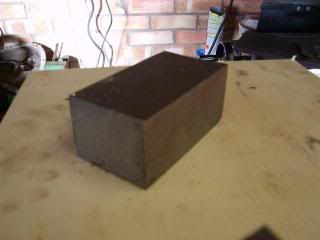
So off to find a suitable lump of bright hard stuff, me and 'Er inddors came up with this...


It was the best that was to hand without going out and buying yet more material and having to wait for the postie to deliver it...

The main dimensions of the base block were approx 50mm*50mm, taken from the compound slide on the minilathe. I guessed the height of the block to ensure the tool holders would have sufficient adjustment for centre height.

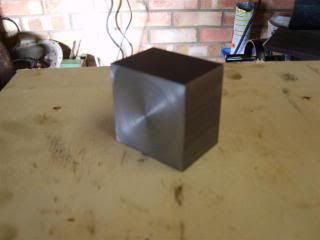
After cleaning up the sawn end in the 4jaw on the lathe I ended up with this...
eccentric millionaire financed by 'er indoors
Location:  Backworth Newcastle

Skype: chippiejnr

Offline John Rudd

  • Hero Member
  • *****
  • Posts: 2525
  • Country: gb
Re: Minilathe QCTP
« Reply #1 on: January 25, 2012, 09:54:19 AM »
After finding the centre of the block, a suitable size hole was drilled through to clear the clamping stud on the compound slide..( 10mm as it happens..).
Next up, drill a hole offset to one edge and make a saw cut from the opposing edge to meet the hole....This is the method of clamping the holder once the dovetail has been cut...


Next machine the dovetail and finally add a hole for the clamping screw..I used an 8mm cap head bolt as per my lathe...

It's all self explanatory from the pictures
eccentric millionaire financed by 'er indoors
Location:  Backworth Newcastle

Skype: chippiejnr

Offline John Rudd

  • Hero Member
  • *****
  • Posts: 2525
  • Country: gb
Re: Minilathe QCTP
« Reply #2 on: January 25, 2012, 10:00:39 AM »
That more or less wraps up the base...save for a quick run over with a countersinking bit to take the edges off the corners...

Now onto the holders..
Again pretty straight forward having acquired a decent piece of material...


Again cut to length to suit the base, 50mm long...


eccentric millionaire financed by 'er indoors
Location:  Backworth Newcastle

Skype: chippiejnr

Offline John Rudd

  • Hero Member
  • *****
  • Posts: 2525
  • Country: gb
Re: Minilathe QCTP
« Reply #3 on: January 25, 2012, 10:01:11 AM »
There are a number of operations to get to the end result..
Dovetail first...


Then a slot to take the tool. I made two holders intially. One to take some 8mm HSS blanks, with a 10mm slot and the second one cut to take a blade type parting tool. I made the slot in this holder 16mm wide.

eccentric millionaire financed by 'er indoors
Location:  Backworth Newcastle

Skype: chippiejnr

Offline John Rudd

  • Hero Member
  • *****
  • Posts: 2525
  • Country: gb
Re: Minilathe QCTP
« Reply #4 on: January 25, 2012, 10:04:18 AM »
Now to make the height adjustment..
I took a piece of 16mm dia bms bar and cut some pieces off...Centre drilled/drilled and tapped through to take an M5 grub screw with an M5 cap head for locking...


Almost done now....

The holders were given the same edge clean up as the base....A quick dip in some solvent to clean up all the marking blue and remove any oil/swarf and this is what we ended up with...

eccentric millionaire financed by 'er indoors
Location:  Backworth Newcastle

Skype: chippiejnr

Offline John Rudd

  • Hero Member
  • *****
  • Posts: 2525
  • Country: gb
Re: Minilathe QCTP
« Reply #5 on: January 25, 2012, 10:05:22 AM »
...and finally fitted to the lathe.......


Impressed?

I am.. :dremel:  :clap:
eccentric millionaire financed by 'er indoors
Location:  Backworth Newcastle

Skype: chippiejnr

Offline Stilldrillin

  • Global Moderator
  • Hero Member
  • *****
  • Posts: 4972
  • Country: gb
  • Staveley, Derbyshire. England.
Re: Minilathe QCTP
« Reply #6 on: January 25, 2012, 12:04:49 PM »
Impressed?

I'm VERY impressed John!  :clap:  :clap:  :thumbup:

I removed my topslide, and fitted a raised block...... And bought the "same" toolpost as you have made!

 :bow: :bow: Blummin well done!

David D
David.

Still drilling holes... Sometimes, in the right place!

Still modifying bits of metal... Occasionally, making an improvement!

Offline John Rudd

  • Hero Member
  • *****
  • Posts: 2525
  • Country: gb
Re: Minilathe QCTP
« Reply #7 on: January 25, 2012, 12:11:09 PM »
Thanks David,

Feedback is always a good thing. :thumbup:

The only regret I have is not being able to blacken the parts...

Ok I managed to blacken the height adjuster that was turned from solid bar and the washer that I had to make that fits under the tool post securing handle ( my lathe didnt come with one..how strange?) but I managed that by heating the parts in a flame until red and plunging into engine oil....It made them go black!!! 

Ok, I could go and buy one of the blackening kits, but we're talking serious money here..

The end result looked ok to me.. But the major parts are just too big for the same treatment and I dont know how well the oil blackening will protect from going rusty.. We'll see :coffee:
eccentric millionaire financed by 'er indoors
Location:  Backworth Newcastle

Skype: chippiejnr

Offline Lew_Merrick_PE

  • Hero Member
  • *****
  • Posts: 690
  • Country: us
Re: Minilathe QCTP
« Reply #8 on: January 25, 2012, 01:01:48 PM »
John,

The "heat and plunge" oil blackening is more dependent on the carbon content of the steel (the higher, the better).  I have 40 year old tools blackened that way that are still quite nice and rust free -- and I live in an area where rust happens almost instantly.

Wash your parts in a light acid solution (vinegar & salt works).  Dry in an oven.  Expose to steam (from a tea kettle) and allow to hang in an open moist environment (i.e. under shady eaves in western Washington State works quite well) until they are evenly coated with rust (about two weeks here).  Wire brush and (fine) steel wool to remove any loose rust.  Boil in water for half-an-hour per inch of thickness.  Dry in an oven and lightly oil.  You may like the results.

Offline WillieL

  • Full Member
  • ***
  • Posts: 108
  • Country: us
  • This space for rent.
Re: Minilathe QCTP
« Reply #9 on: January 25, 2012, 04:40:39 PM »
...and finally fitted to the lathe.......


Impressed?

I am.. :dremel: :clap:

I certainly am!  :bow:

Do you have a link to your write up on the bearing change over? I'd like to see that one as well.
WillieL

Midwestern USA

Offline John Rudd

  • Hero Member
  • *****
  • Posts: 2525
  • Country: gb
Re: Minilathe QCTP
« Reply #10 on: January 26, 2012, 02:57:02 AM »
eccentric millionaire financed by 'er indoors
Location:  Backworth Newcastle

Skype: chippiejnr

Offline andyf

  • In Memoriam
  • Hero Member
  • *****
  • Posts: 1795
  • Country: gb
    • The Warco WM180 Lathe - Modifications
Re: Minilathe QCTP
« Reply #11 on: January 26, 2012, 04:37:24 AM »
I'm impressed, too  :thumbup: . Like Dave D, I bought a very similar one. It had an Allen screw to clamp up the dovetails, but I replaced that with a handle to save hunting down the hex key. It only needs a quarter turn from vertical to horizontal to tighten up, so doesn't foul things like the back end of a long tool when swapping toolholders.

Andy.
Sale, Cheshire
I've cut the end off it twice, but it's still too short

Offline John Rudd

  • Hero Member
  • *****
  • Posts: 2525
  • Country: gb
Re: Minilathe QCTP
« Reply #12 on: January 26, 2012, 06:42:09 AM »
I'm impressed, too  :thumbup: . Like Dave D, I bought a very similar one. It had an Allen screw to clamp up the dovetails, but I replaced that with a handle to save hunting down the hex key. Andy.
Thanks Andy,

I have a tool box( one of those Stanley plastic ones) with a dedicated set of tooling for my machines..Saves having to hunt for tools when I need a screwdriver/allen key/spanner etc...
eccentric millionaire financed by 'er indoors
Location:  Backworth Newcastle

Skype: chippiejnr

Offline BiggerHammer

  • Full Member
  • ***
  • Posts: 130
  • Country: us
Re: Minilathe QCTP
« Reply #13 on: January 26, 2012, 05:10:35 PM »
Very nice, and yes I am impressed. Looks like that will last for years. Makes me want to go out and get a milling machine TODAY!

Offline andyf

  • In Memoriam
  • Hero Member
  • *****
  • Posts: 1795
  • Country: gb
    • The Warco WM180 Lathe - Modifications
Re: Minilathe QCTP
« Reply #14 on: January 26, 2012, 07:07:46 PM »
I have a tool box( one of those Stanley plastic ones) with a dedicated set of tooling for my machines..Saves having to hunt for tools when I need a screwdriver/allen key/spanner etc...

John, I wish I had your self-discipline. Being a rank amateur, I'm just plain untidy. First place to look for a tool is in the drawer or box where it's supposed to be. Items like frequently used Allen keys are seldom in their place, so the next ports of call are the swarf trays and other flat surfaces on or near my machines,. This can get a bit time-consuming, because for historic reasons the lathe is in my upstairs shed (ex fourth bedroom) and the milling machine in what was once the garage. So, whenever practicable I fit handles on things which often need to be loosened and tightened up, thus reducing  :poke: and  :wack: about swarf trampled into the stair carpet.

Andy
Sale, Cheshire
I've cut the end off it twice, but it's still too short

Offline ksor

  • Sr. Member
  • ****
  • Posts: 316
  • Turn off the TV - life ain't replayed !
    • Keld's hjemmeside
Re: Minilathe QCTP
« Reply #15 on: January 27, 2012, 03:06:37 AM »
Very nice peace of work you've done here !   :bugeye:

I have a stalled project like it going on, but unfortunately I think I have plaved the "outer" dove tale on the main block - this gives so little room for placing the level adjustment  :doh:

I'll finish it anyway - but right now it too cold in the workshop :coffee:

Again nice job !
Best regards
KSor, Denmark
Skype name: keldsor